Saludos amigos, hoy vengo muy animada en participar en el concurso a 🎄 Esferas decorativas con tela🎄, gracias a @equipodelta por esta maravillosa iniciativa. Quisiera invitar a participar a mis amigas @yolimarag y @crisvera.
Greetings friends, today I come very encouraged to participate in the contest 🎄 Decorative spheres with fabric🎄, thanks to @equipodelta for this wonderful initiative. I would like to invite my friend @yolimarag @crisvera to participate.
Me encanta las Navidades, todos los años realizó diferentes manualidades para adornar el arbolito y cada rincón de mi hogar, es por ello que cuando leí sobre este concurso me animé en elaborar mi esfera decorativa. Soy nueva en Hive y esta es mi cuarta publicación espero les guste.
I love Christmas, every year I make different crafts to decorate the tree and every corner of my home, that's why when I read about this contest I was encouraged to make my decorative sphere. I am new in Hive and this is my fourth publication I hope you like it.
Para elaboración de está esfera les voy a dar todos los materiales que utilice:
For the elaboration of this sphere I am going to give you all the materials I used:
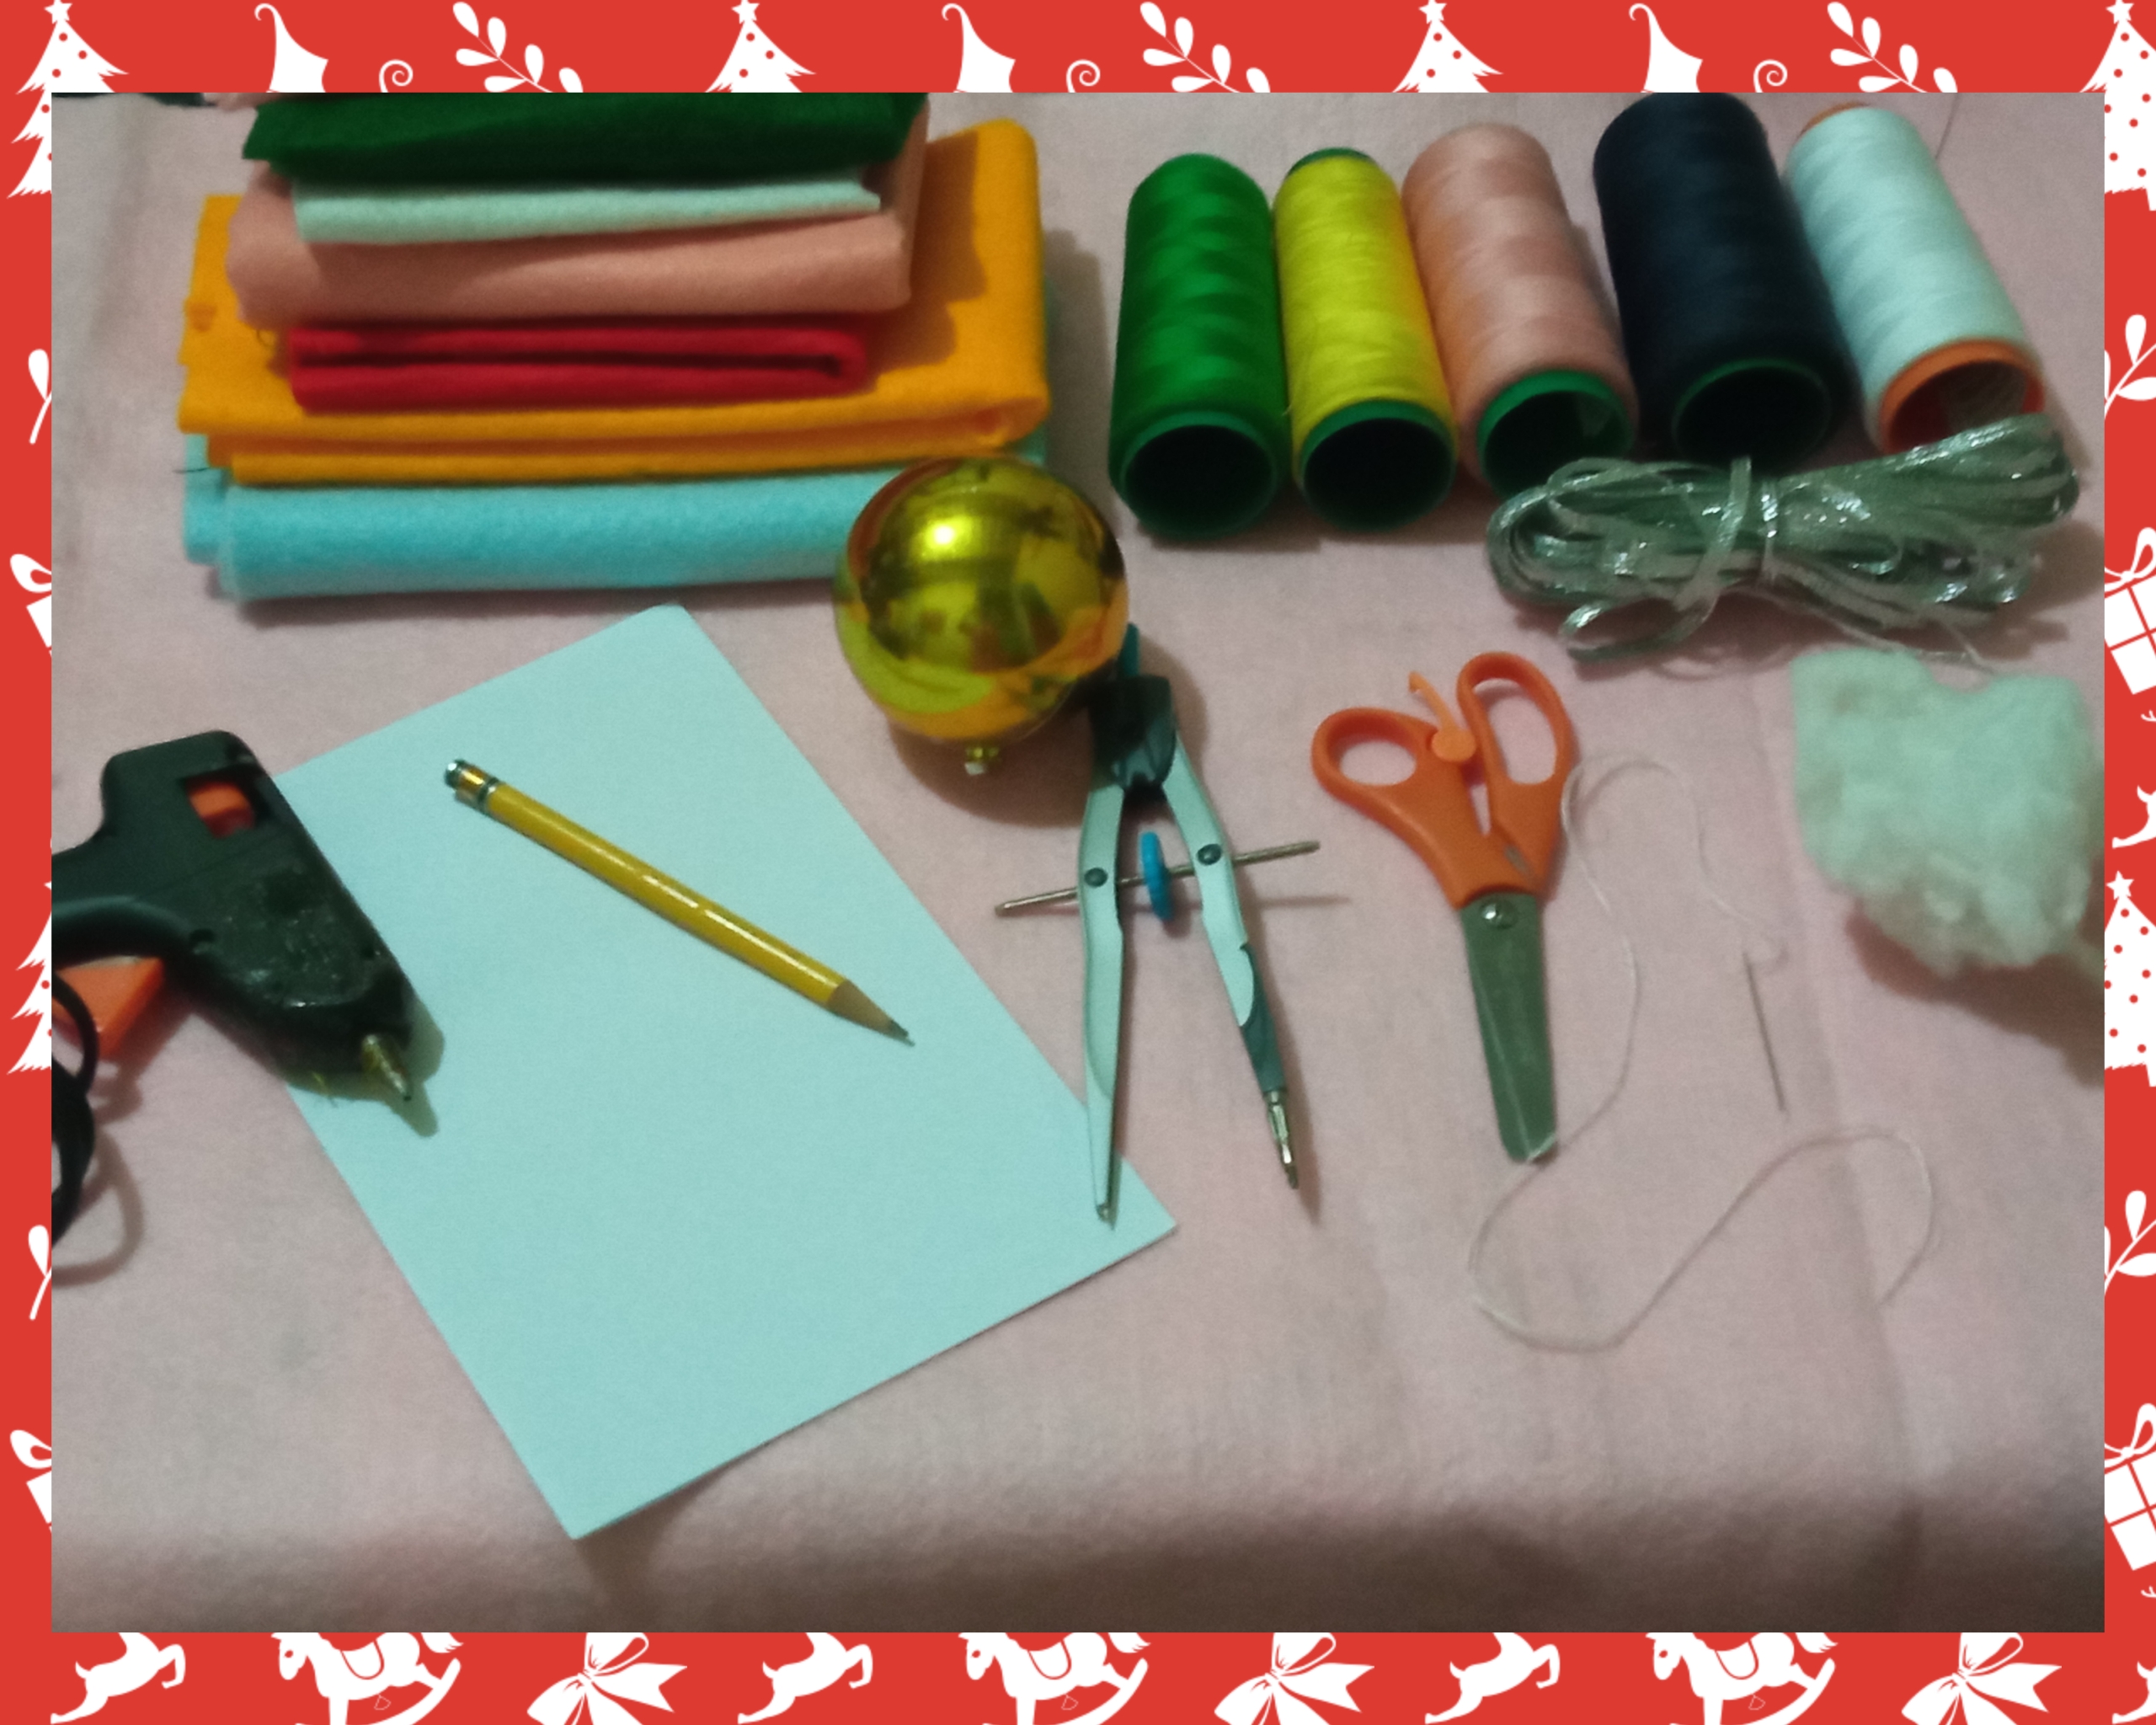
🎄Materiales:🎄 / 🎄Materials:
🎄
- Fieltro de color blanco, rojo, azul, amarillo, color durazno, rosado y verde /
White, red, blue, blue, yellow, peach, pink, and green felt
- Cinta finita plateada. /
Thin silver ribbon
- Una bola mediana./
A medium sized ball.
- Hilo de color blanco, negro, amarillo , rosado y verde. /
White, black, yellow, yellow, pink and green yarns
- Aguja. /
Needle.
- Tijera. /
Scissors.
- Una hoja blanca. /
A white sheet of paper.
- Lápiz. /
Pencil.
- Compás. /
Compass
🎄 Elaboración:🎄 / 🎄Prepared by:
🎄
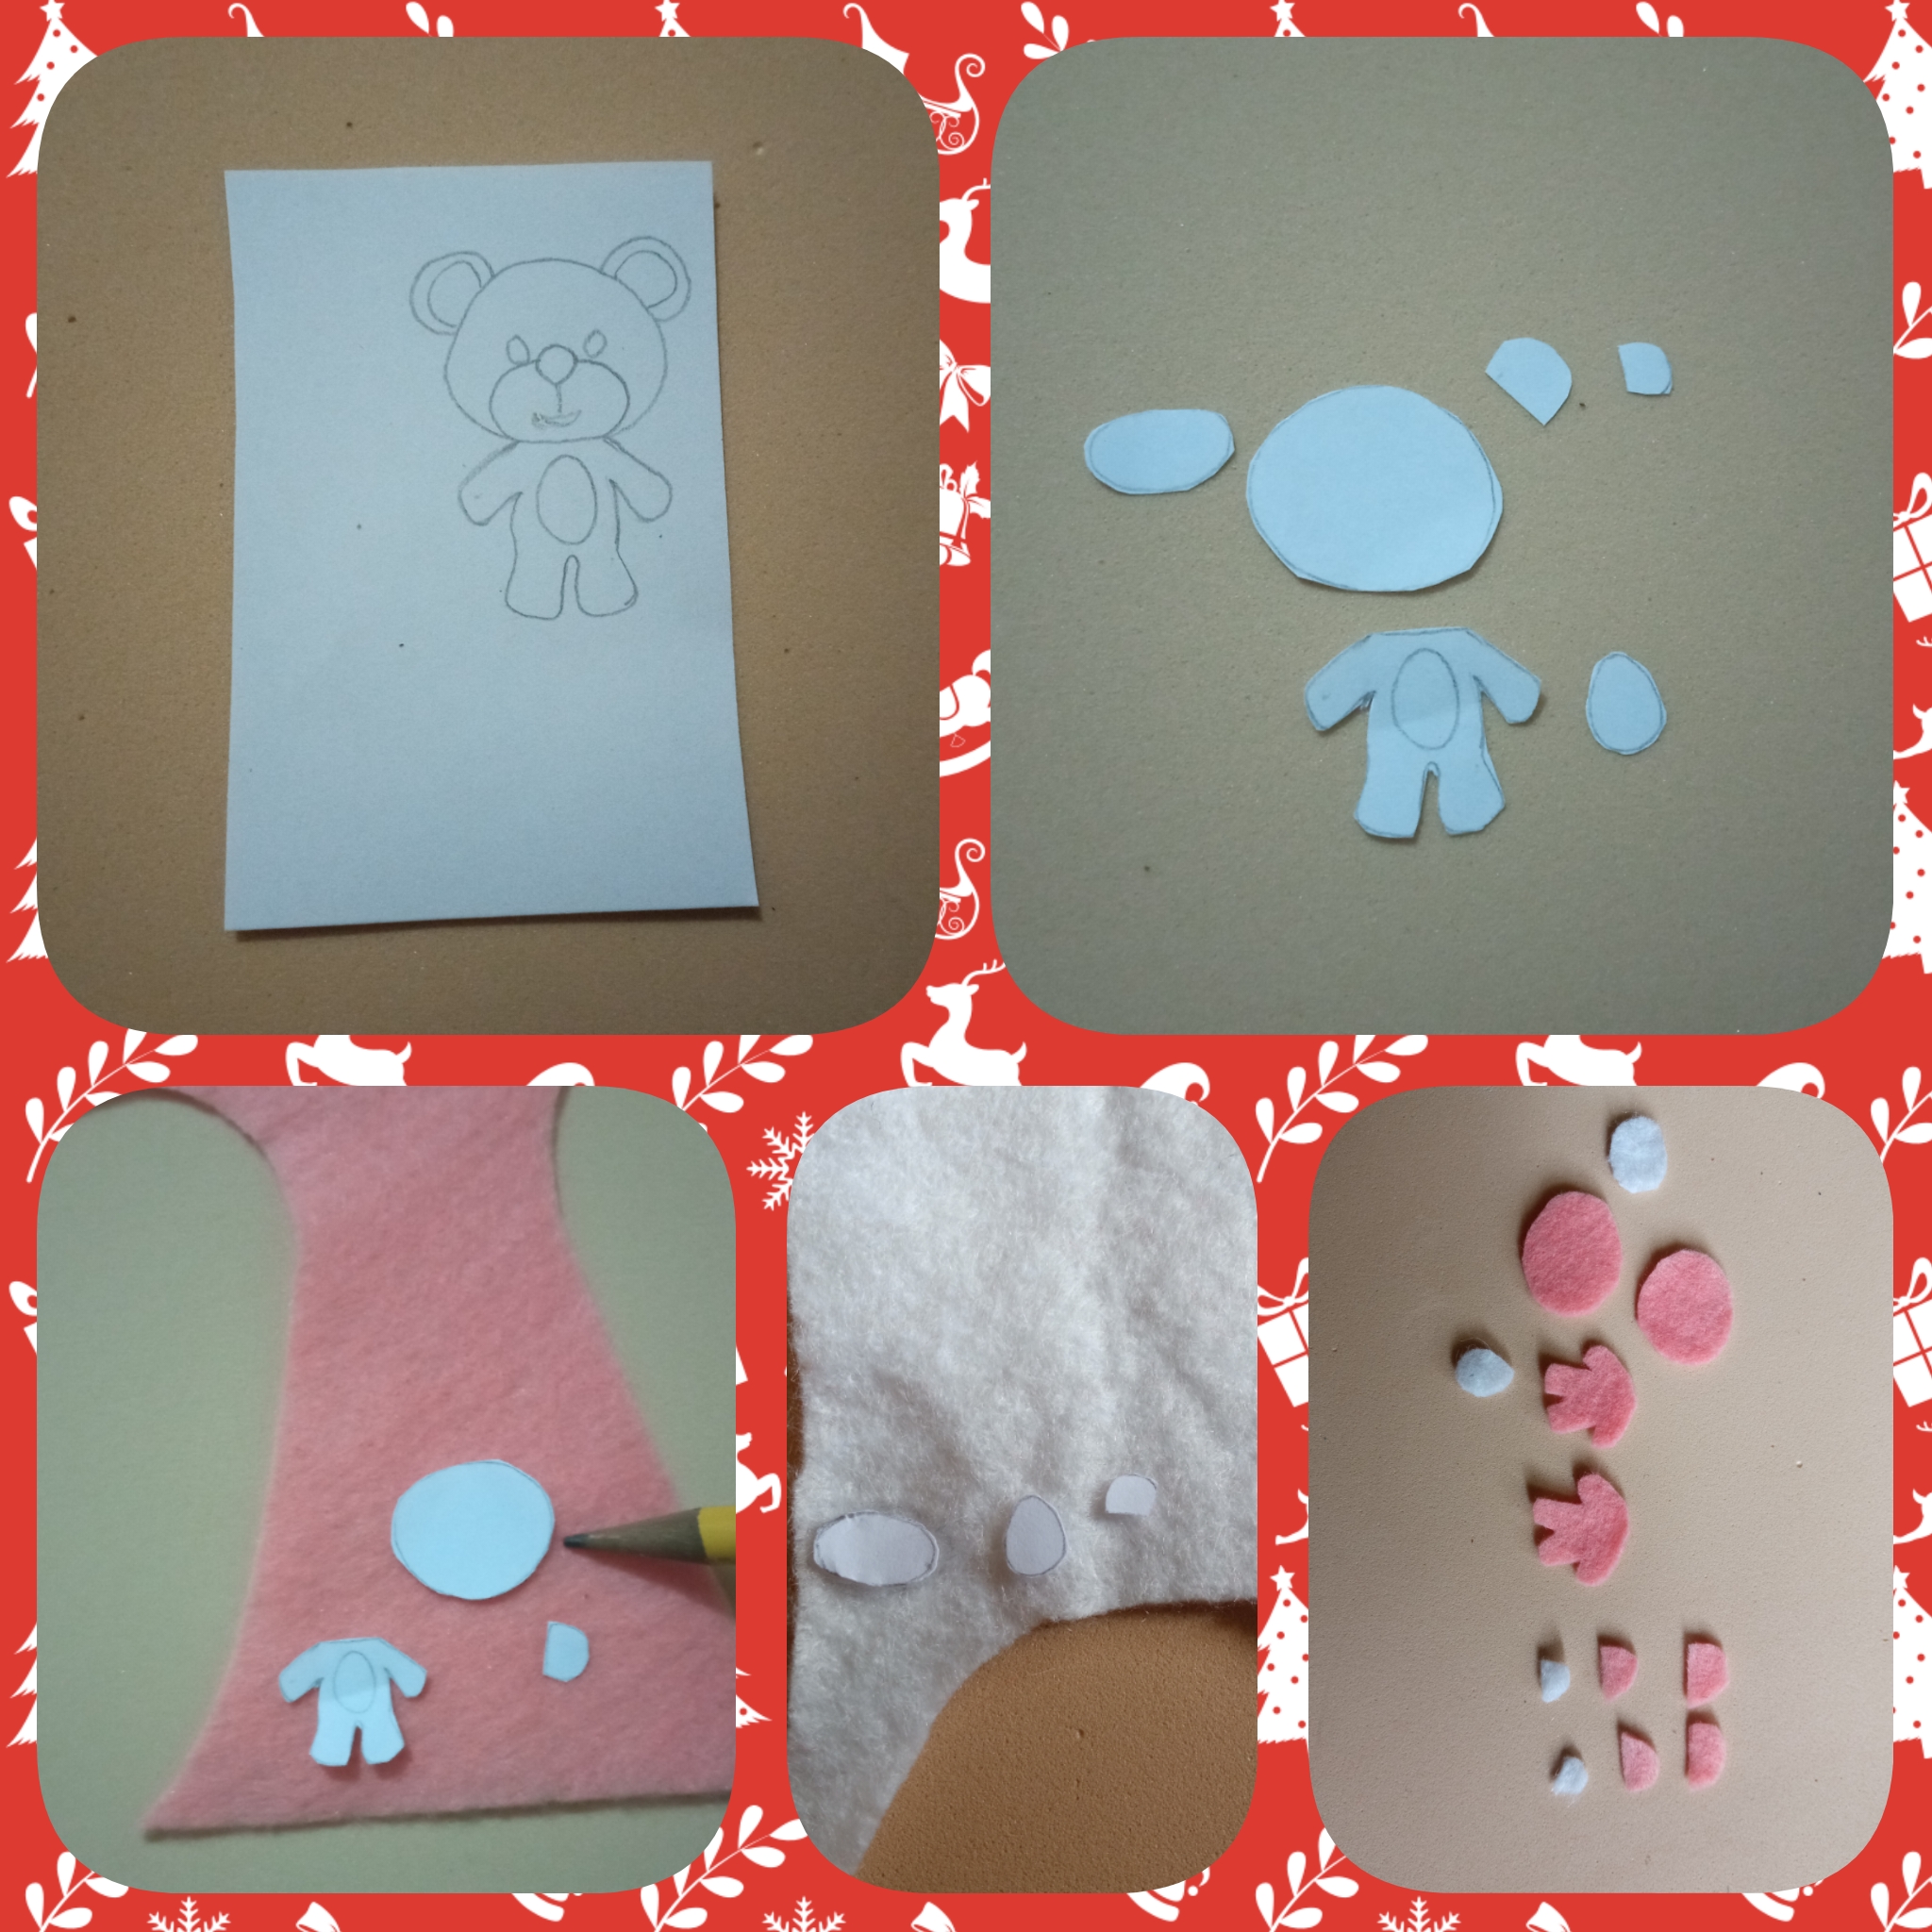
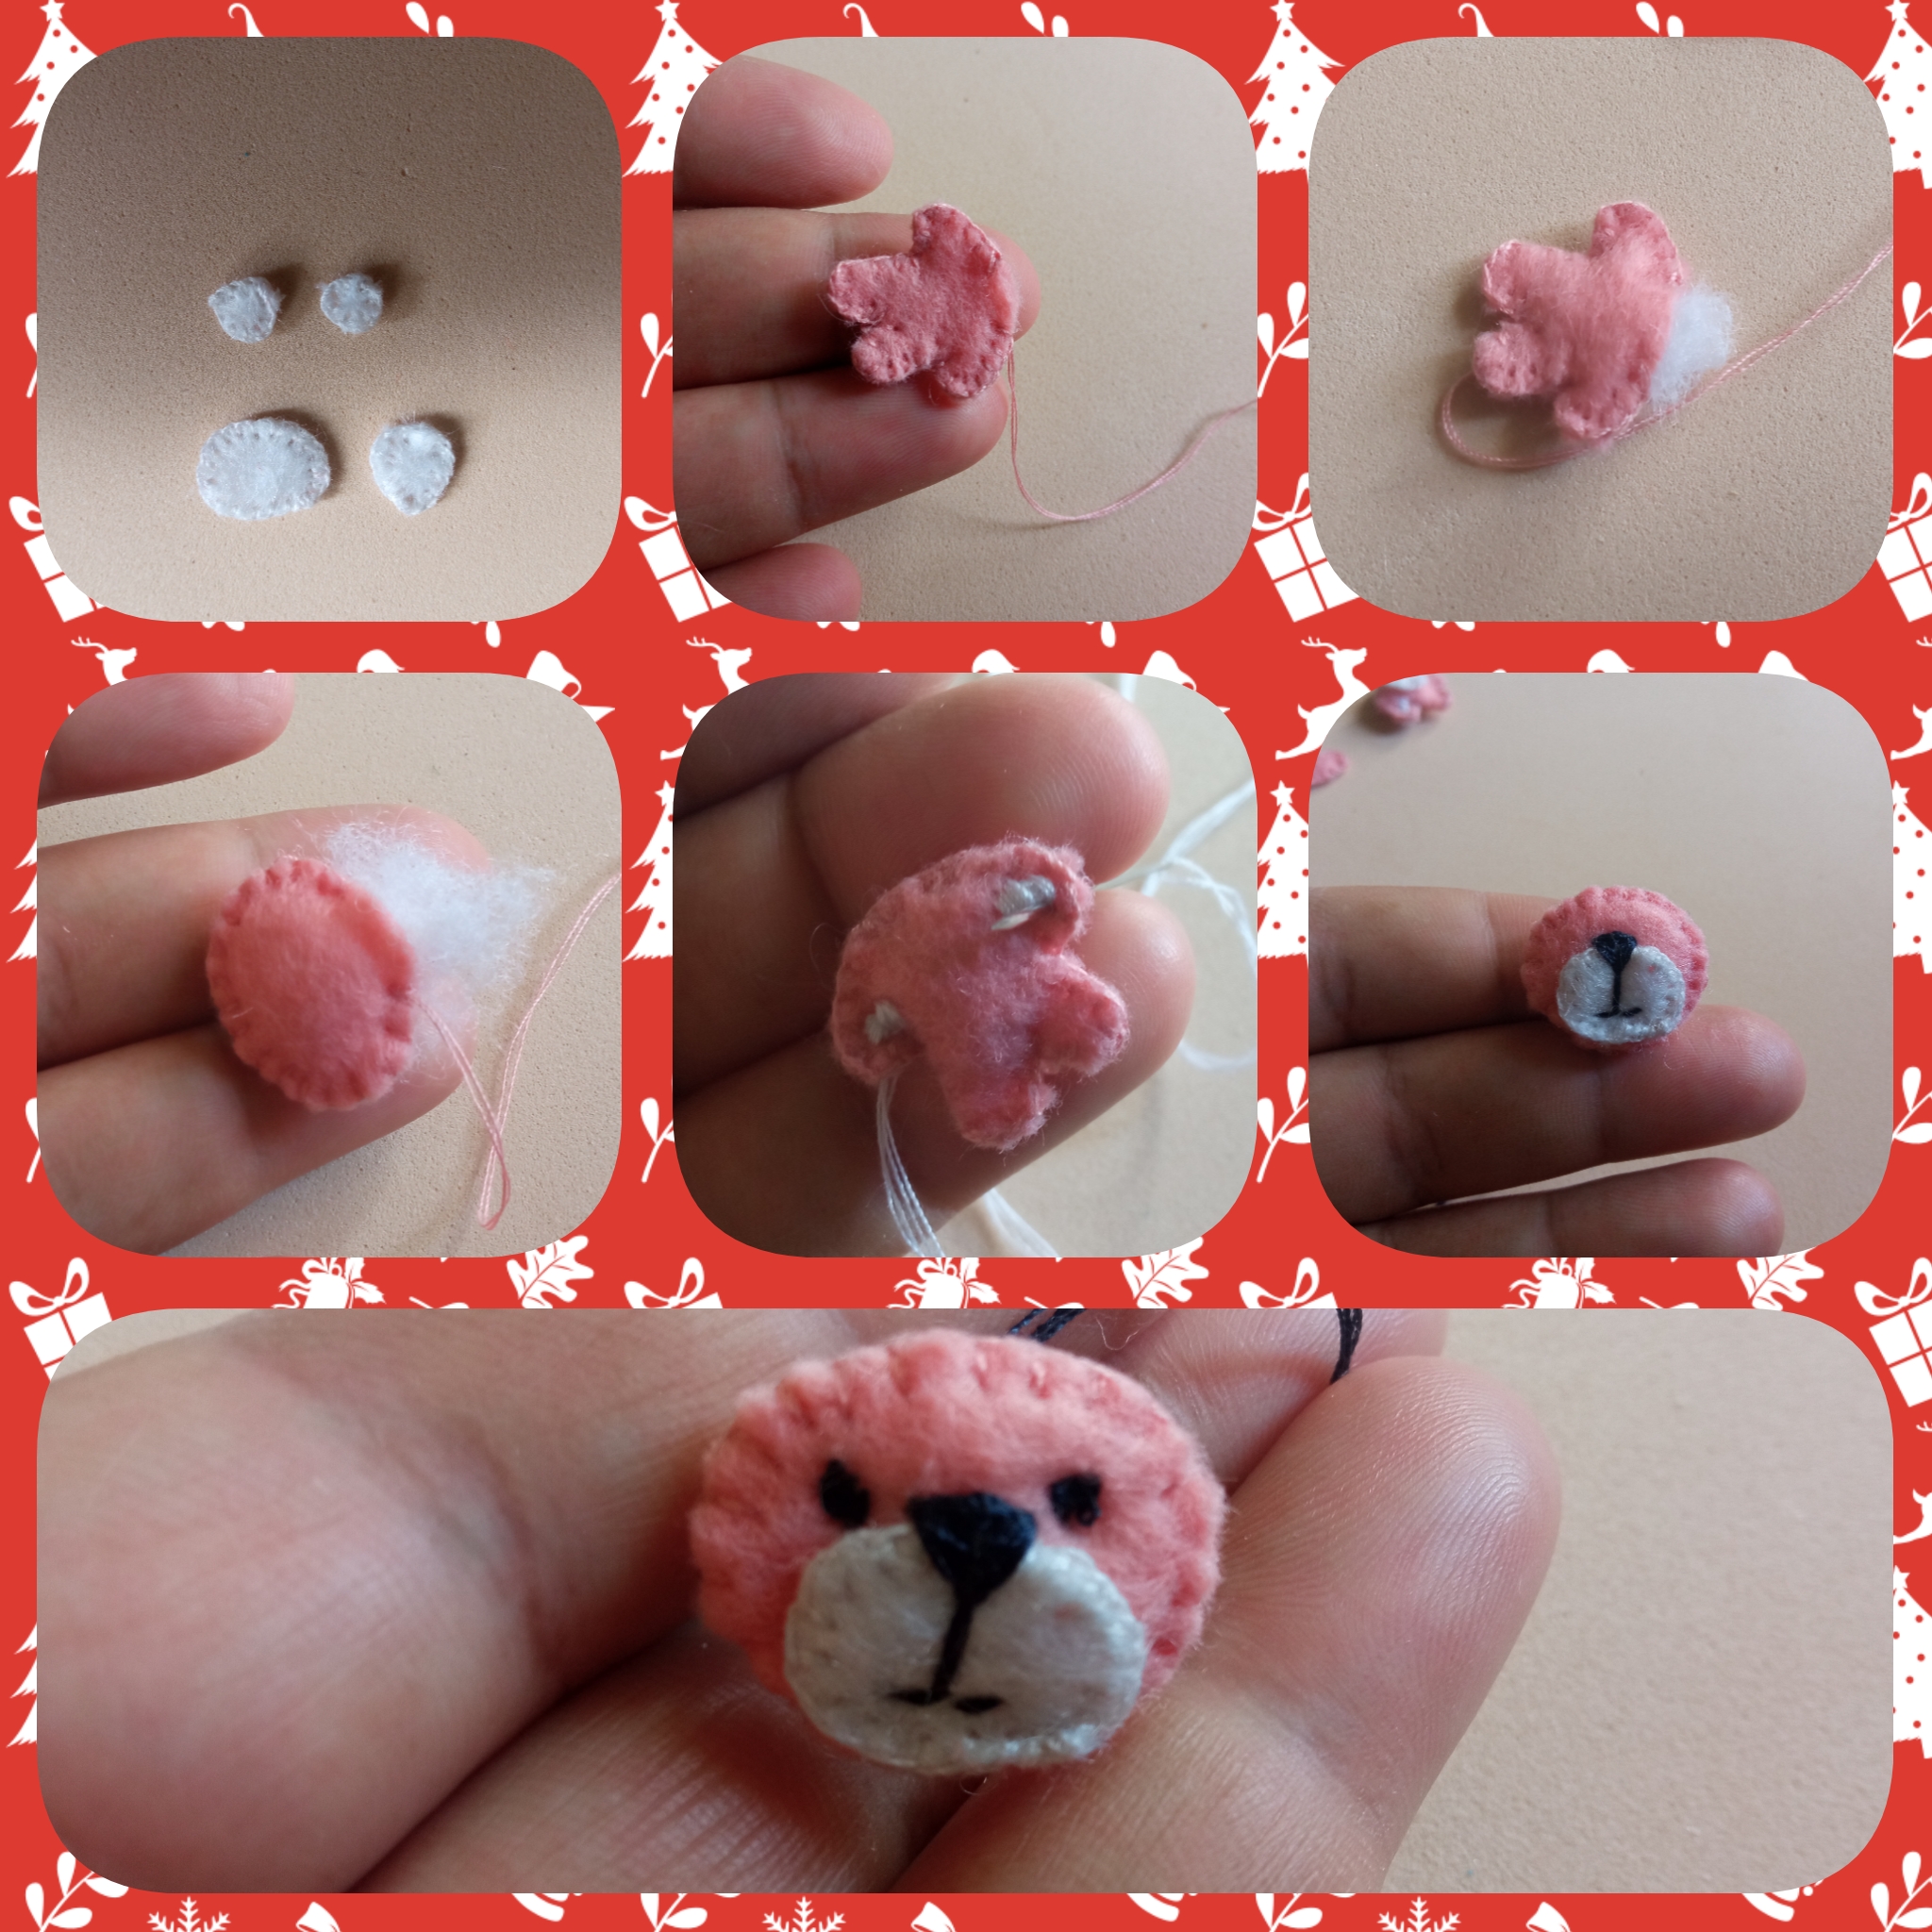
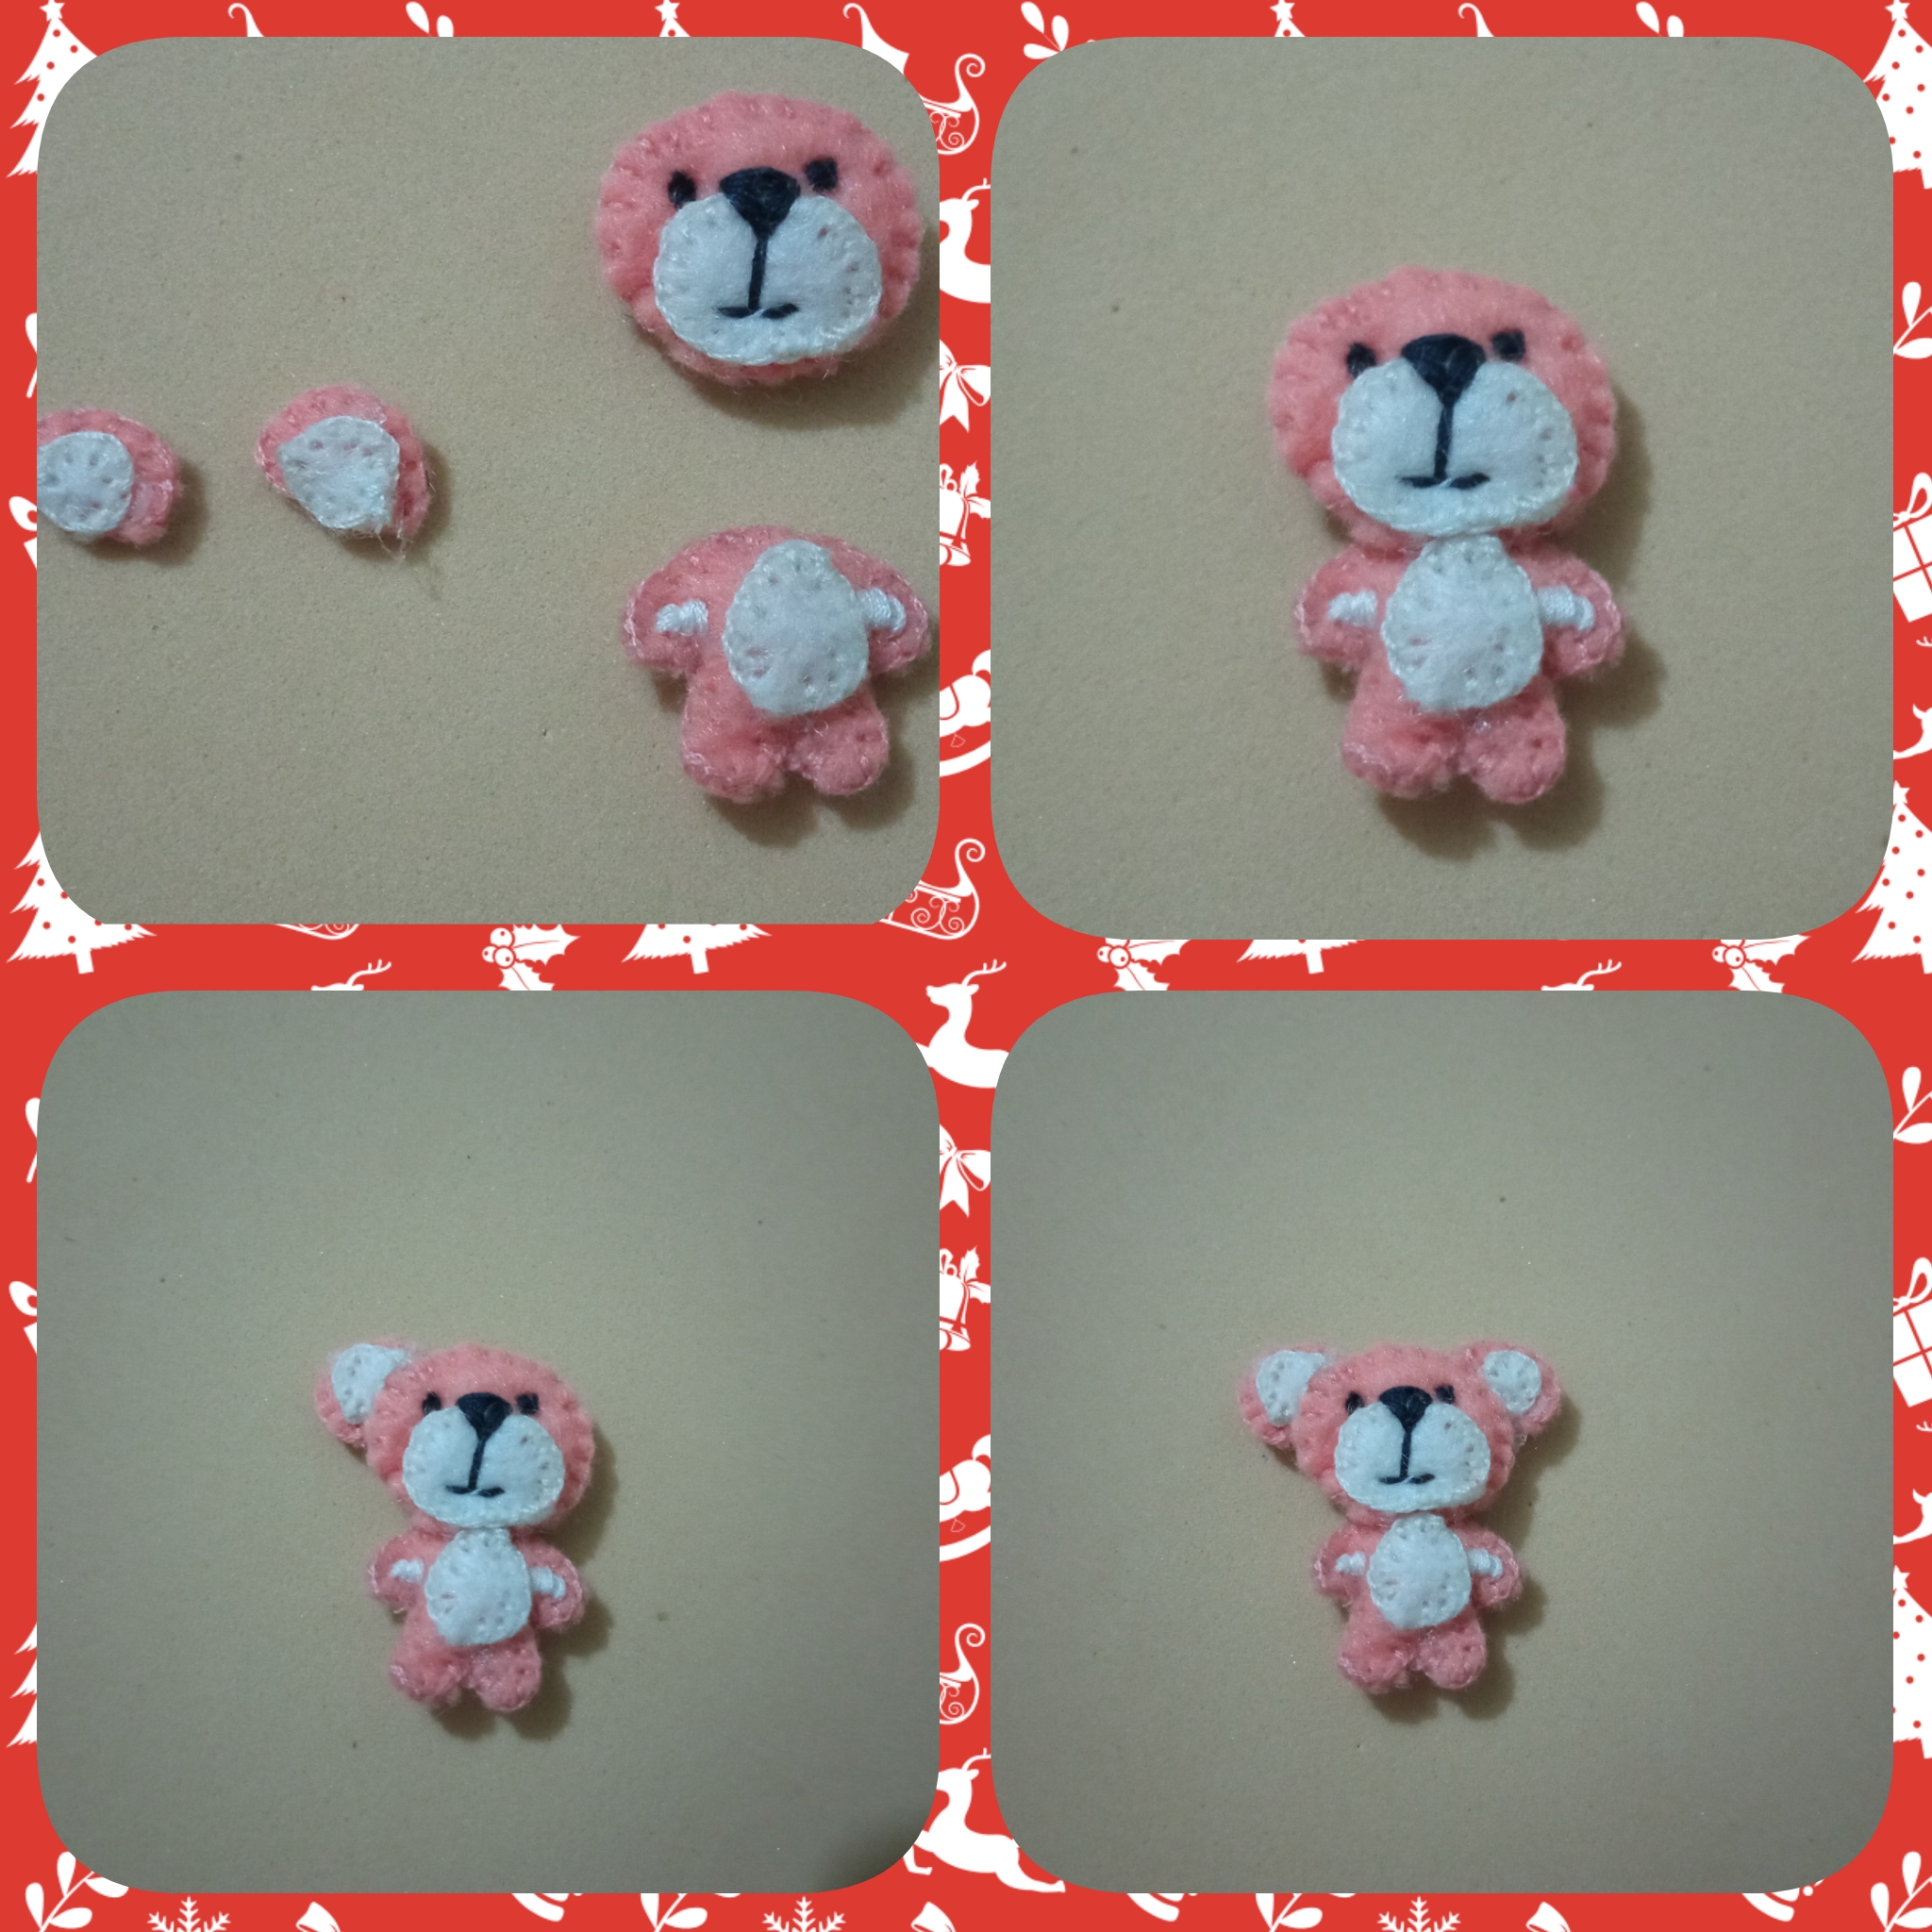
Paso 1:
Para comenzar voy a ir elaborando el osito, dibujo un osito en una hoja blanca, luego recortamos cada pieza la cual vamos a usar de patrón. Cortamos cada pieza en el color de tela correspondiente, luego unimos las piezas de cara y cuerpo cosemos con punto ojal, rellenamos y cerramos. Con hilo negro bordamos los ojos, nariz y boca. Las otras piezas cocemos con punto ojal también, ya lista con Silicon caliente unimos las piezas del osito.
Paso 1:
To begin with I am going to make the teddy bear, I draw a teddy bear on a white sheet, then we cut out each piece which we are going to use as a pattern. We cut each piece in the corresponding color of fabric, then we join the face and body pieces, sew with buttonhole stitch, fill and close. With black thread we embroider the eyes, nose and mouth. The other pieces are also sewn with buttonhole stitch, and then we join the pieces of the teddy bear with hot silicon.
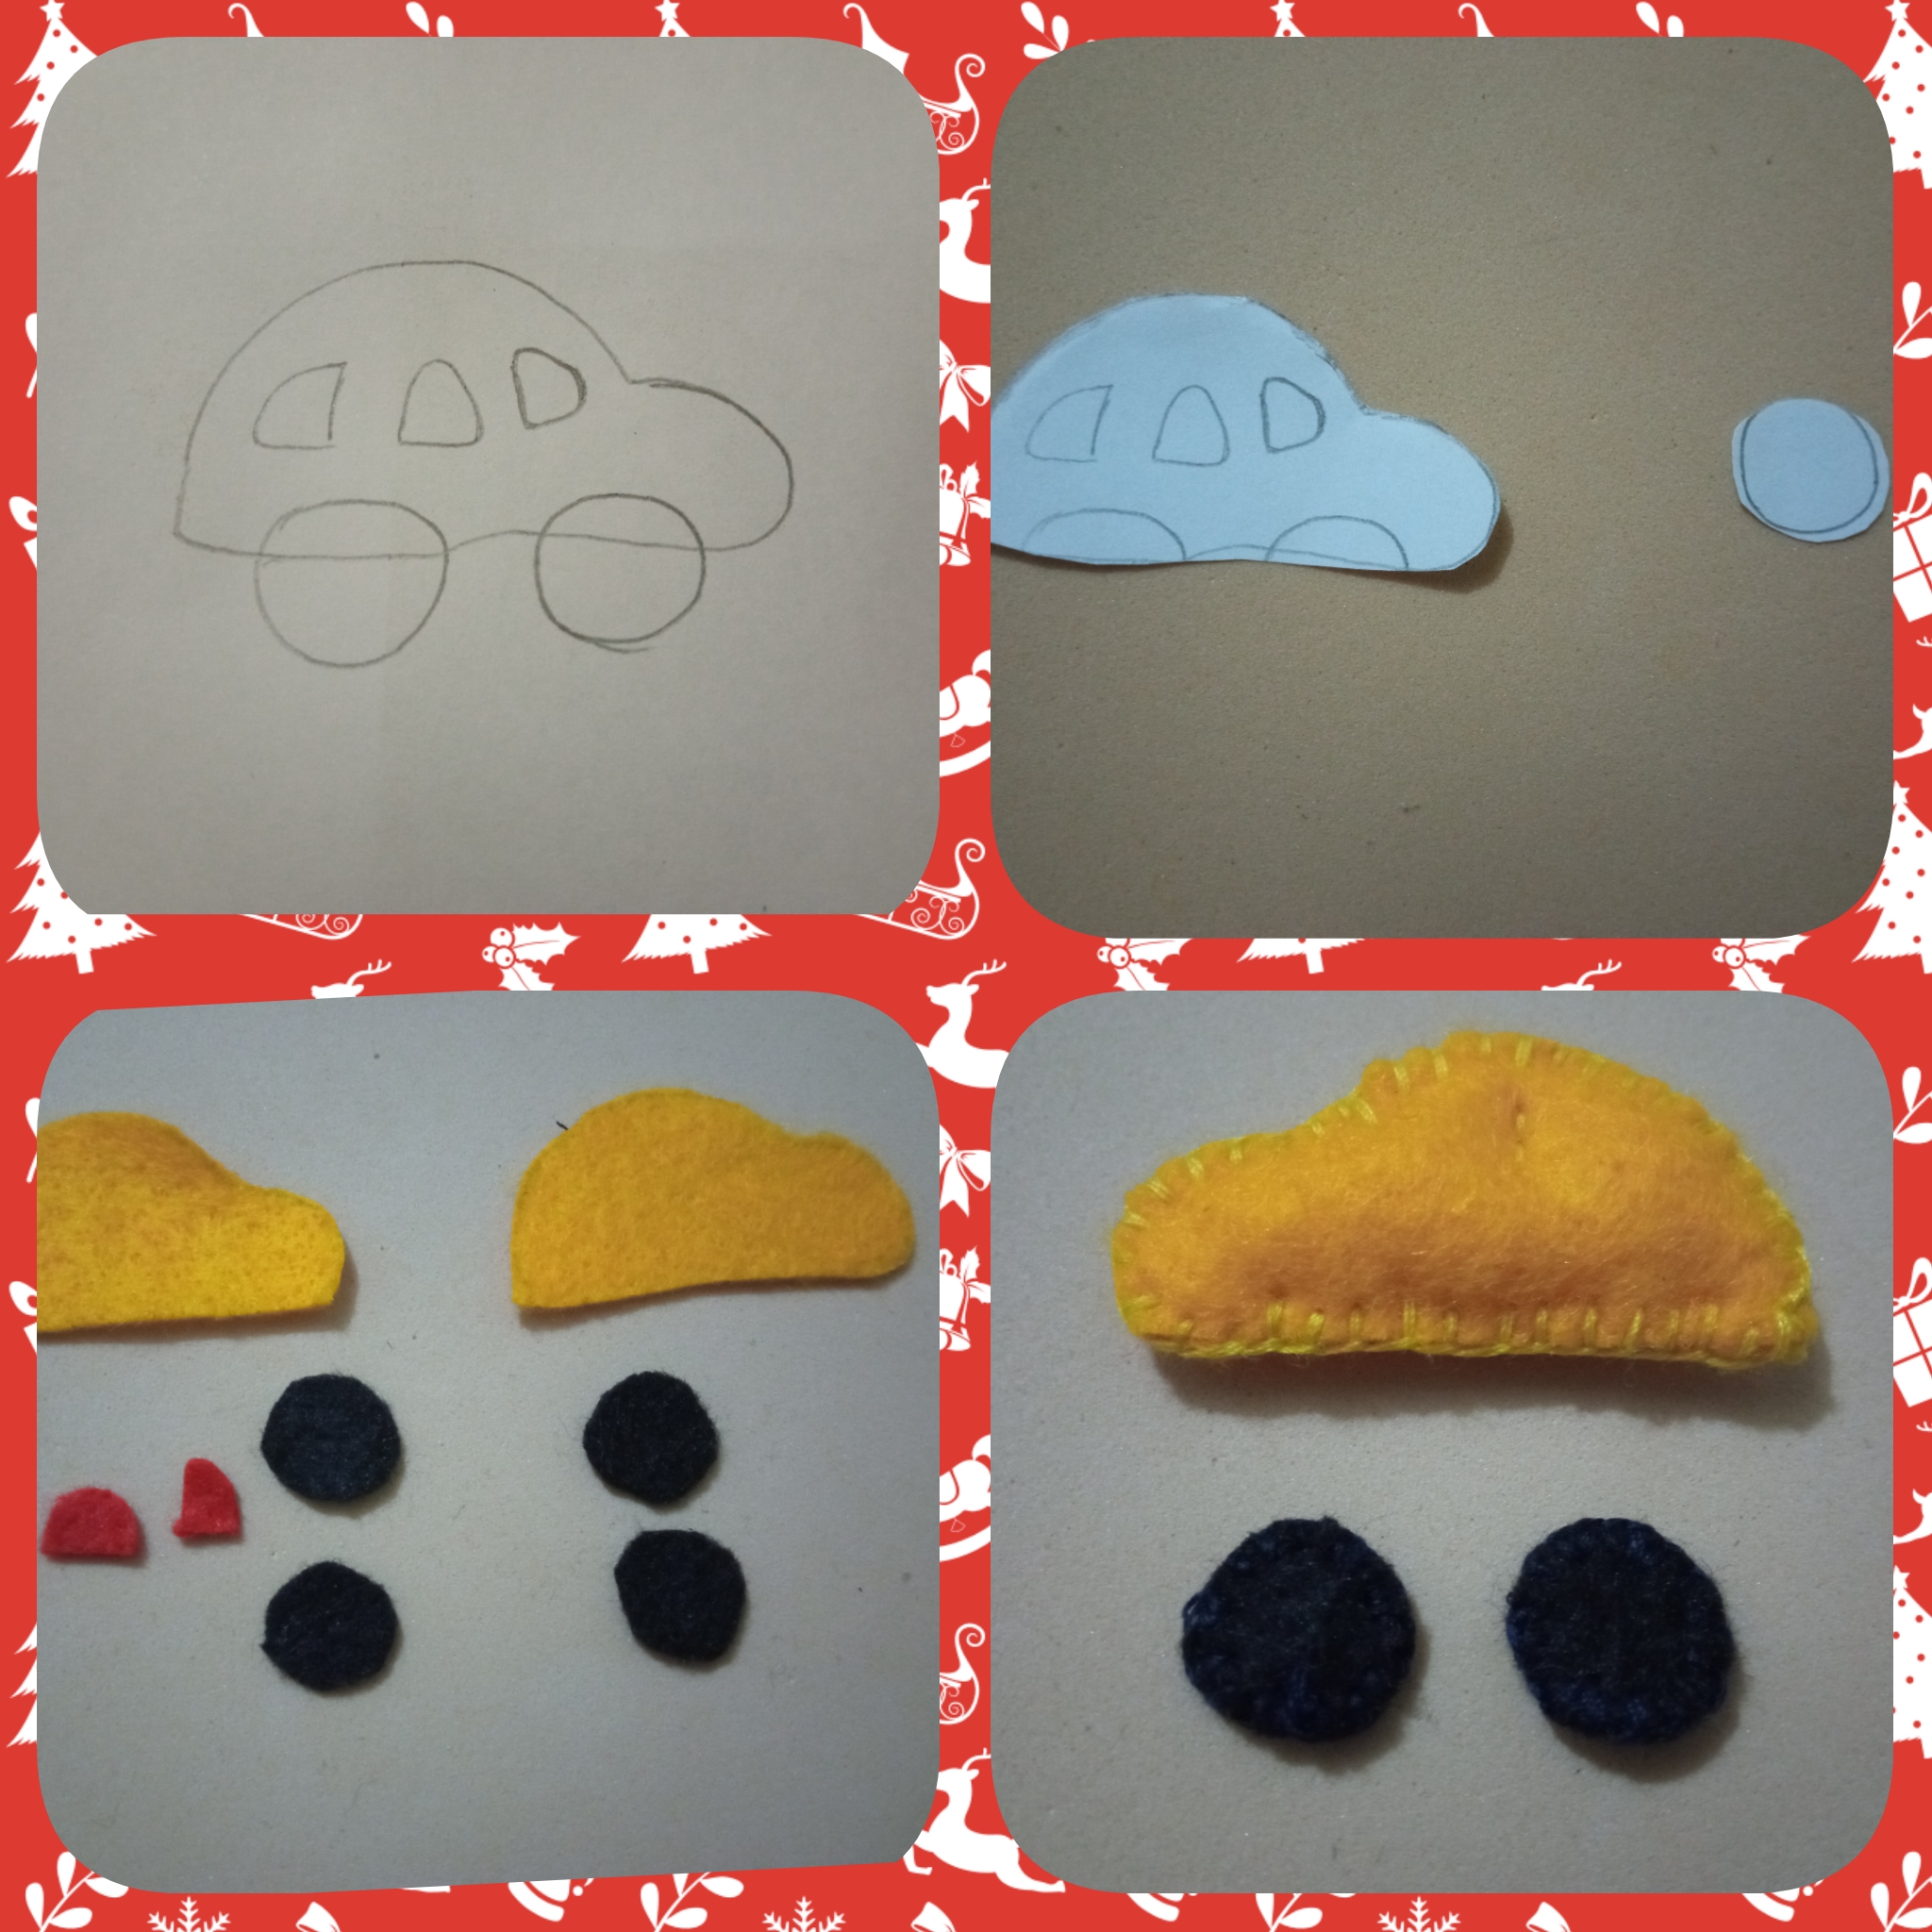
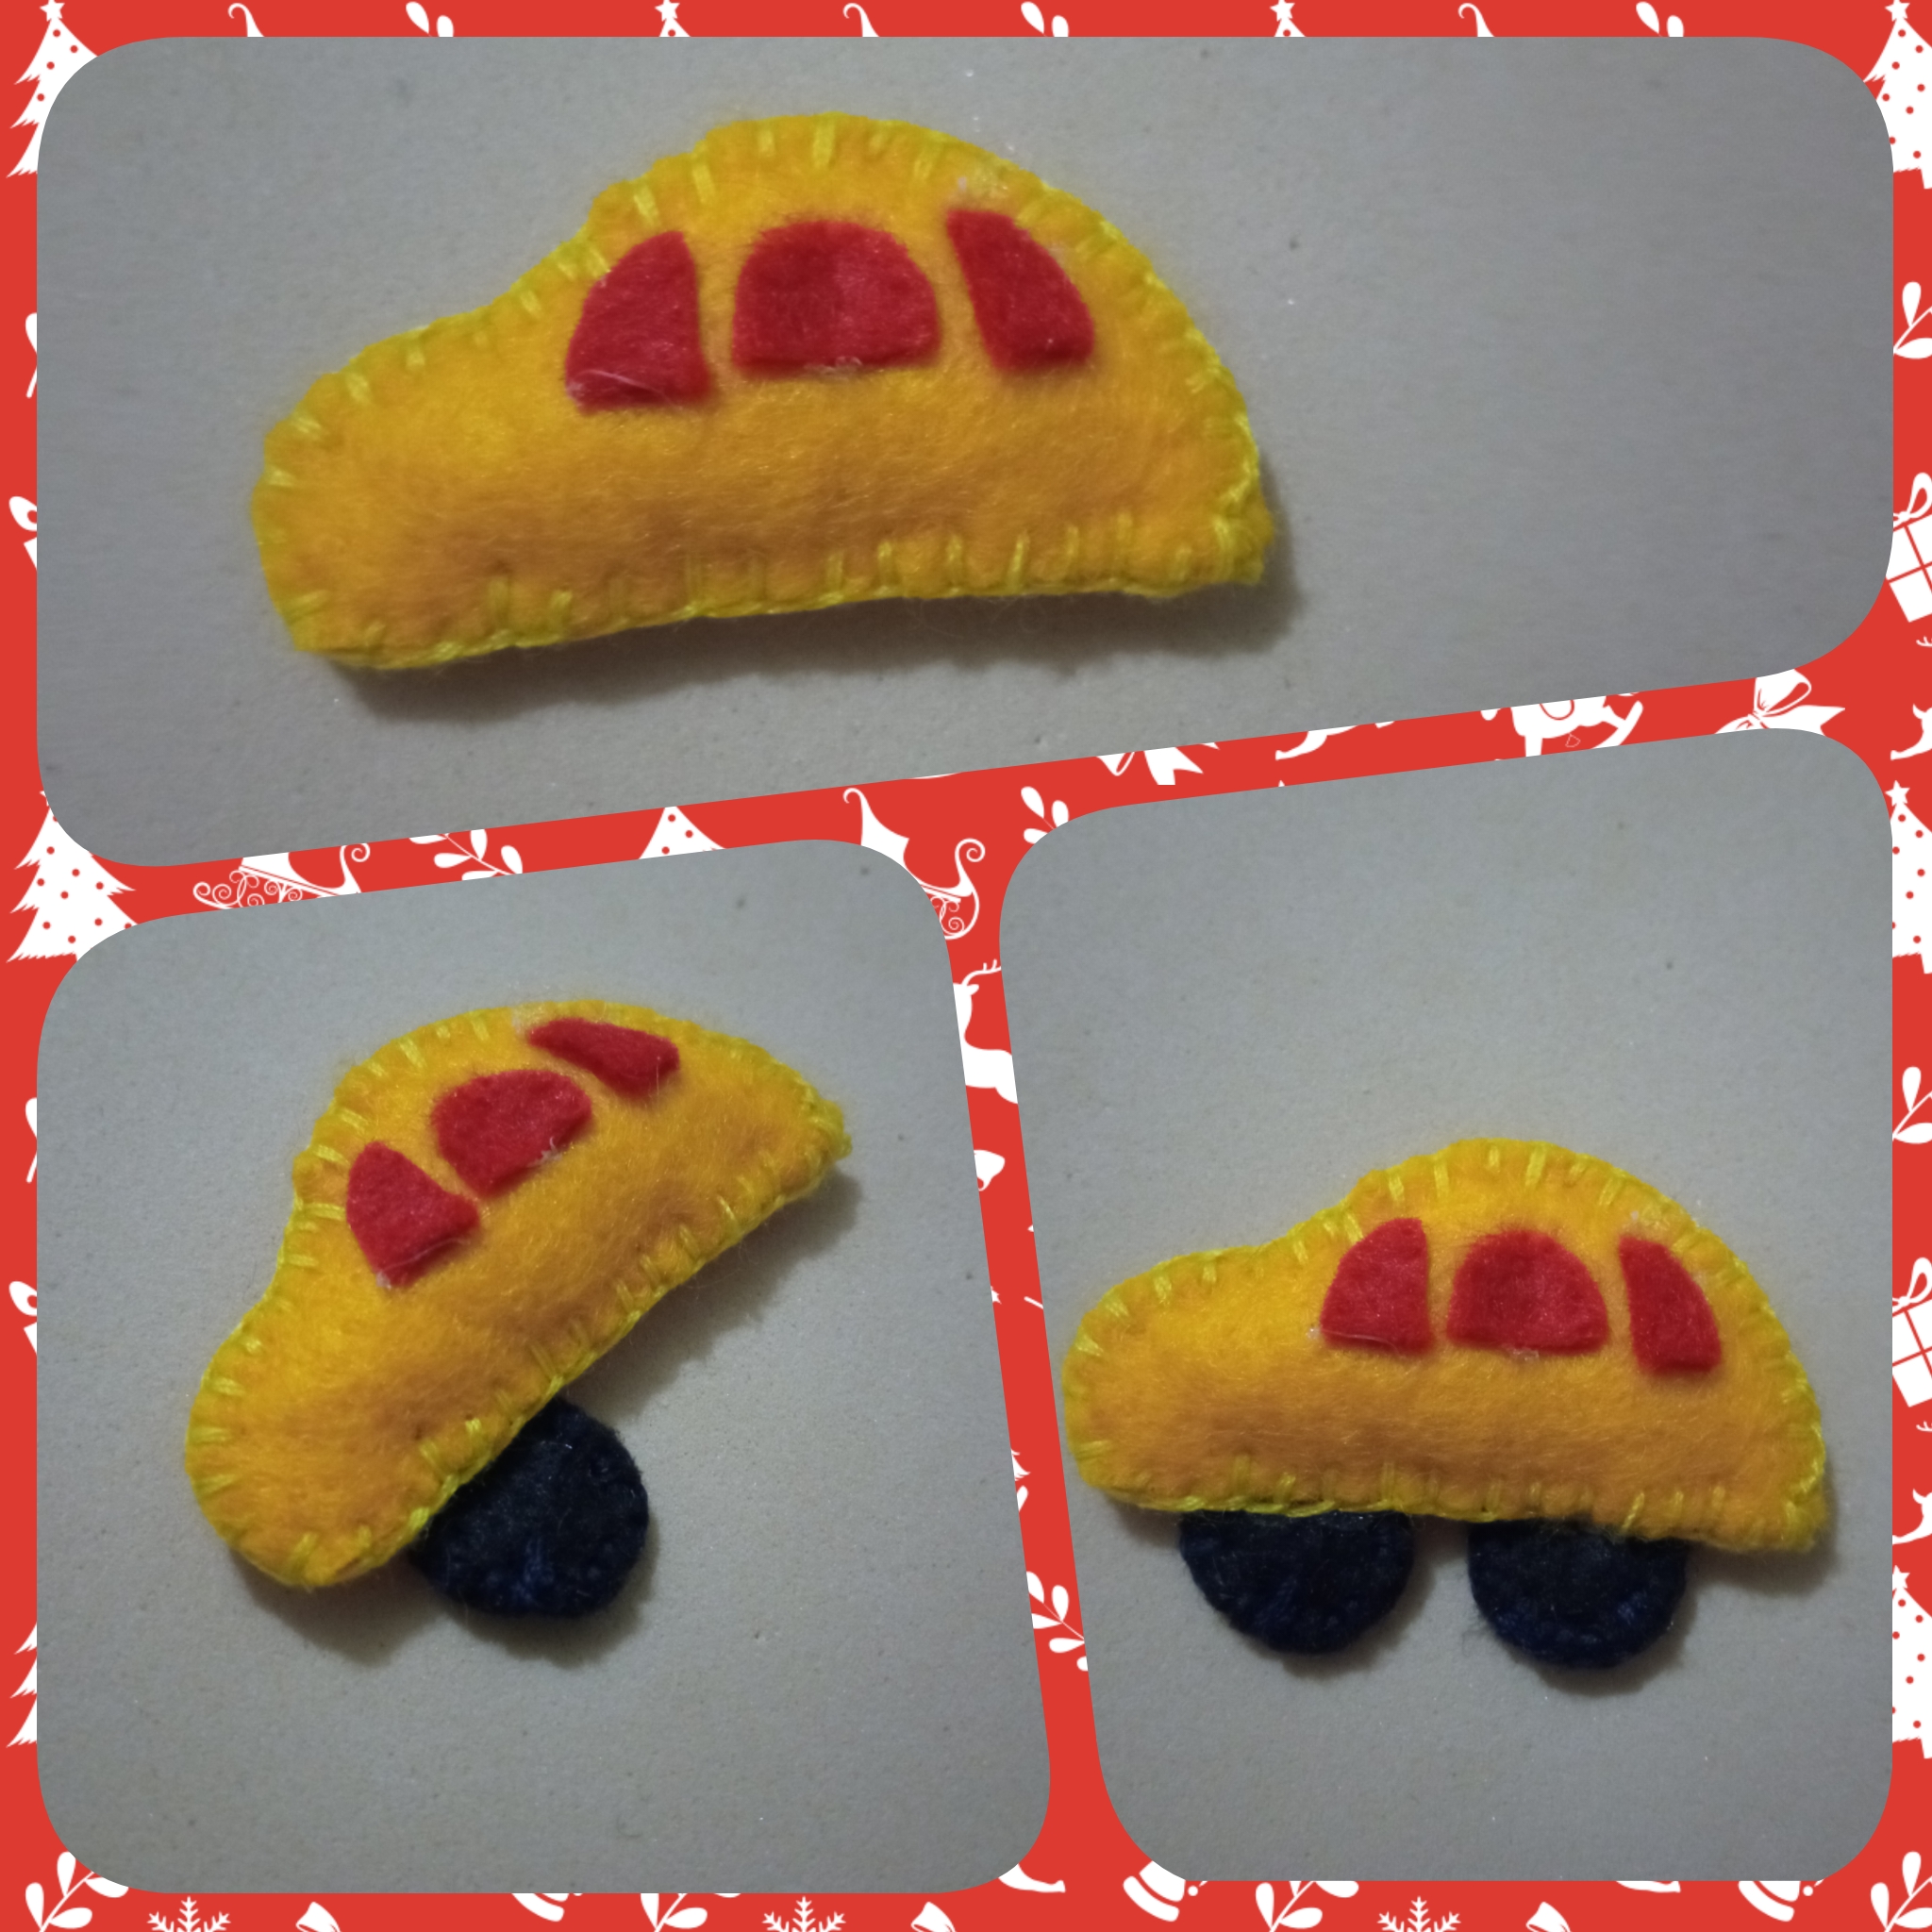
Paso 2:
Haré luego el carro, dibujando en una hoja blanca recortó para los patrones, recortó en el fieltro el color correspondiente, coso cada pieza con punto ojal. Luego con silicon caliente voy pegando las ventas y los cauchos de mi carro.
Paso 2:
Then I will make the carriage, drawing on a white sheet cut out for the patterns, cut out the corresponding color in the felt, sew each piece with buttonhole stitch. Then with hot silicon I glue the sales and the rubbers of my car.
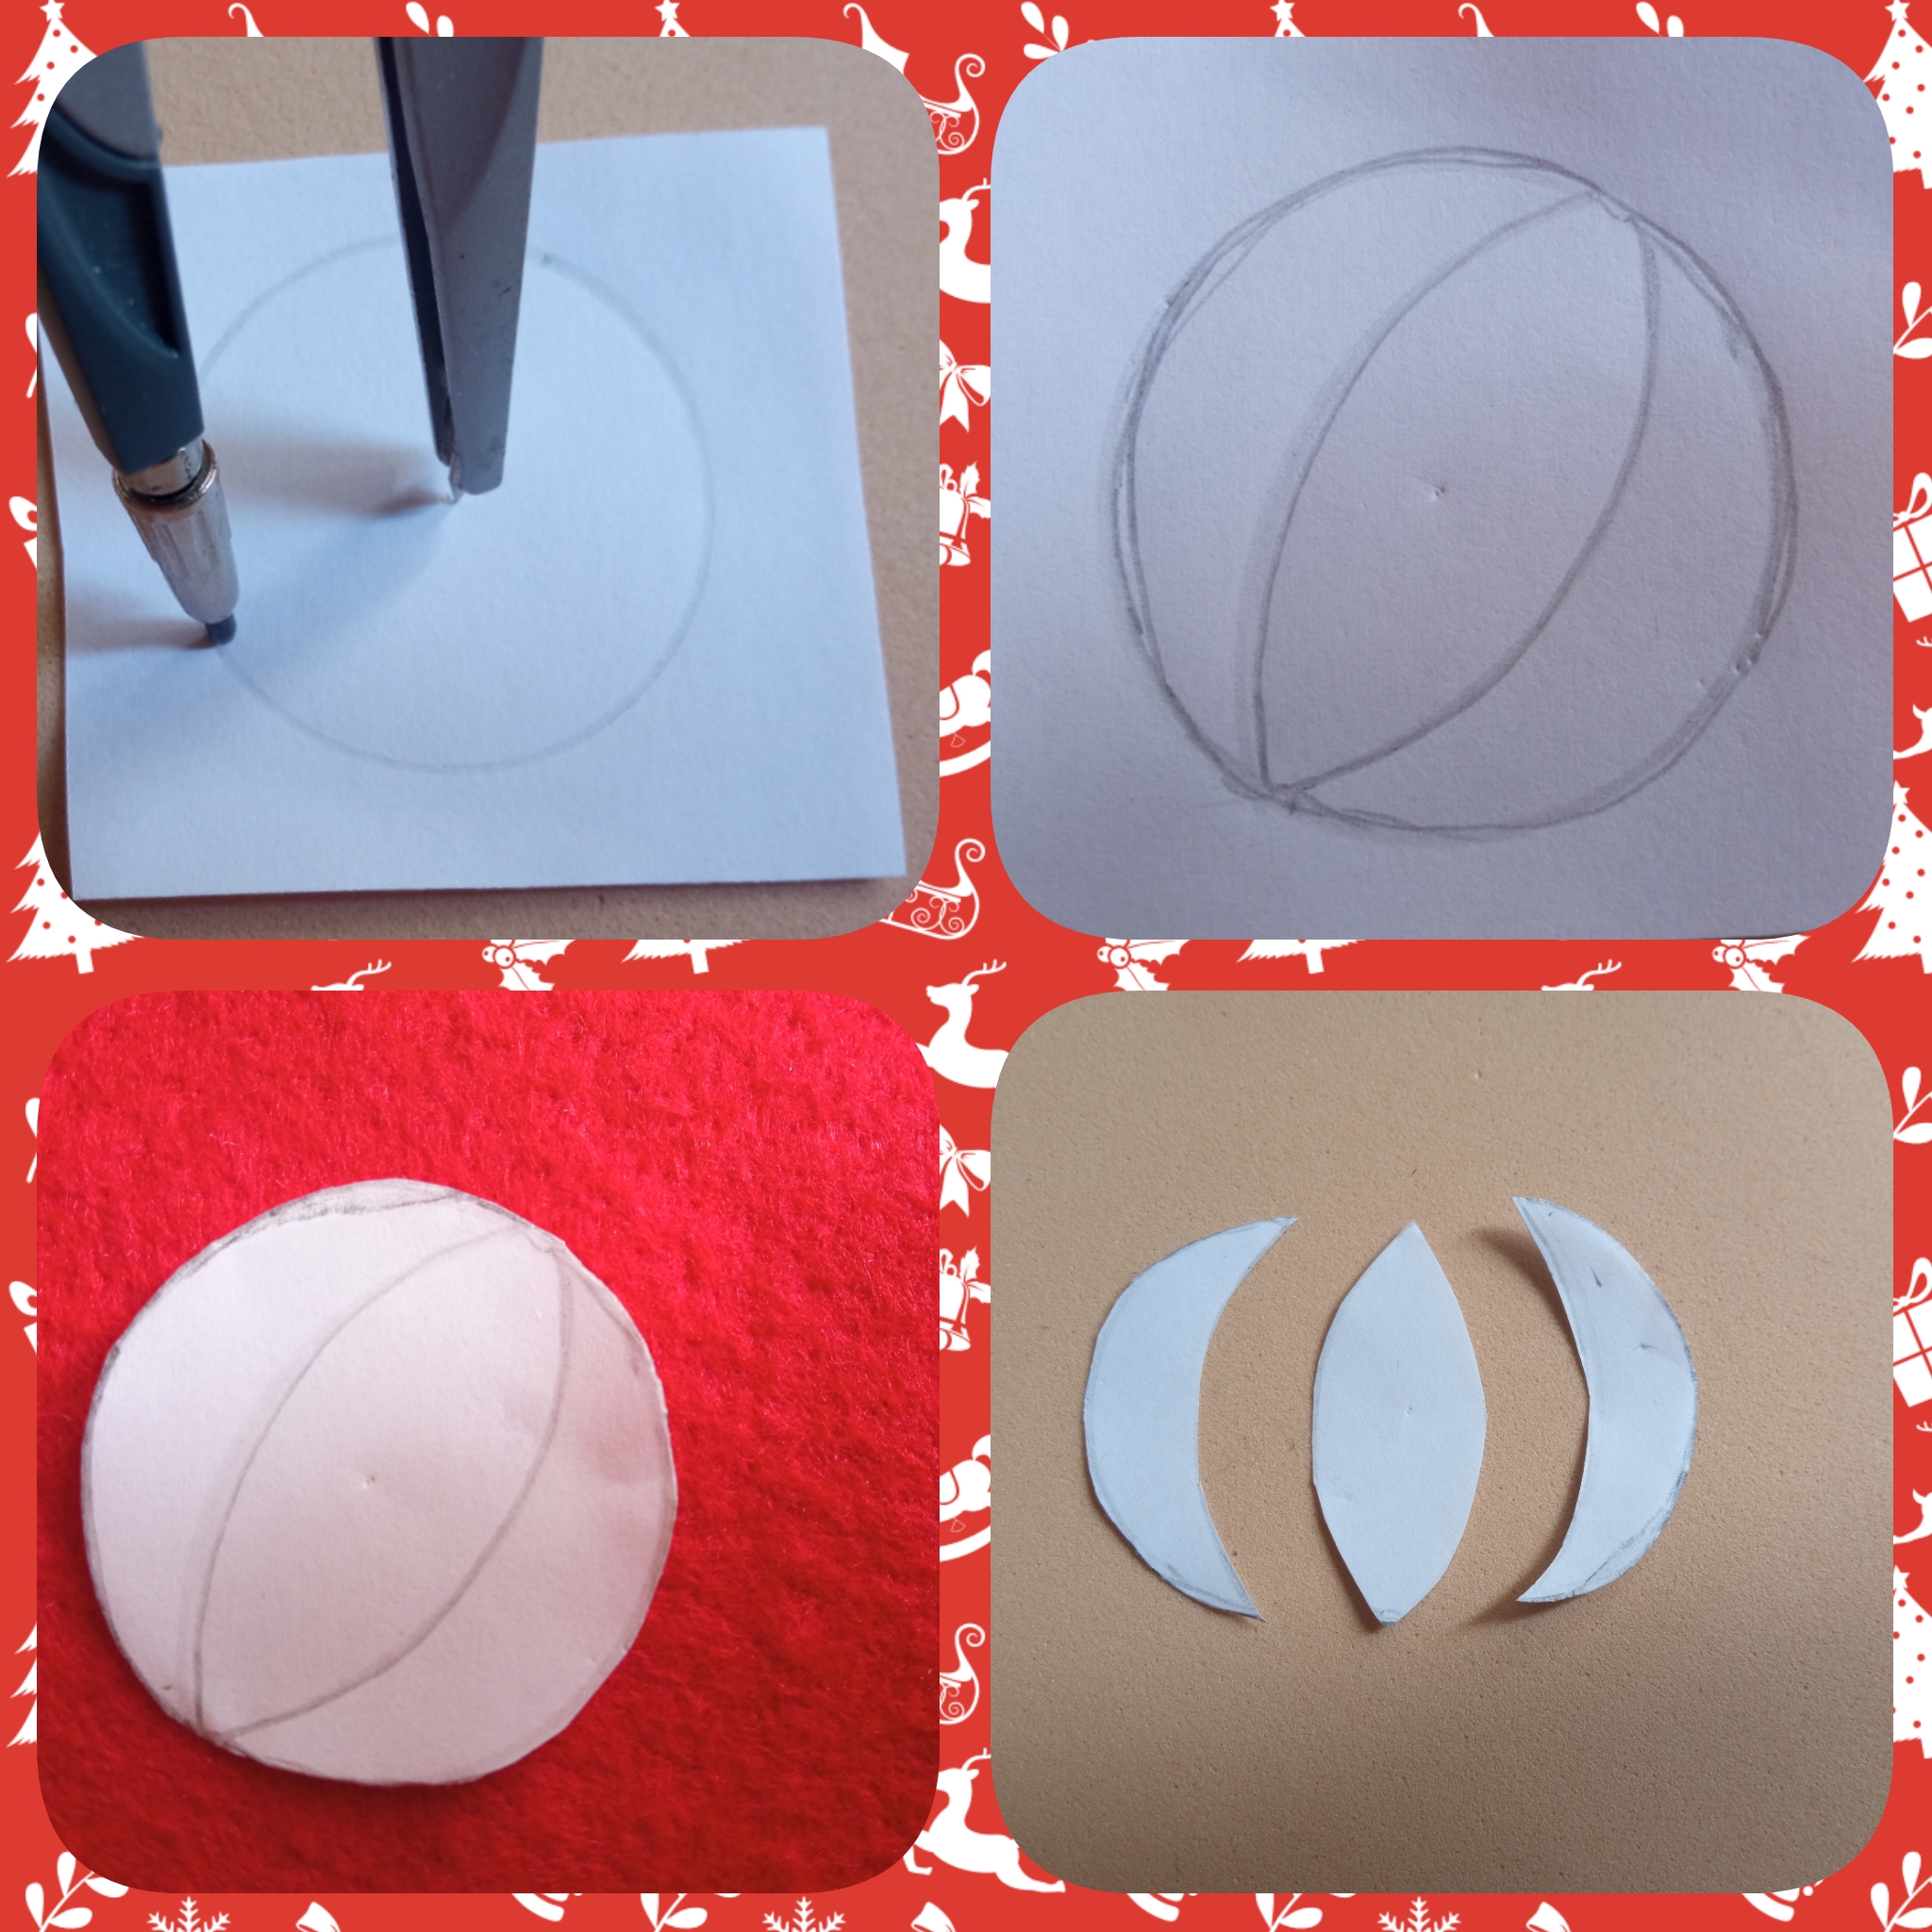
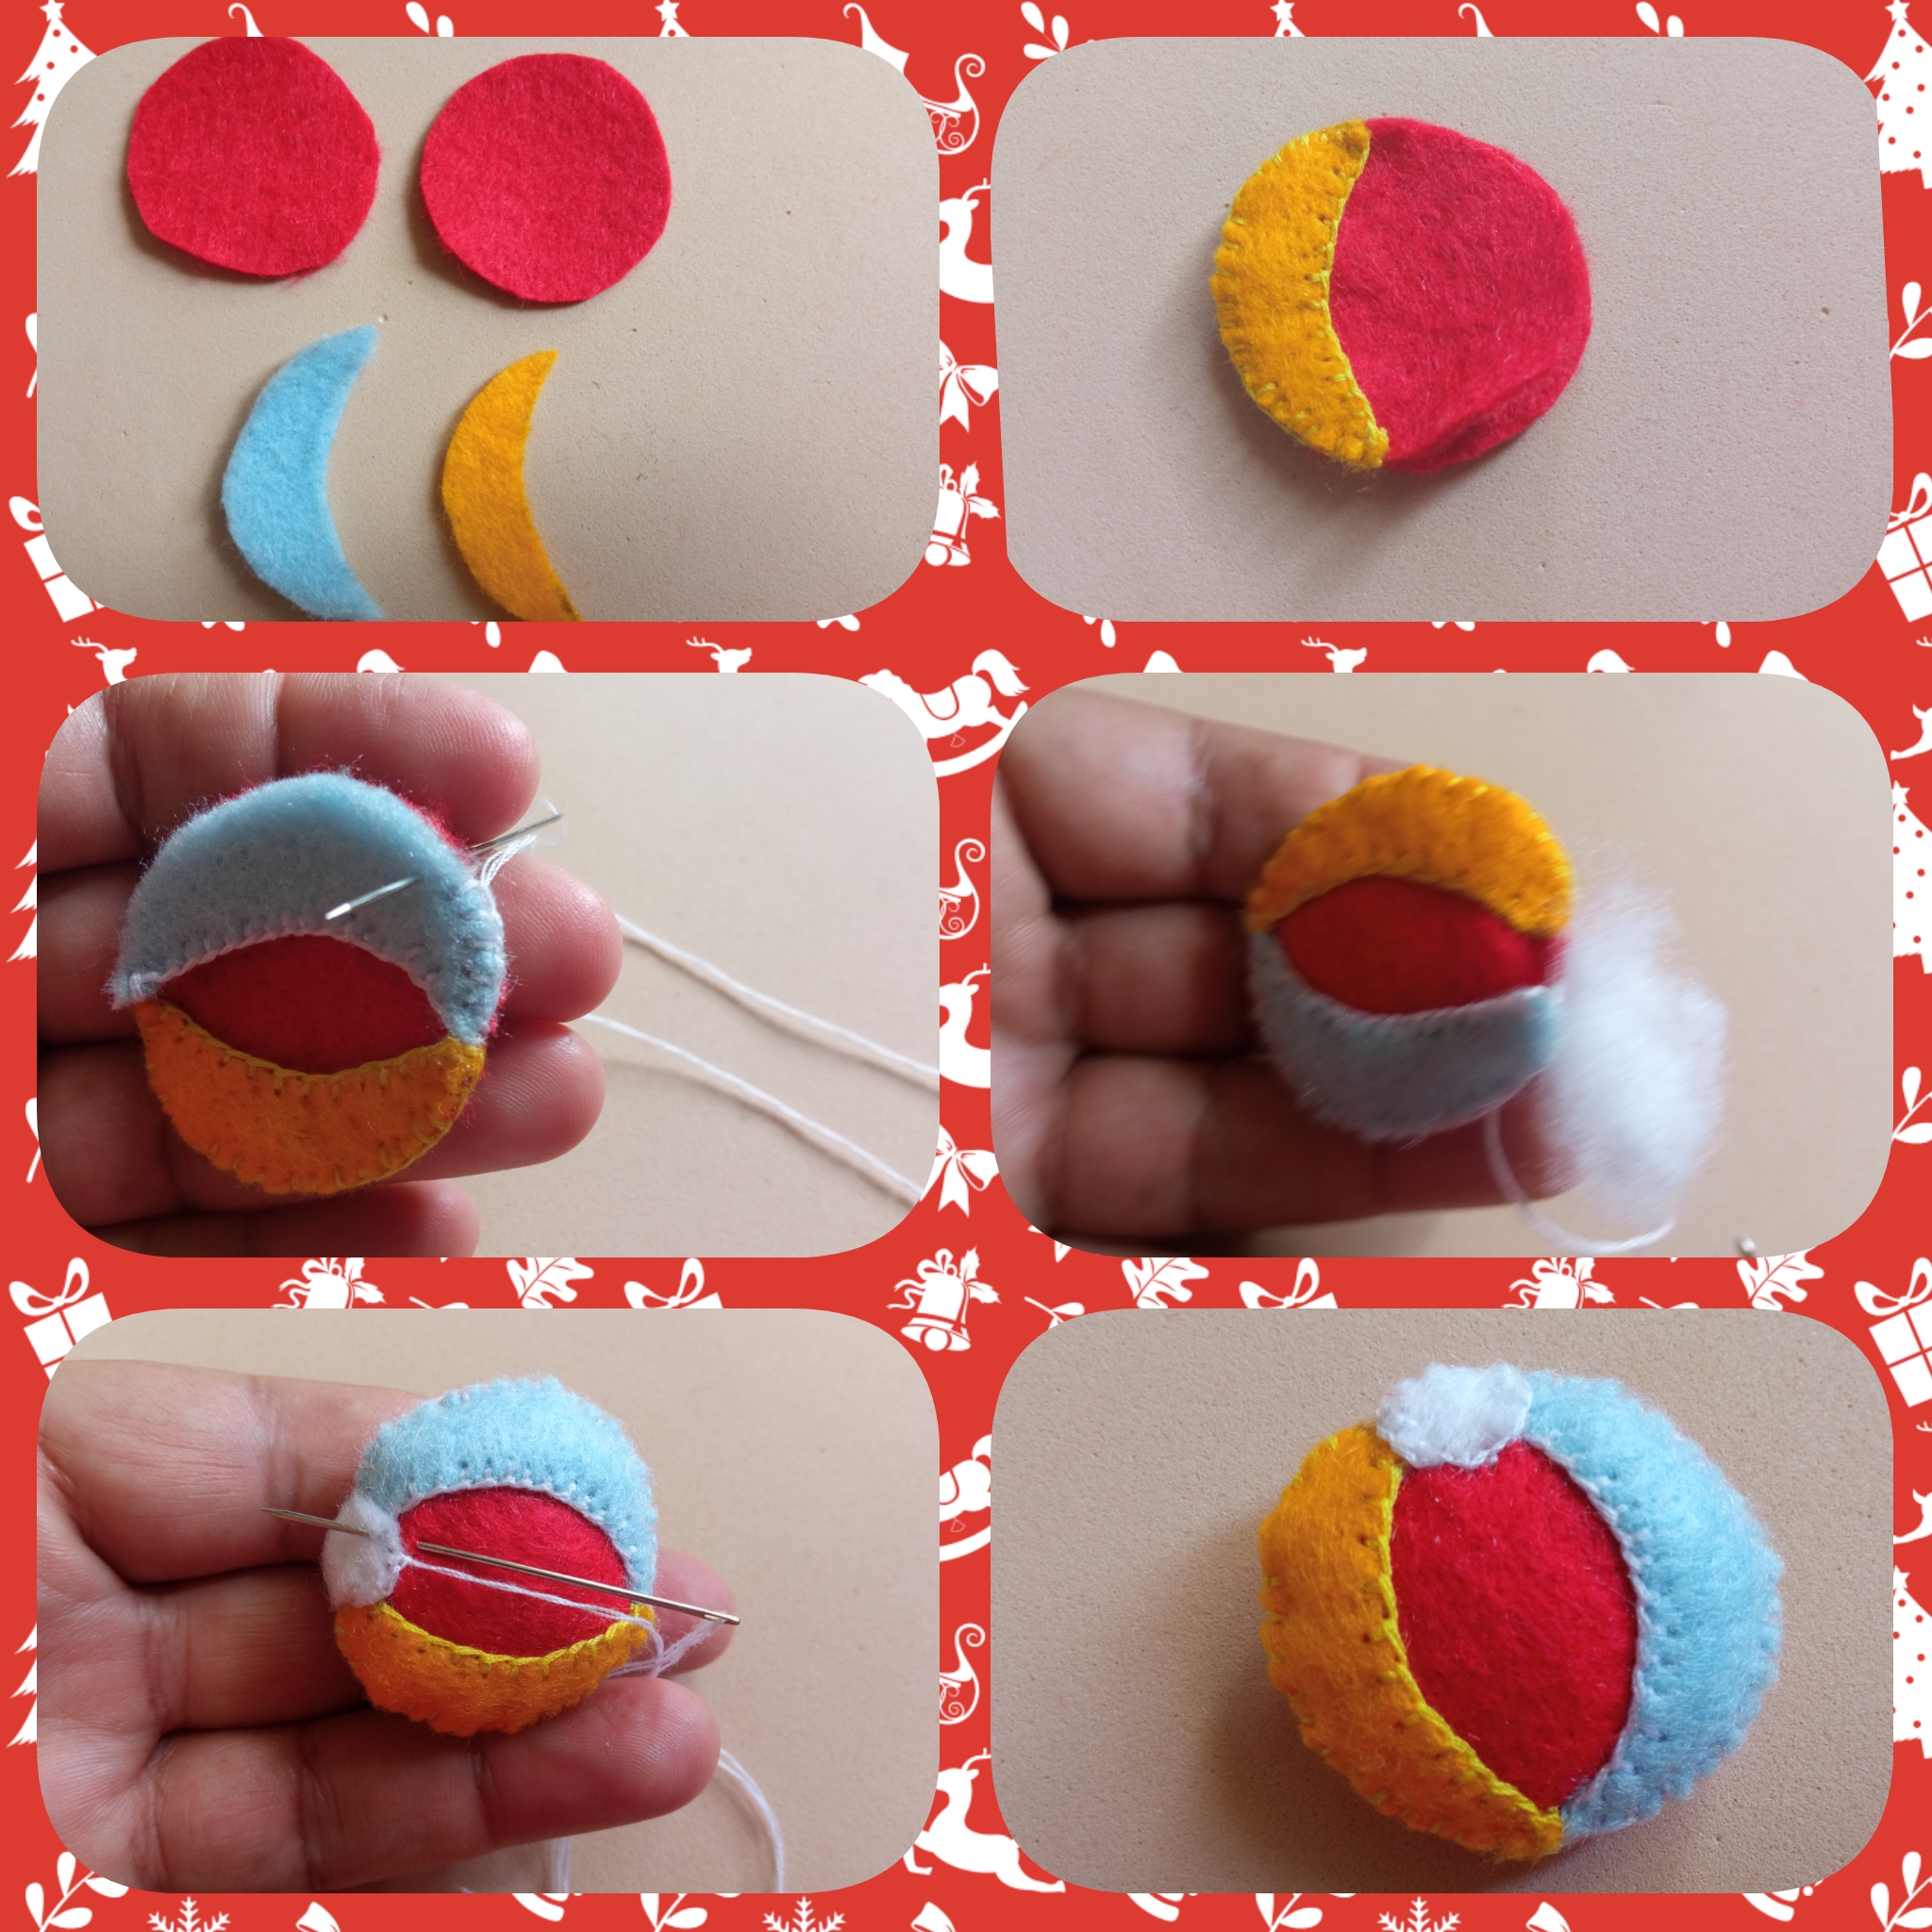
Paso 3:
Dibujo una pelota con ayuda de un compás, luego divido en tres de piezas. Antes de recortar saco el círculo en fieltro rojo, corto las piezas del patrón y las corto en fieltro amarillo y azul claro, las coso en punto ojal uniendo en el círculo rojo rellenamos y terminamos de coser. Para finalizar cortamos un círculo en fieltro blanco y lo cosemos con punto ojal en la pelota como se muestra en la foto.
Paso 3:
I draw a ball with the help of a compass, then I divide it into three pieces. Before cutting out the circle in red felt, I cut the pattern pieces and cut them in yellow and light blue felt, I sew them in buttonhole stitch joining the red circle, fill in and finish sewing. To finish we cut a circle in white felt and sew it with buttonhole stitch on the ball as shown in the picture.
Paso 4:
Ahora haré dos cajas de regalos, dibujo dos cubos uno pequeño y otro mediano lo recortó, los saco el fieltro rosado y rojo. Luego uno coso con punto ojal relleno y termino de cerrar. Bordo las líneas del cubo, luego contó una tira de 5 milímetros roja y blanca y se la pego a las caja de regalos. Para finalizar hago un lazo y se lo pegó.
Paso 4:
Now I will make two gift boxes, I draw two cubes, one small and one medium, I cut them out of the pink and red felt. Then I sew one with buttonhole stitch stuffed and finish closing. I embroider the lines of the cube, then I count a strip of 5 millimeters red and white and glue it to the gift box. To finish I make a bow and glue it on.


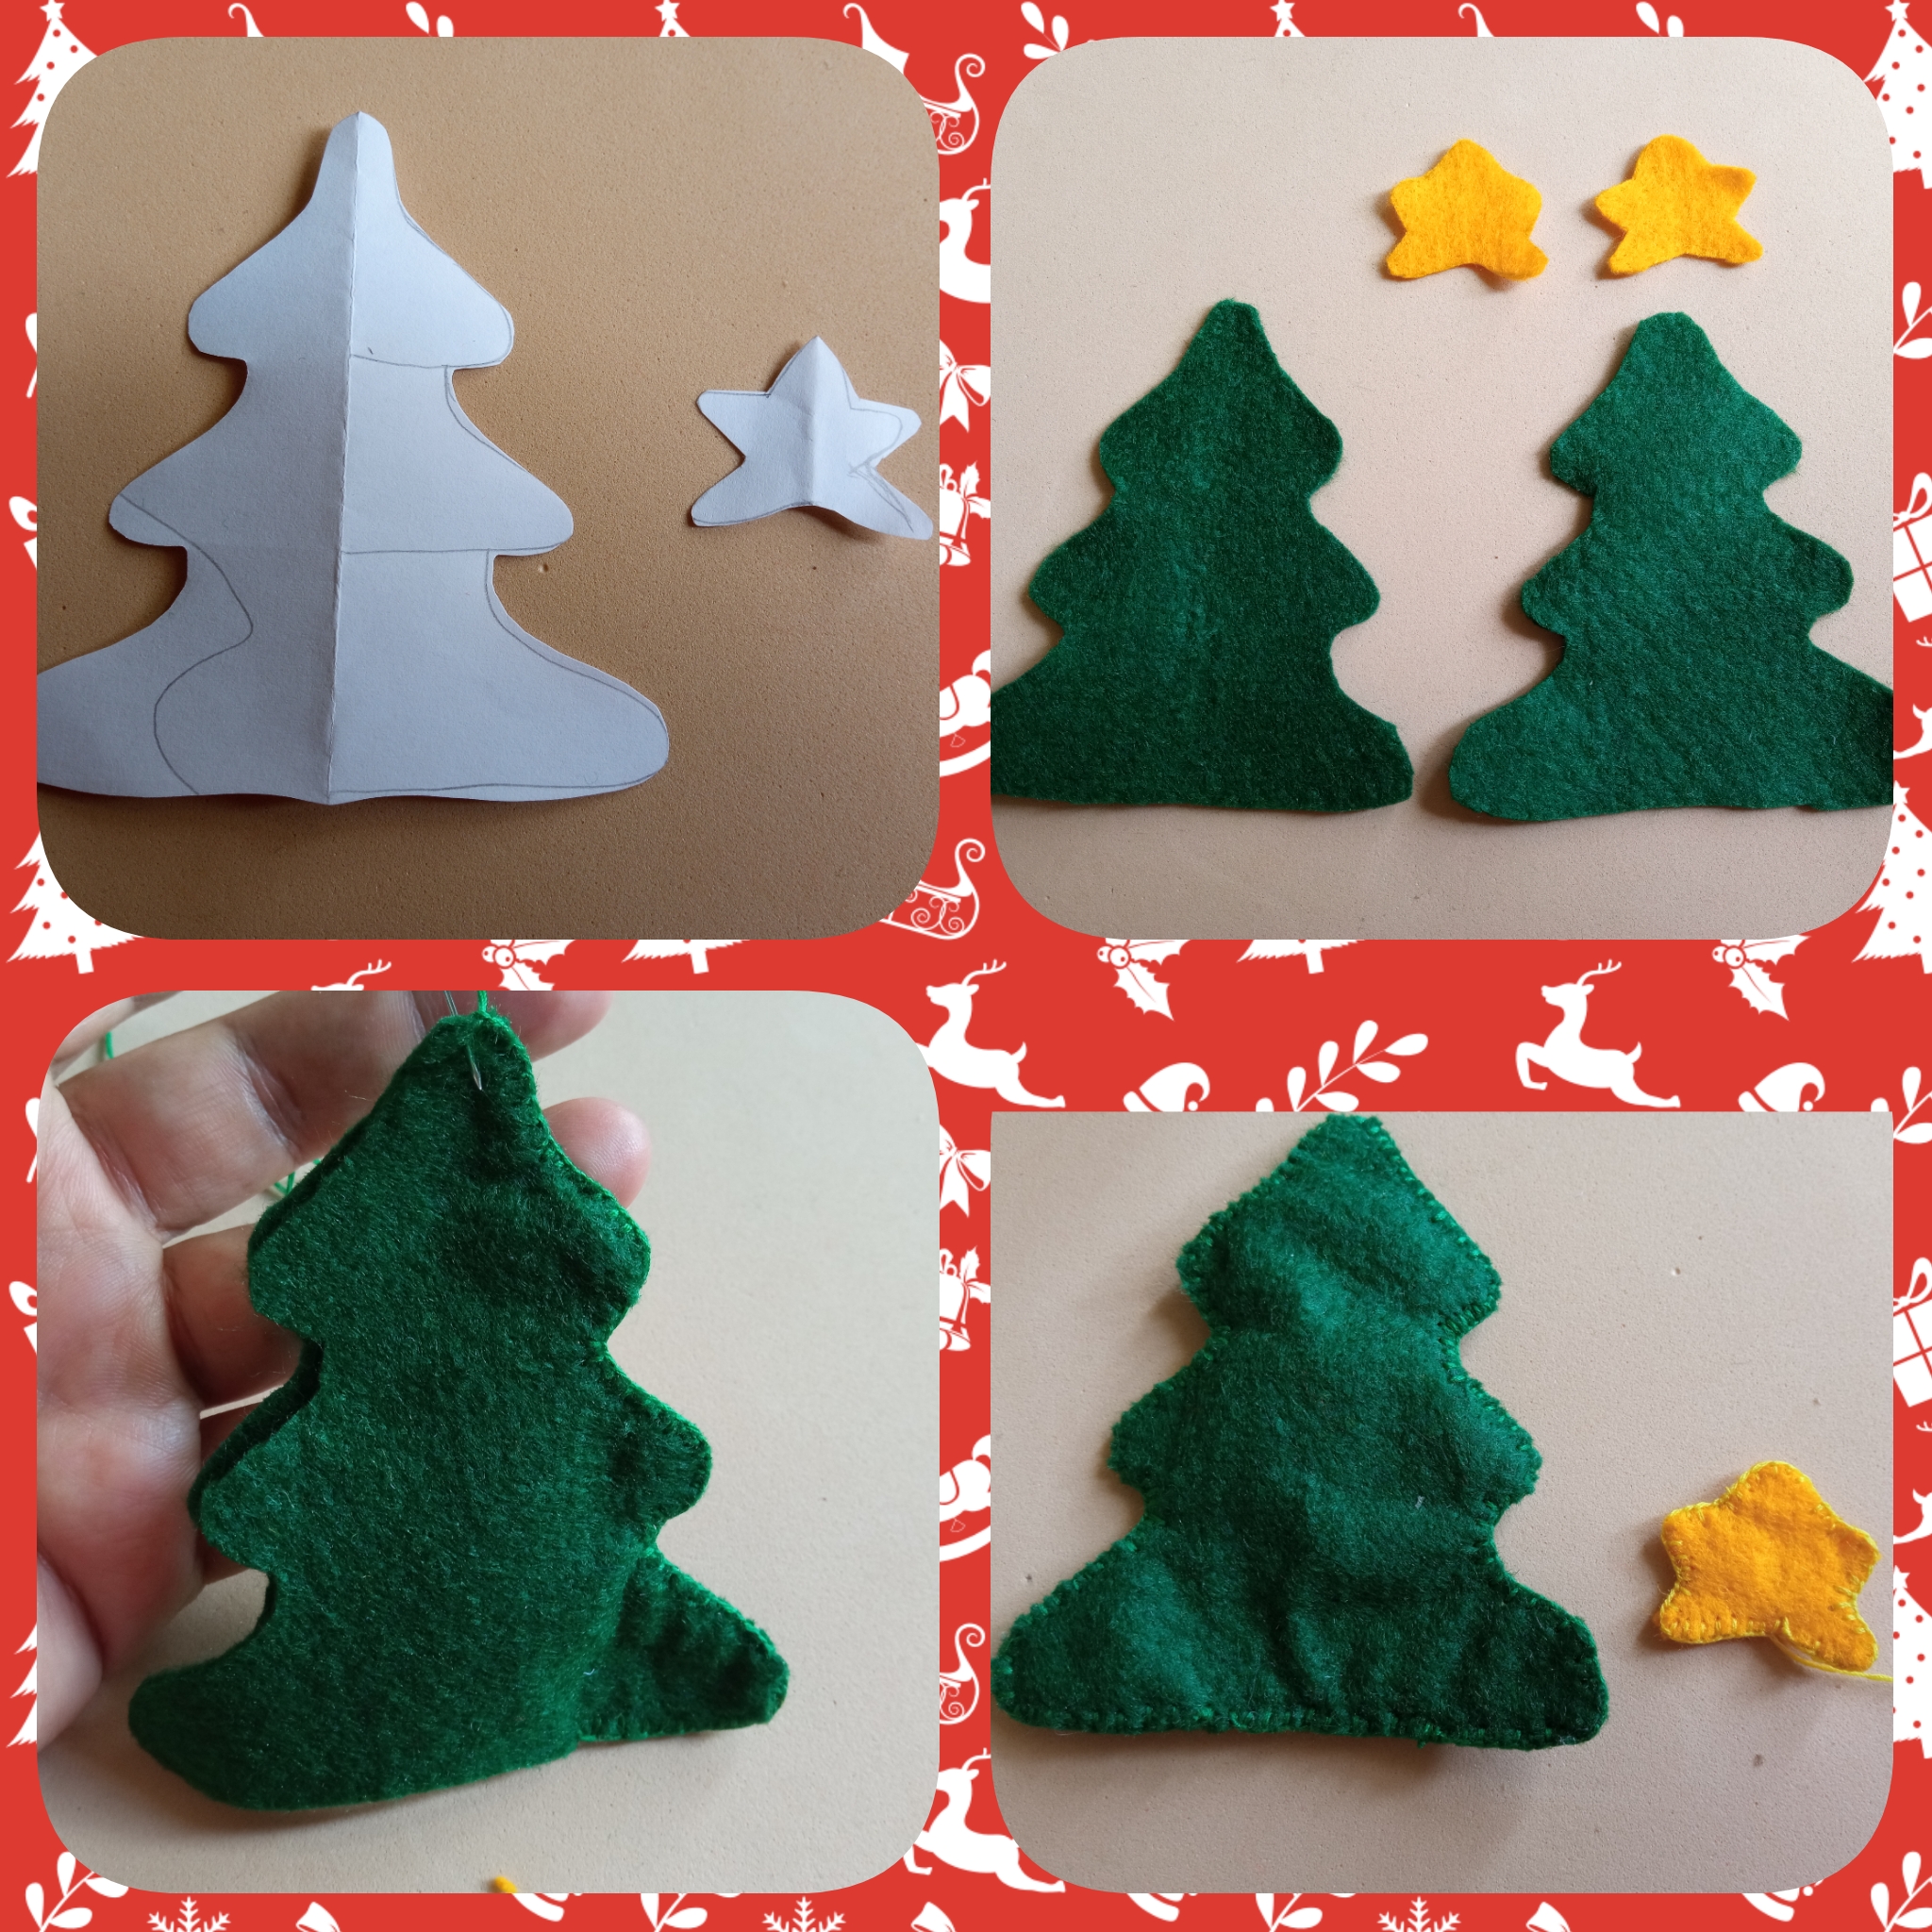
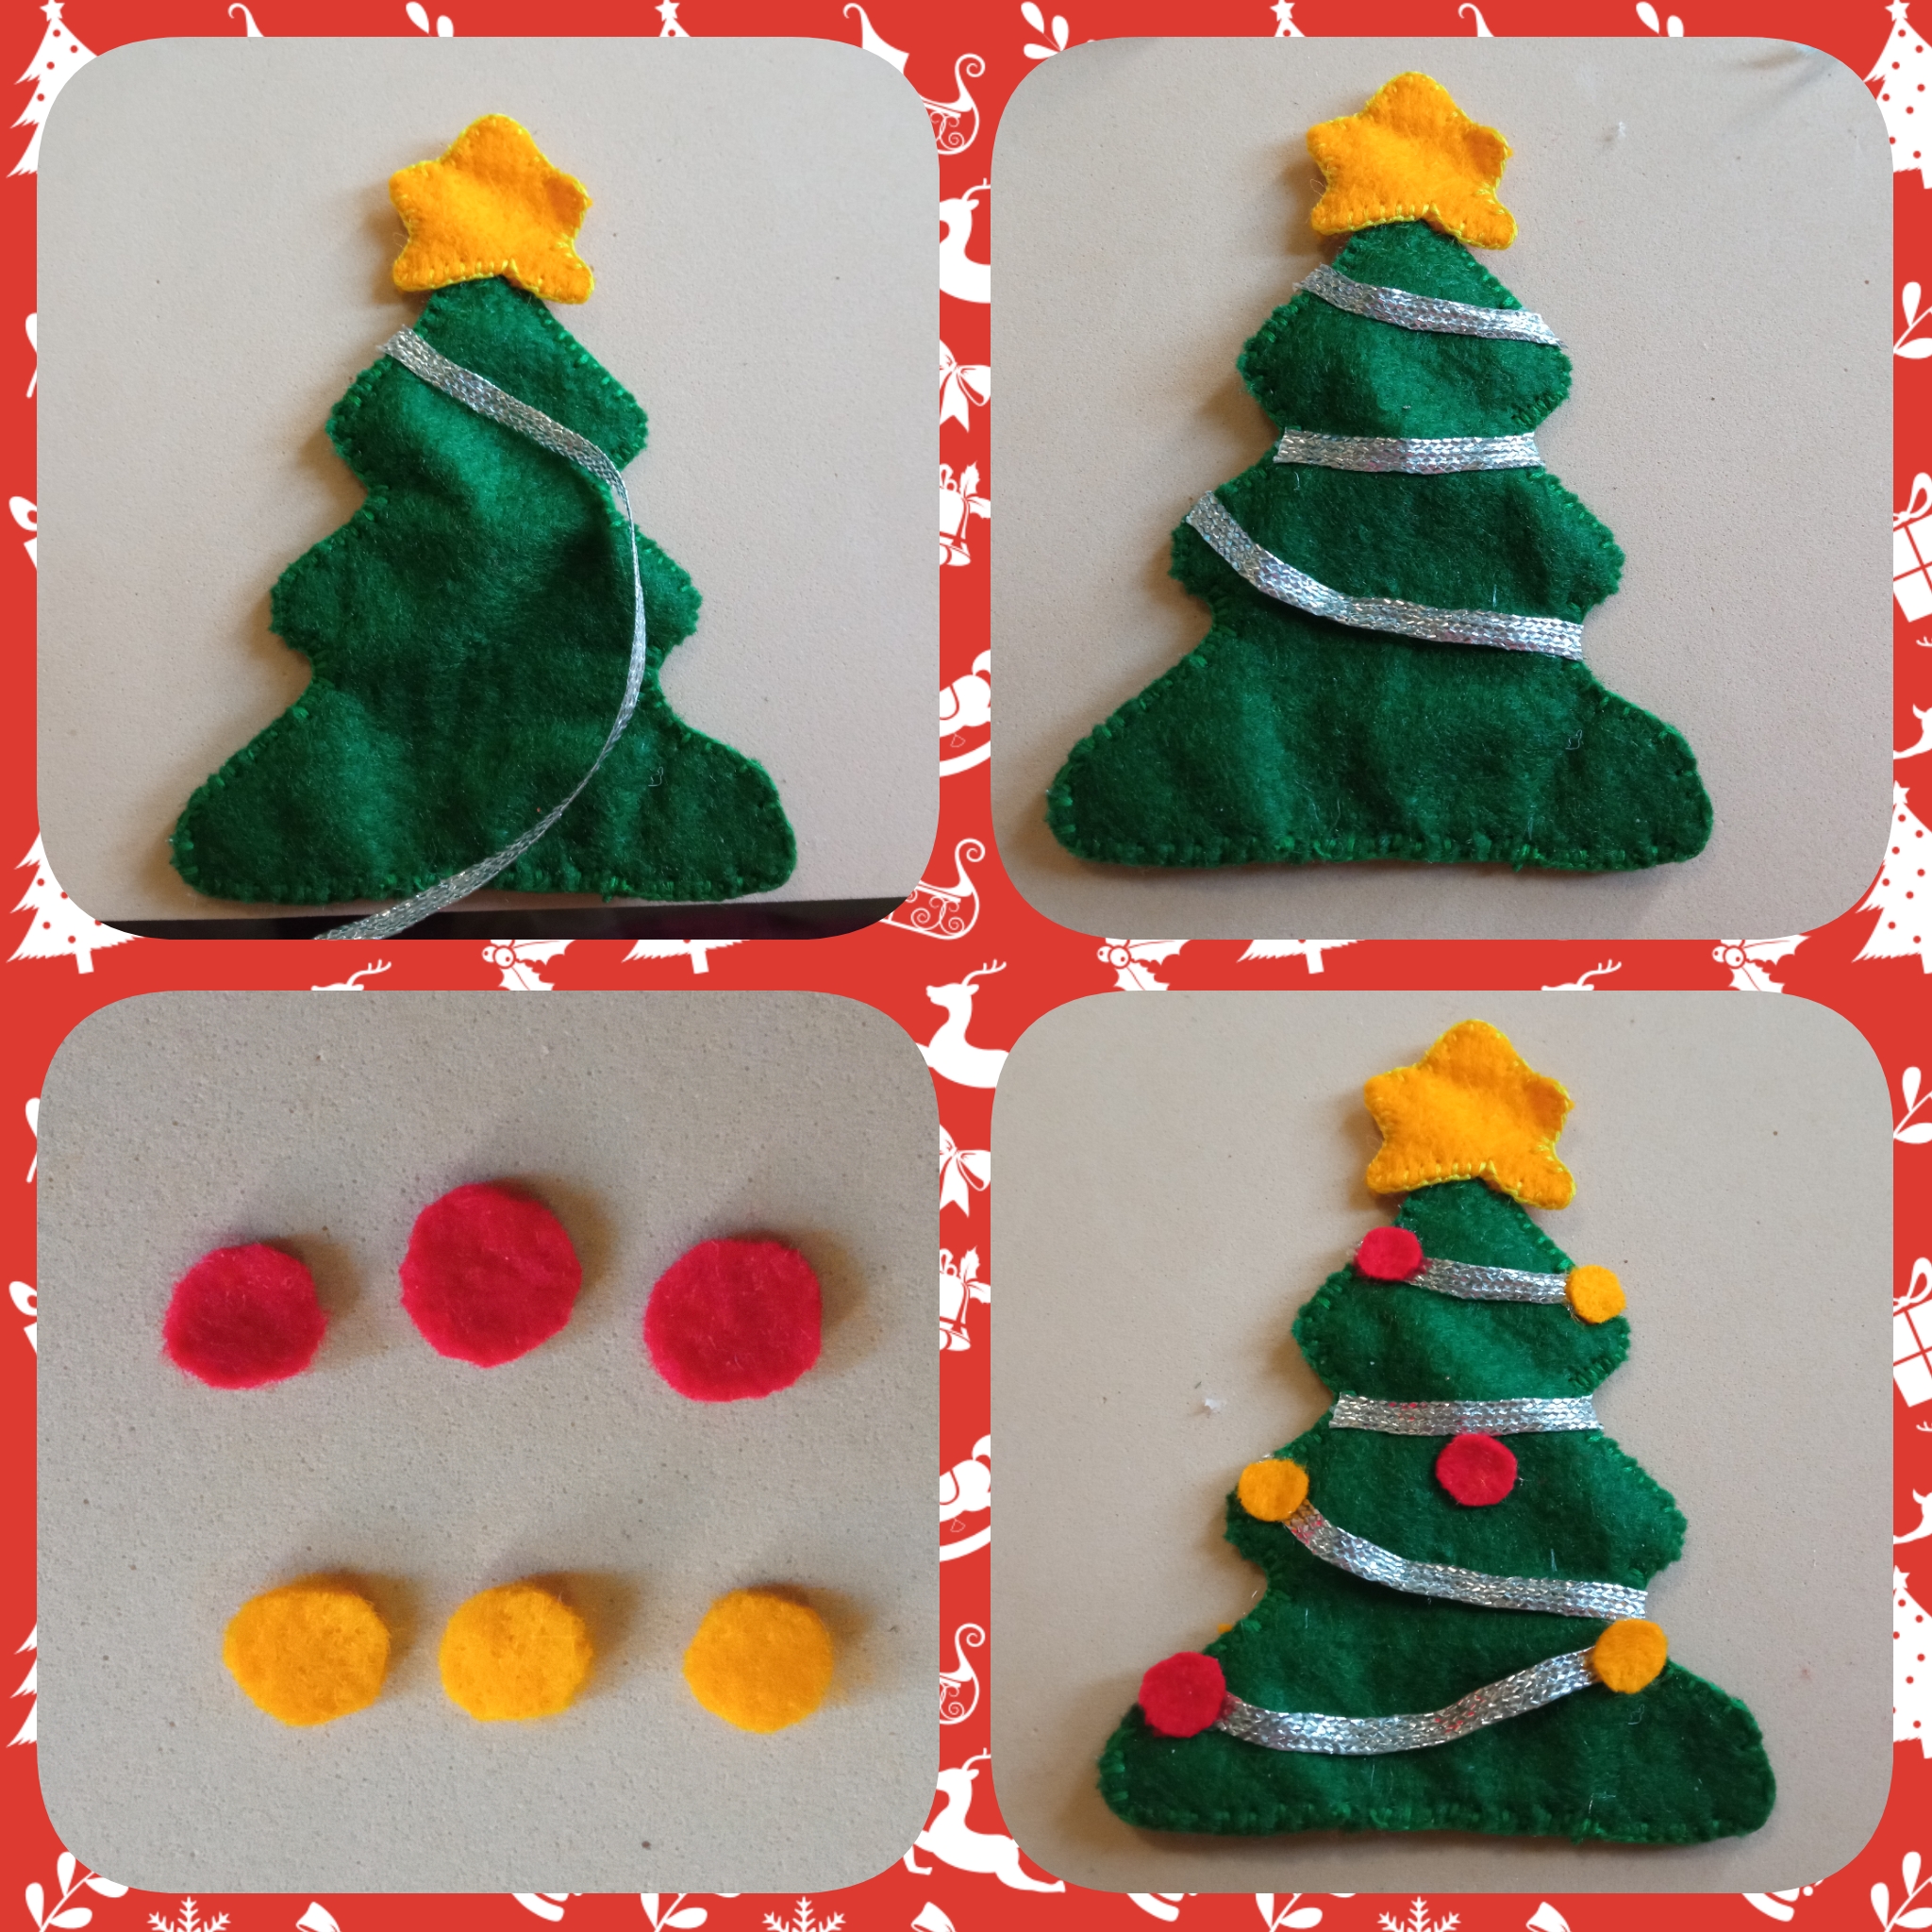
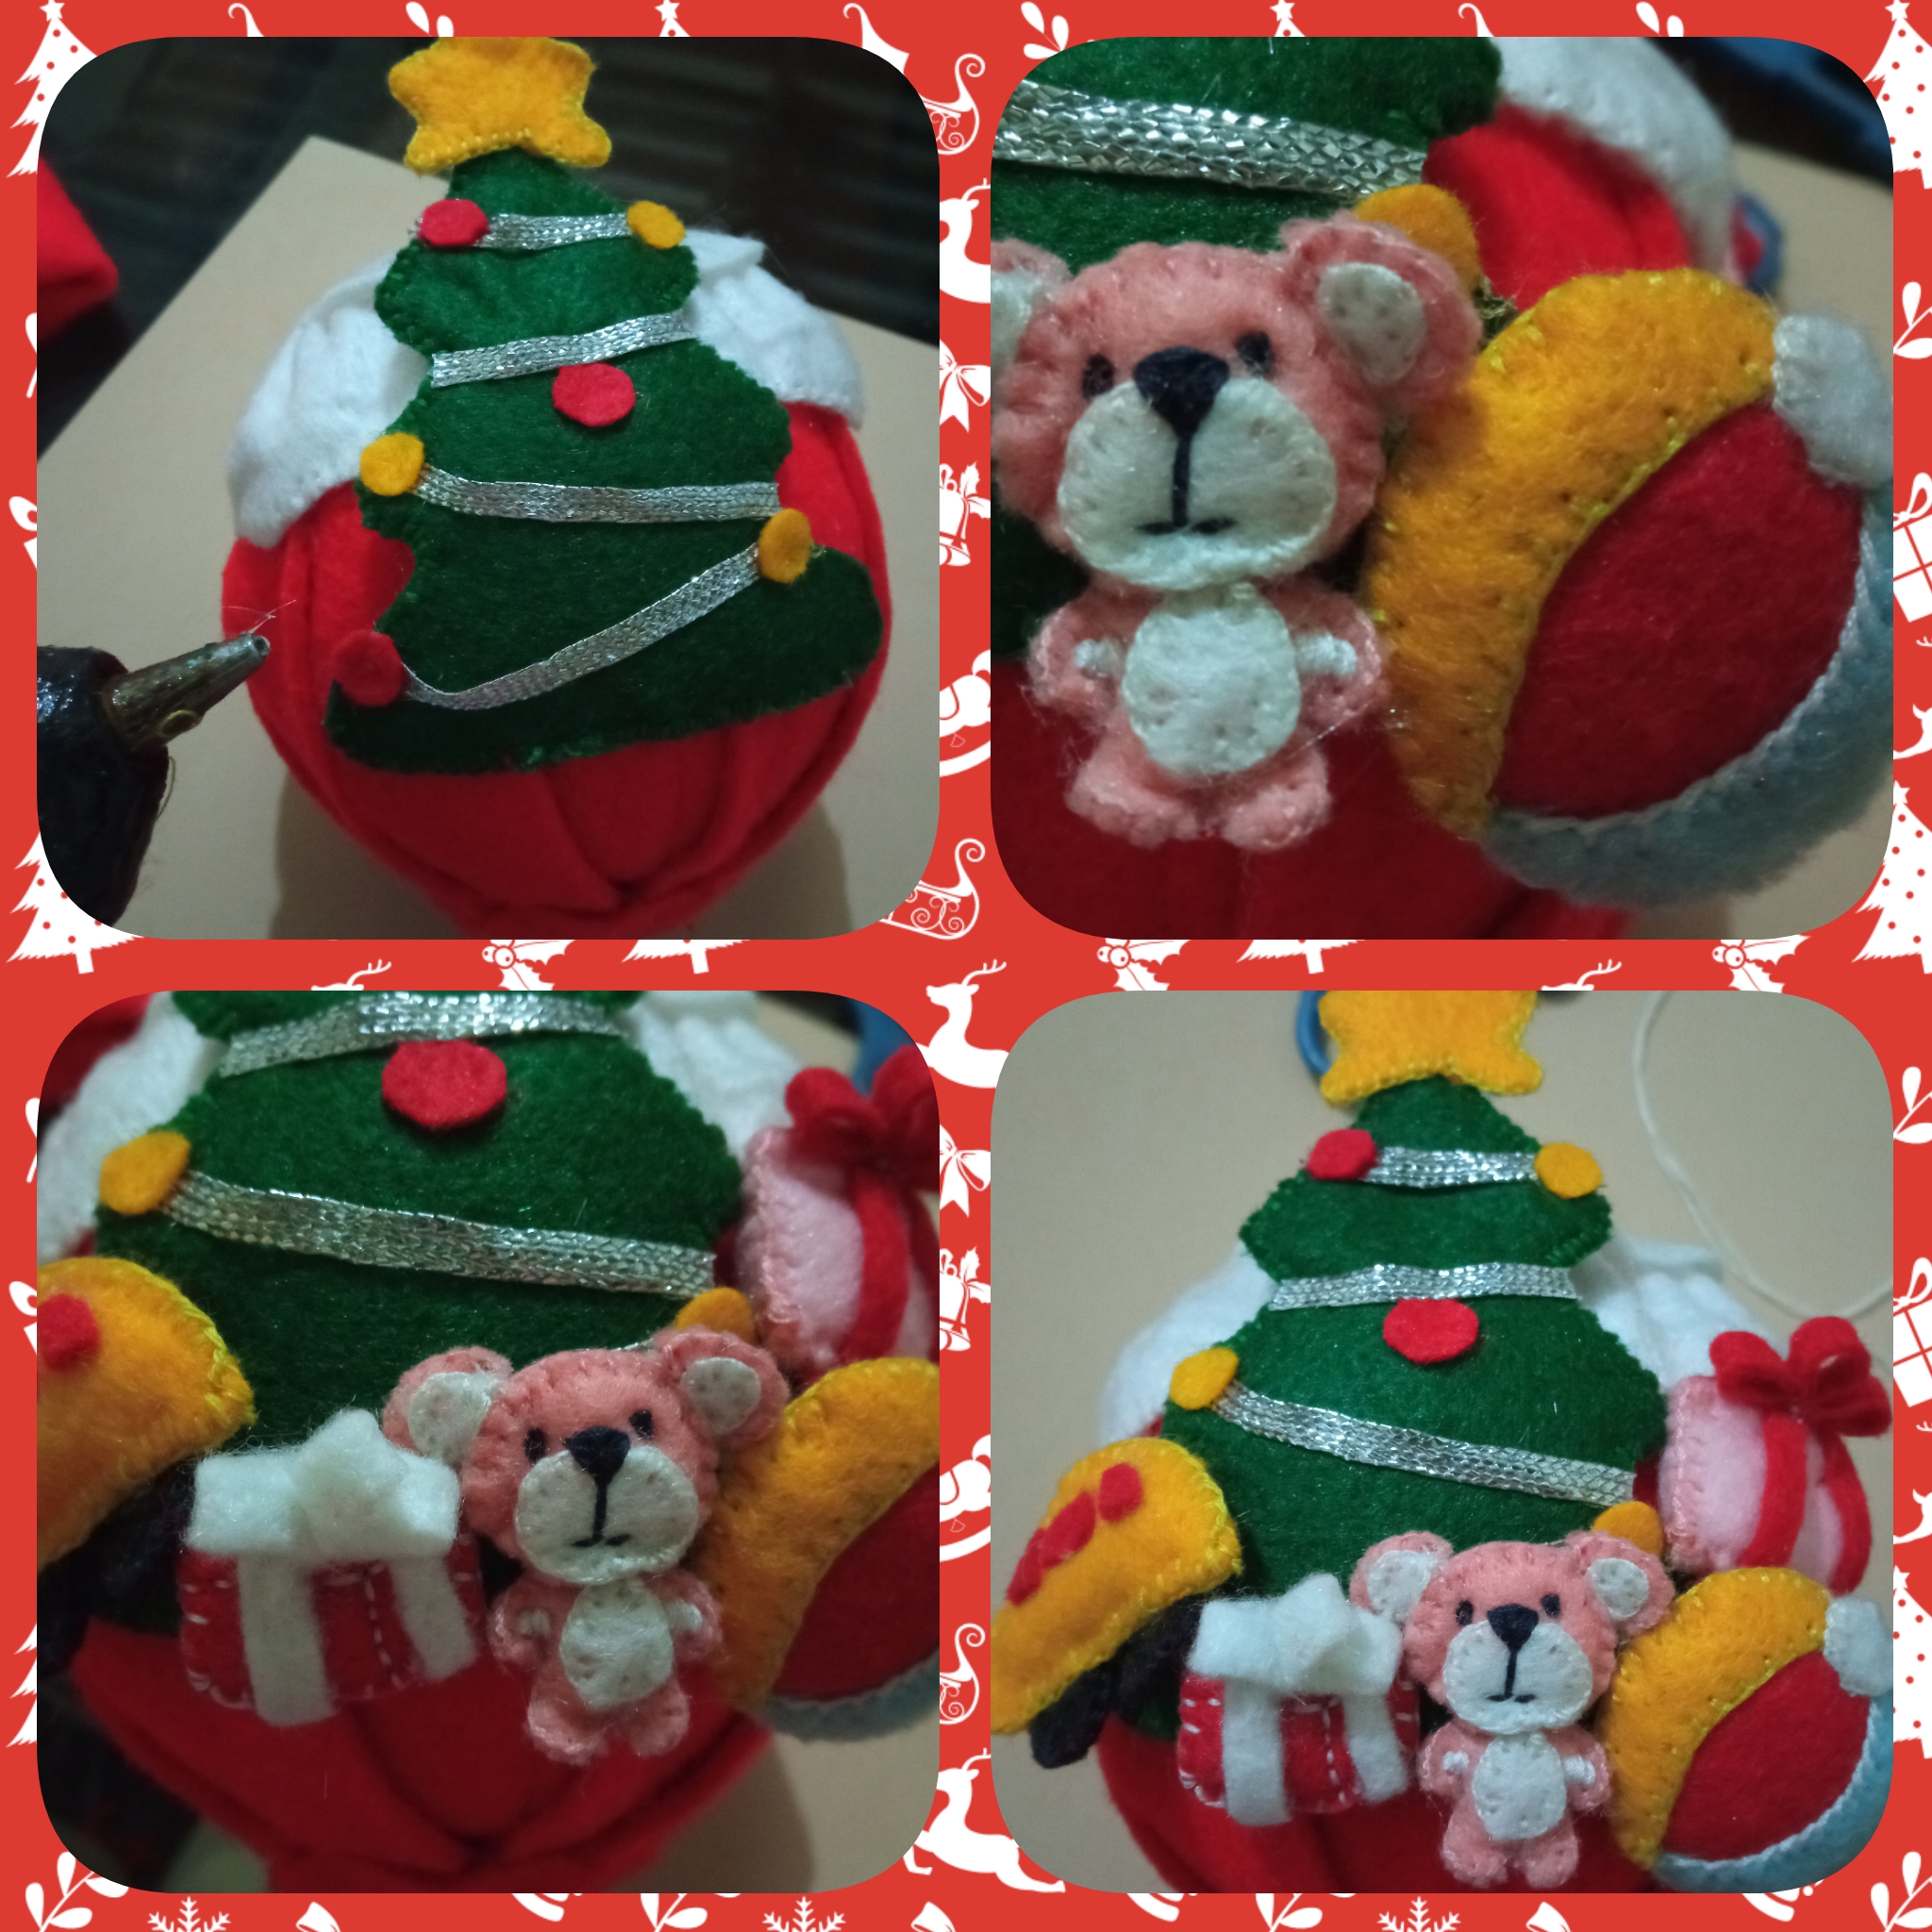
Paso 5:
Dibujamos un arbolito y la estrella cortamos, luego en fieltro verde marcamos y cortamos 2 piezas del arbolito unimos las piezas cosemos con punto ojal. Después dos piezas de la estrella en fieltro amarillo, unimos cosemos con punto ojal. Para finalizar cosemos la estrella en la punta del arbolito. Tomamos la cinta plateada y adornamos el arbolito, recortamos círculos rojos y amarillos y se lo pegamos.
Paso 5:
We draw a tree and cut the star, then in green felt we mark and cut 2 pieces of the tree, join the pieces and sew with buttonhole stitch. Then we cut two pieces of the star in yellow felt, join them together and sew with buttonhole stitch. Finally we sew the star at the end of the tree. We take the silver ribbon and decorate the tree, cut out red and yellow circles and glue it.
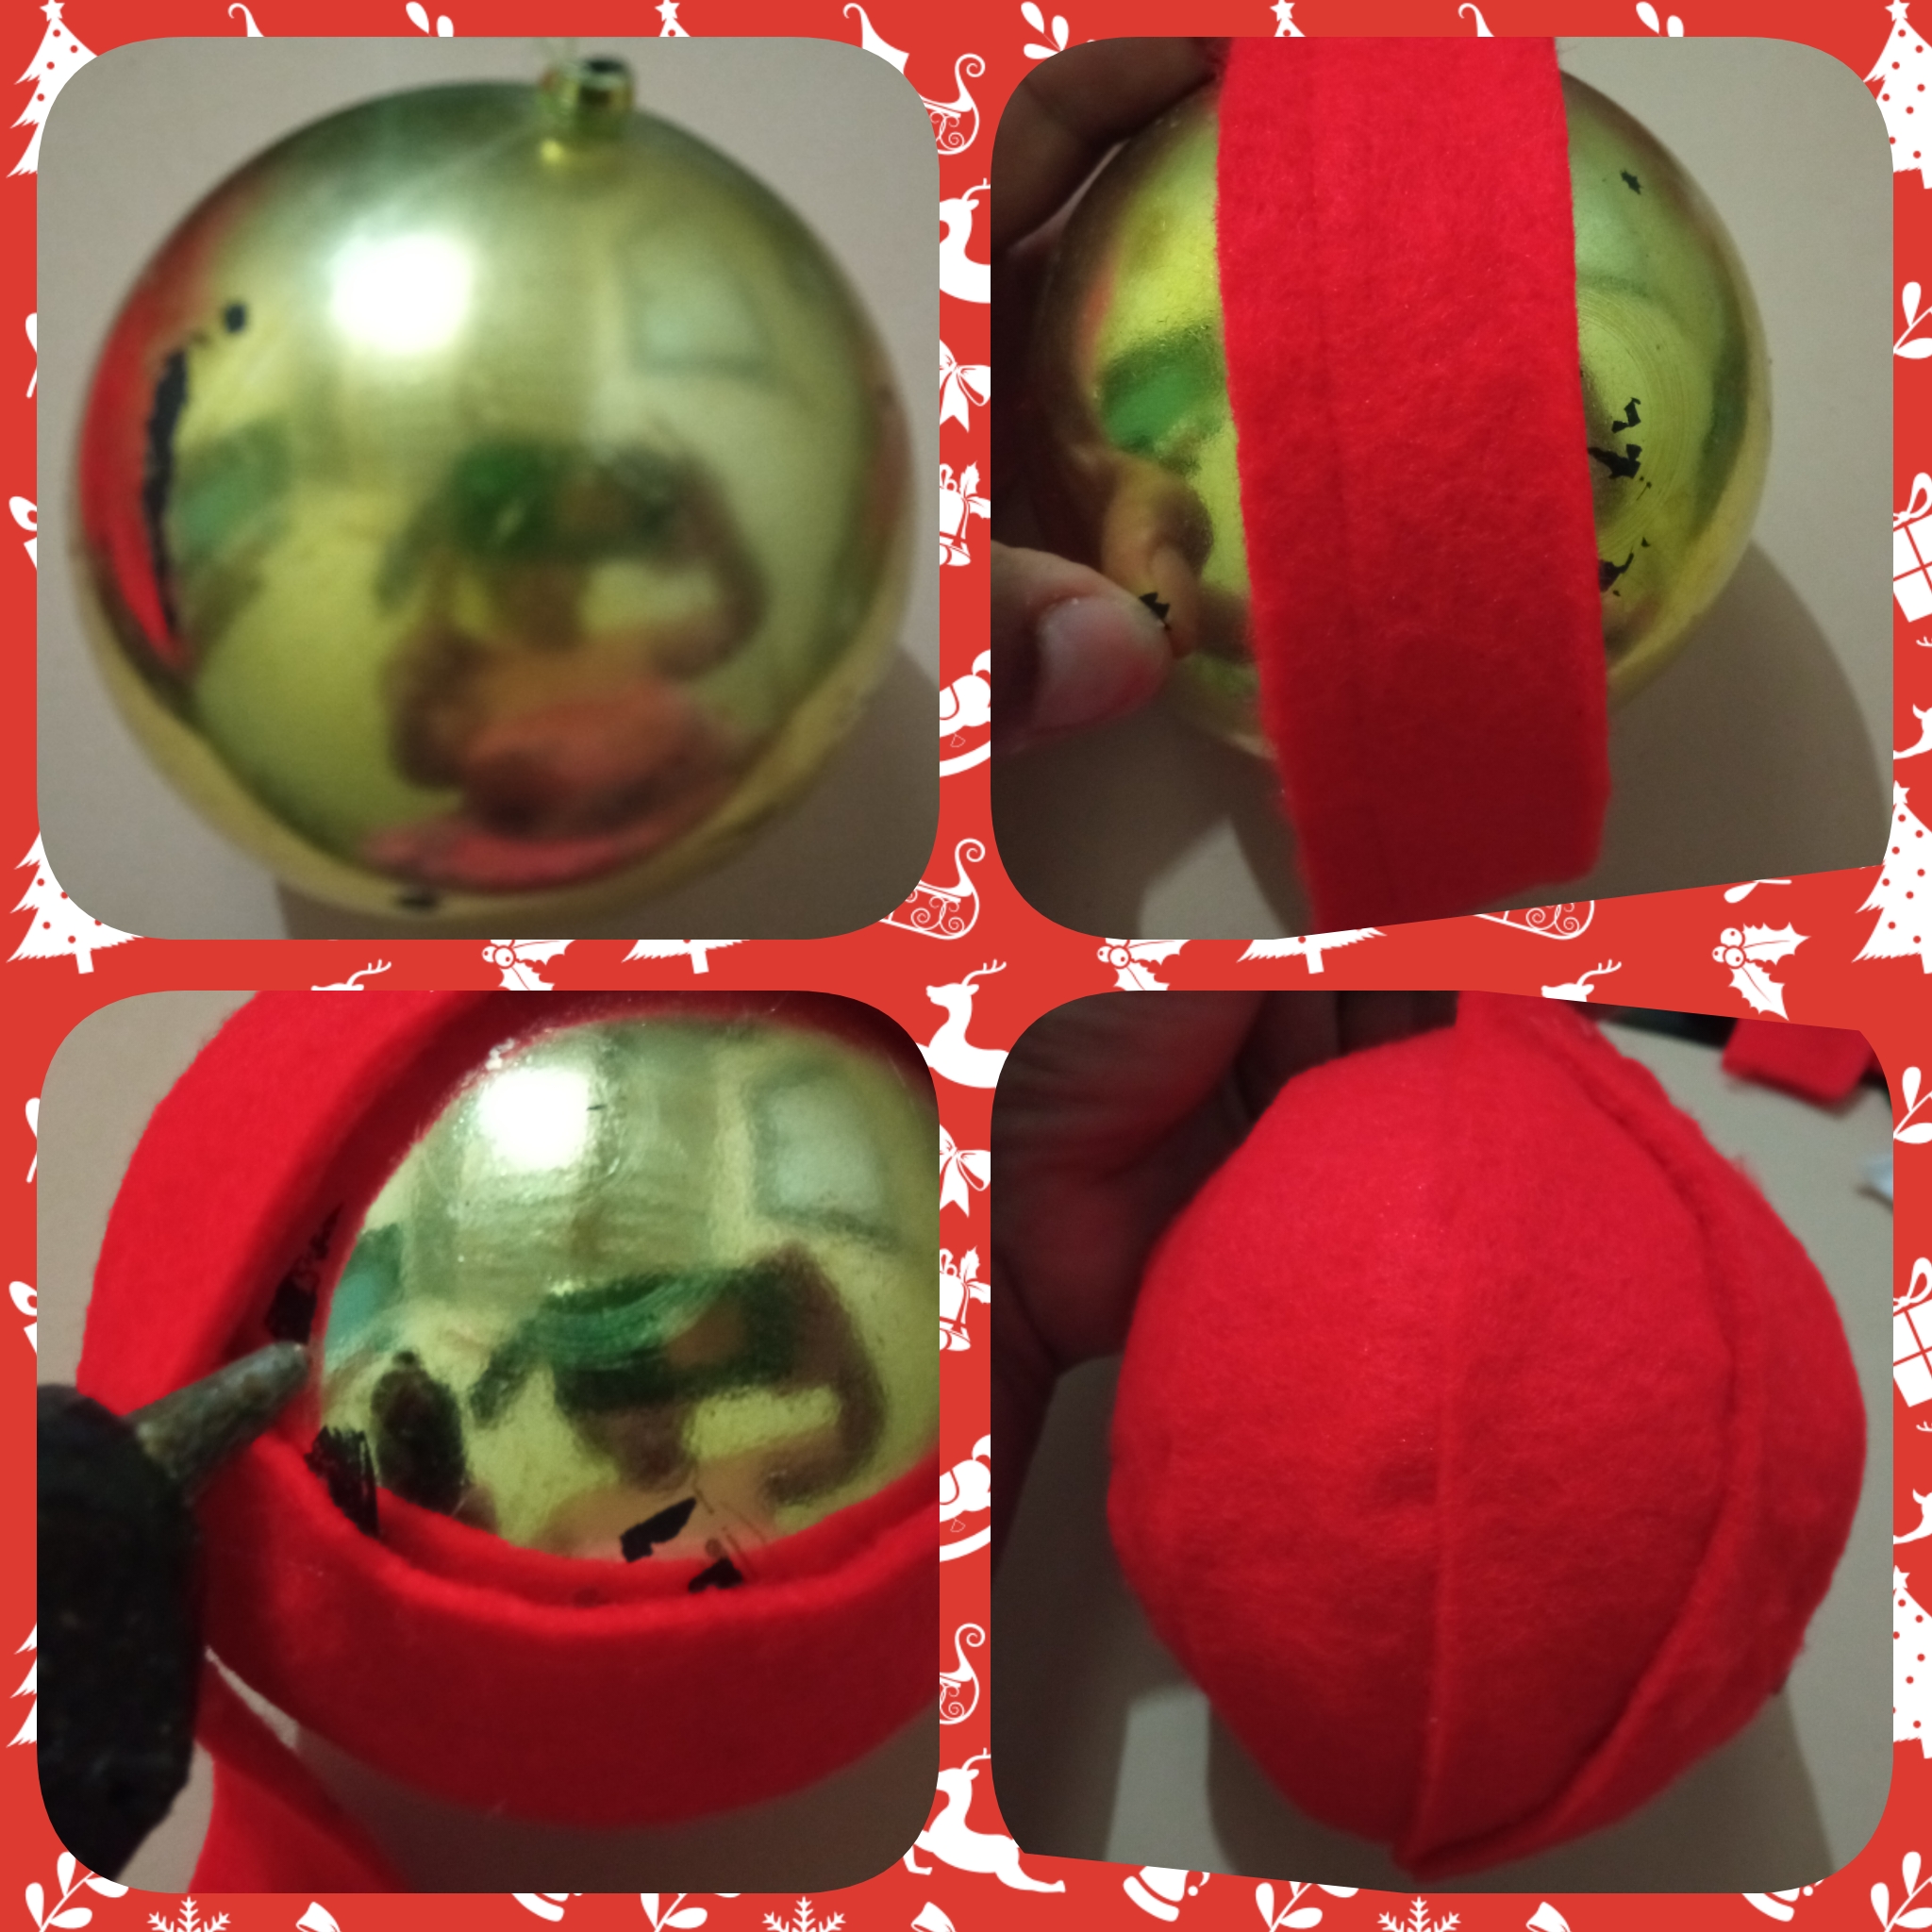
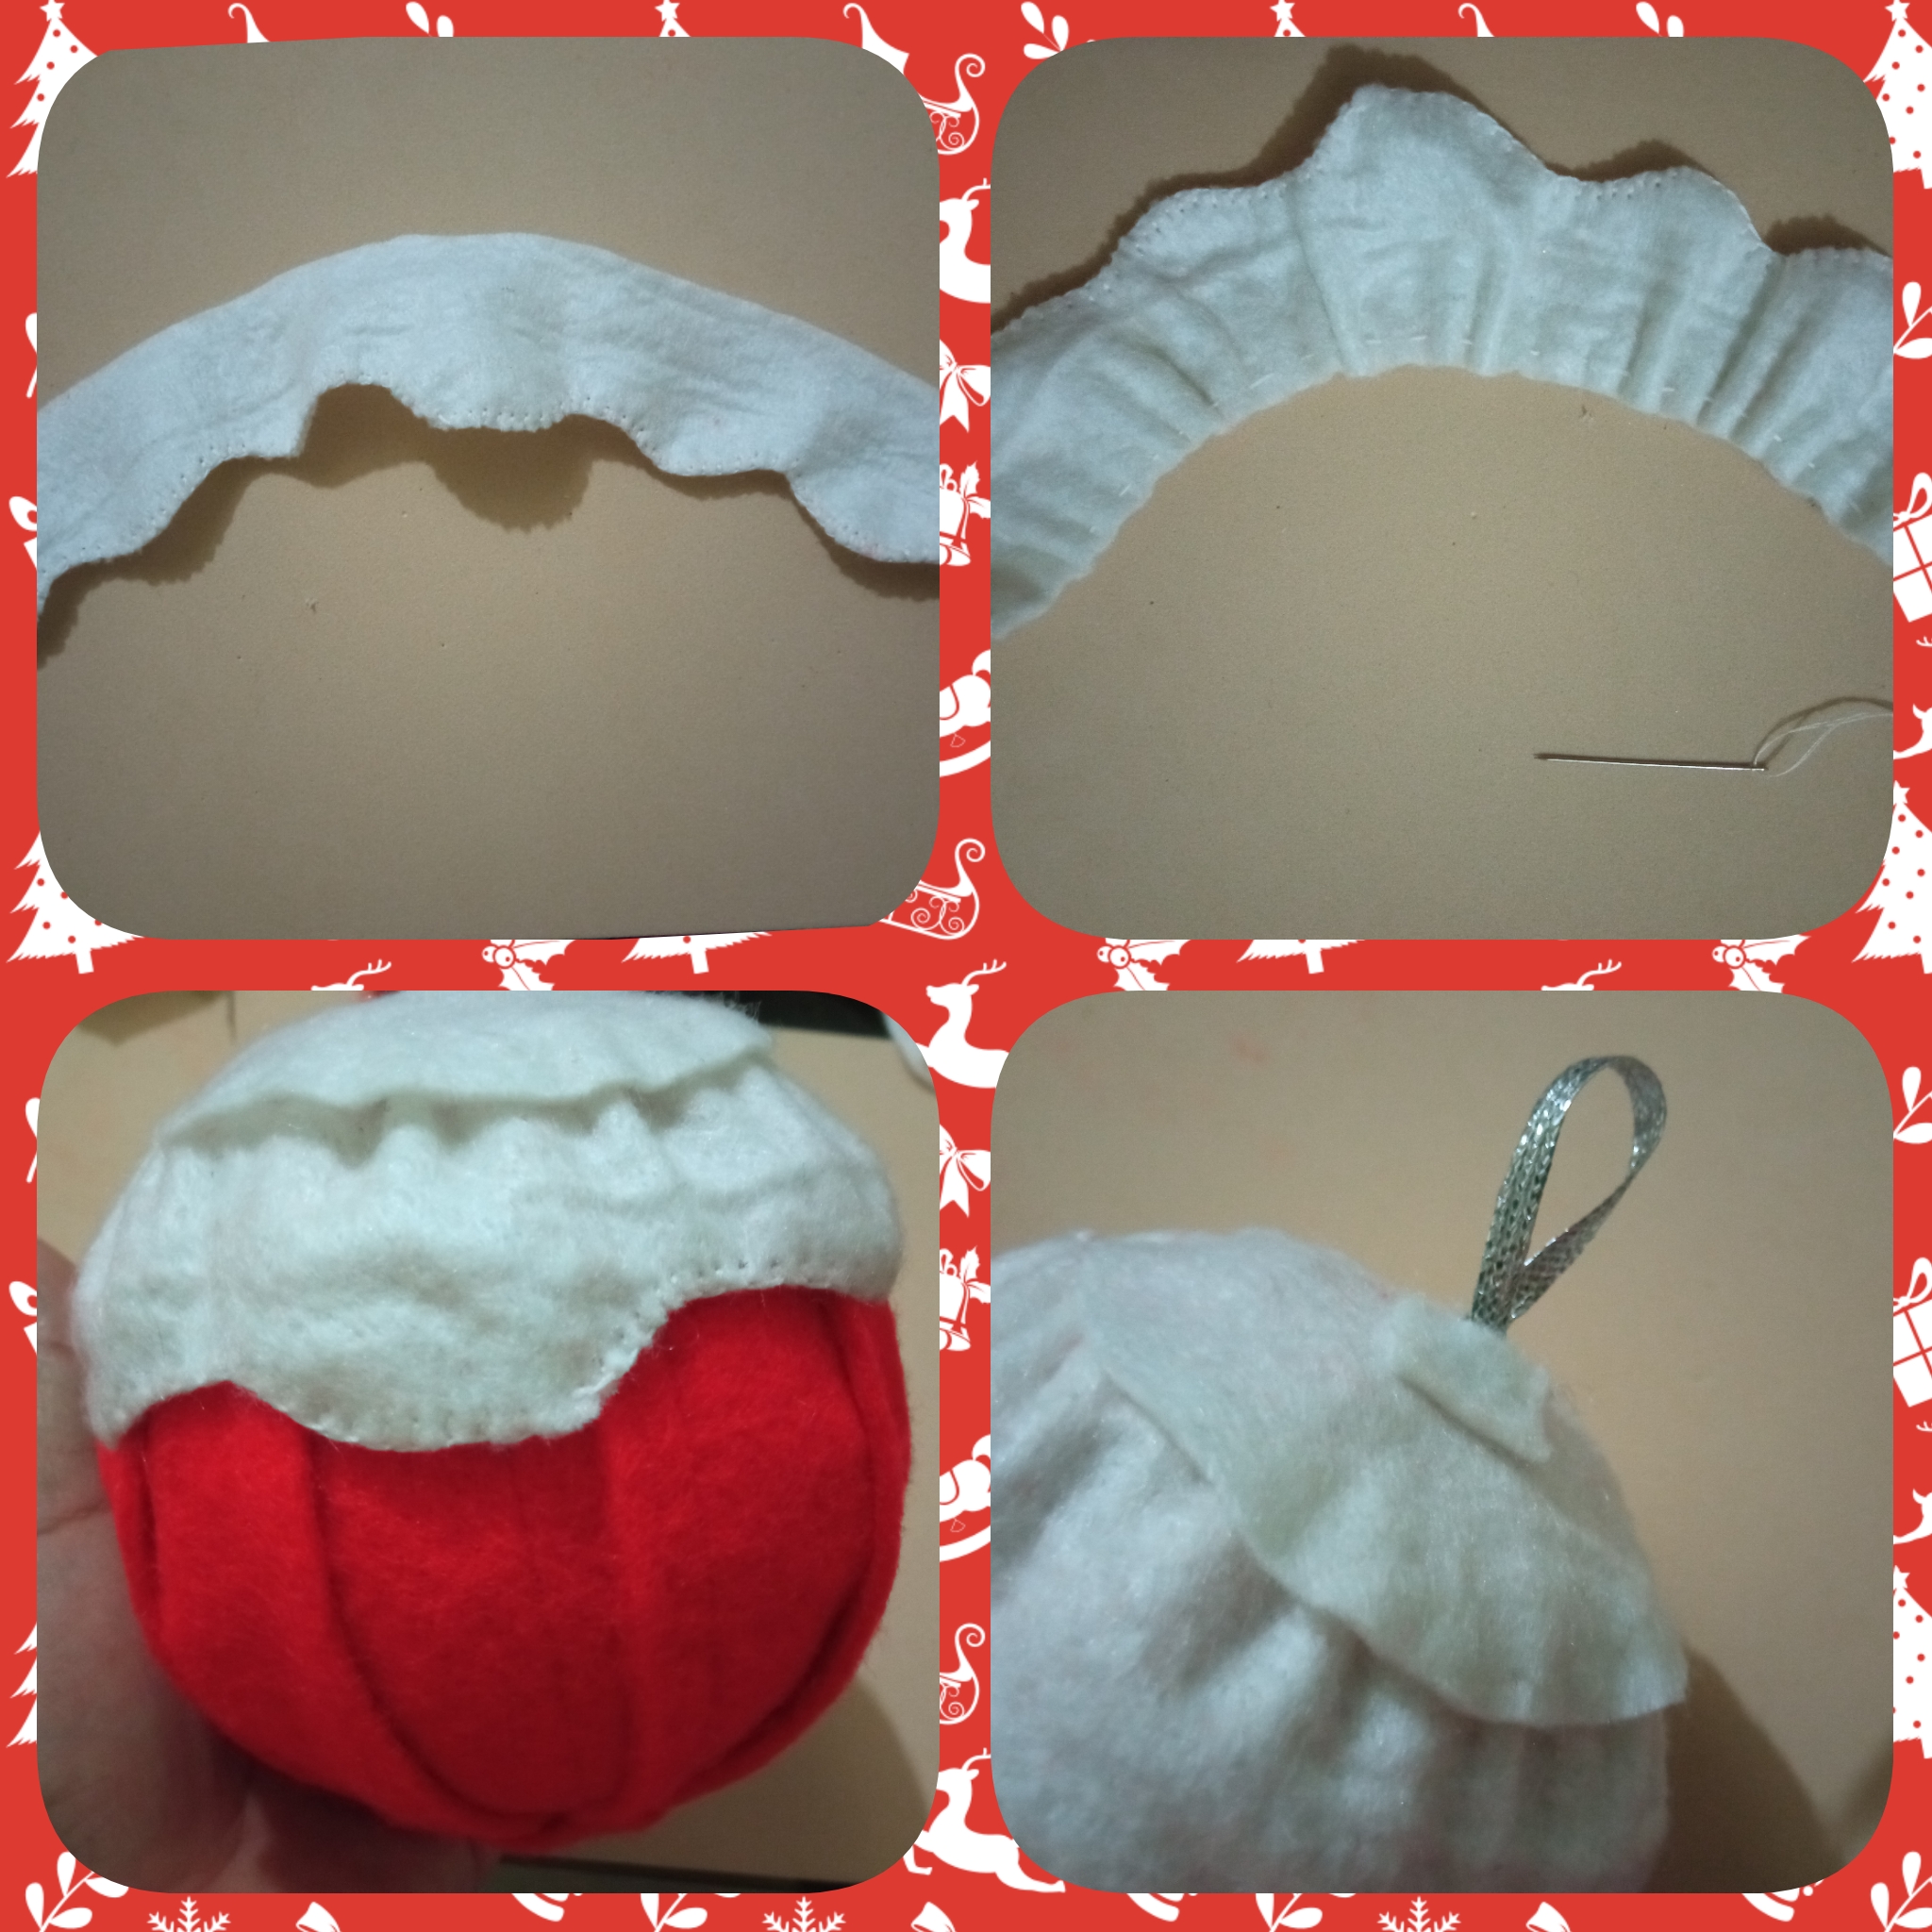
Paso 6:
Ahora tomo la bola y corto tiras de 3cm en fieltro rojo y voy forrando de manera que mi bola quedé bien forrada. Luego corto una tira en fieltro blanco de 30 cm de largo y 5 cm de ancho por un lado contó en curvas, luego coso con punto ojal. Listo se lo pegó a mi bola con Silicon caliente en la parte superior, luego corto un círculo y se lo pegó. Para finalizar corto un trozo de cinta doblo y se lo pegó a la bola para poder guindar.
Paso 6:
Now I take the ball and cut 3cm strips of red felt and I go lining it so that my ball is well lined. Then I cut a strip of white felt 30 cm long and 5 cm wide on one side and counted in curves, then I sew with buttonhole stitch. I glued it to my ball with hot silicon on the top, then I cut a circle and glued it. To finish, I cut a piece of ribbon and glued it to the ball to be able to hang it.
Paso 7:
Ahora comienzo a pegar con silicon caliente cada detalle, pego primero el arbolito de Navidad, luego el osito, la pelota, el carro y las cajas de regalos.
Paso 7:
Now I start gluing with hot glue every detail, first I glue the Christmas tree, then the bear, the ball, the car and the gift boxes.
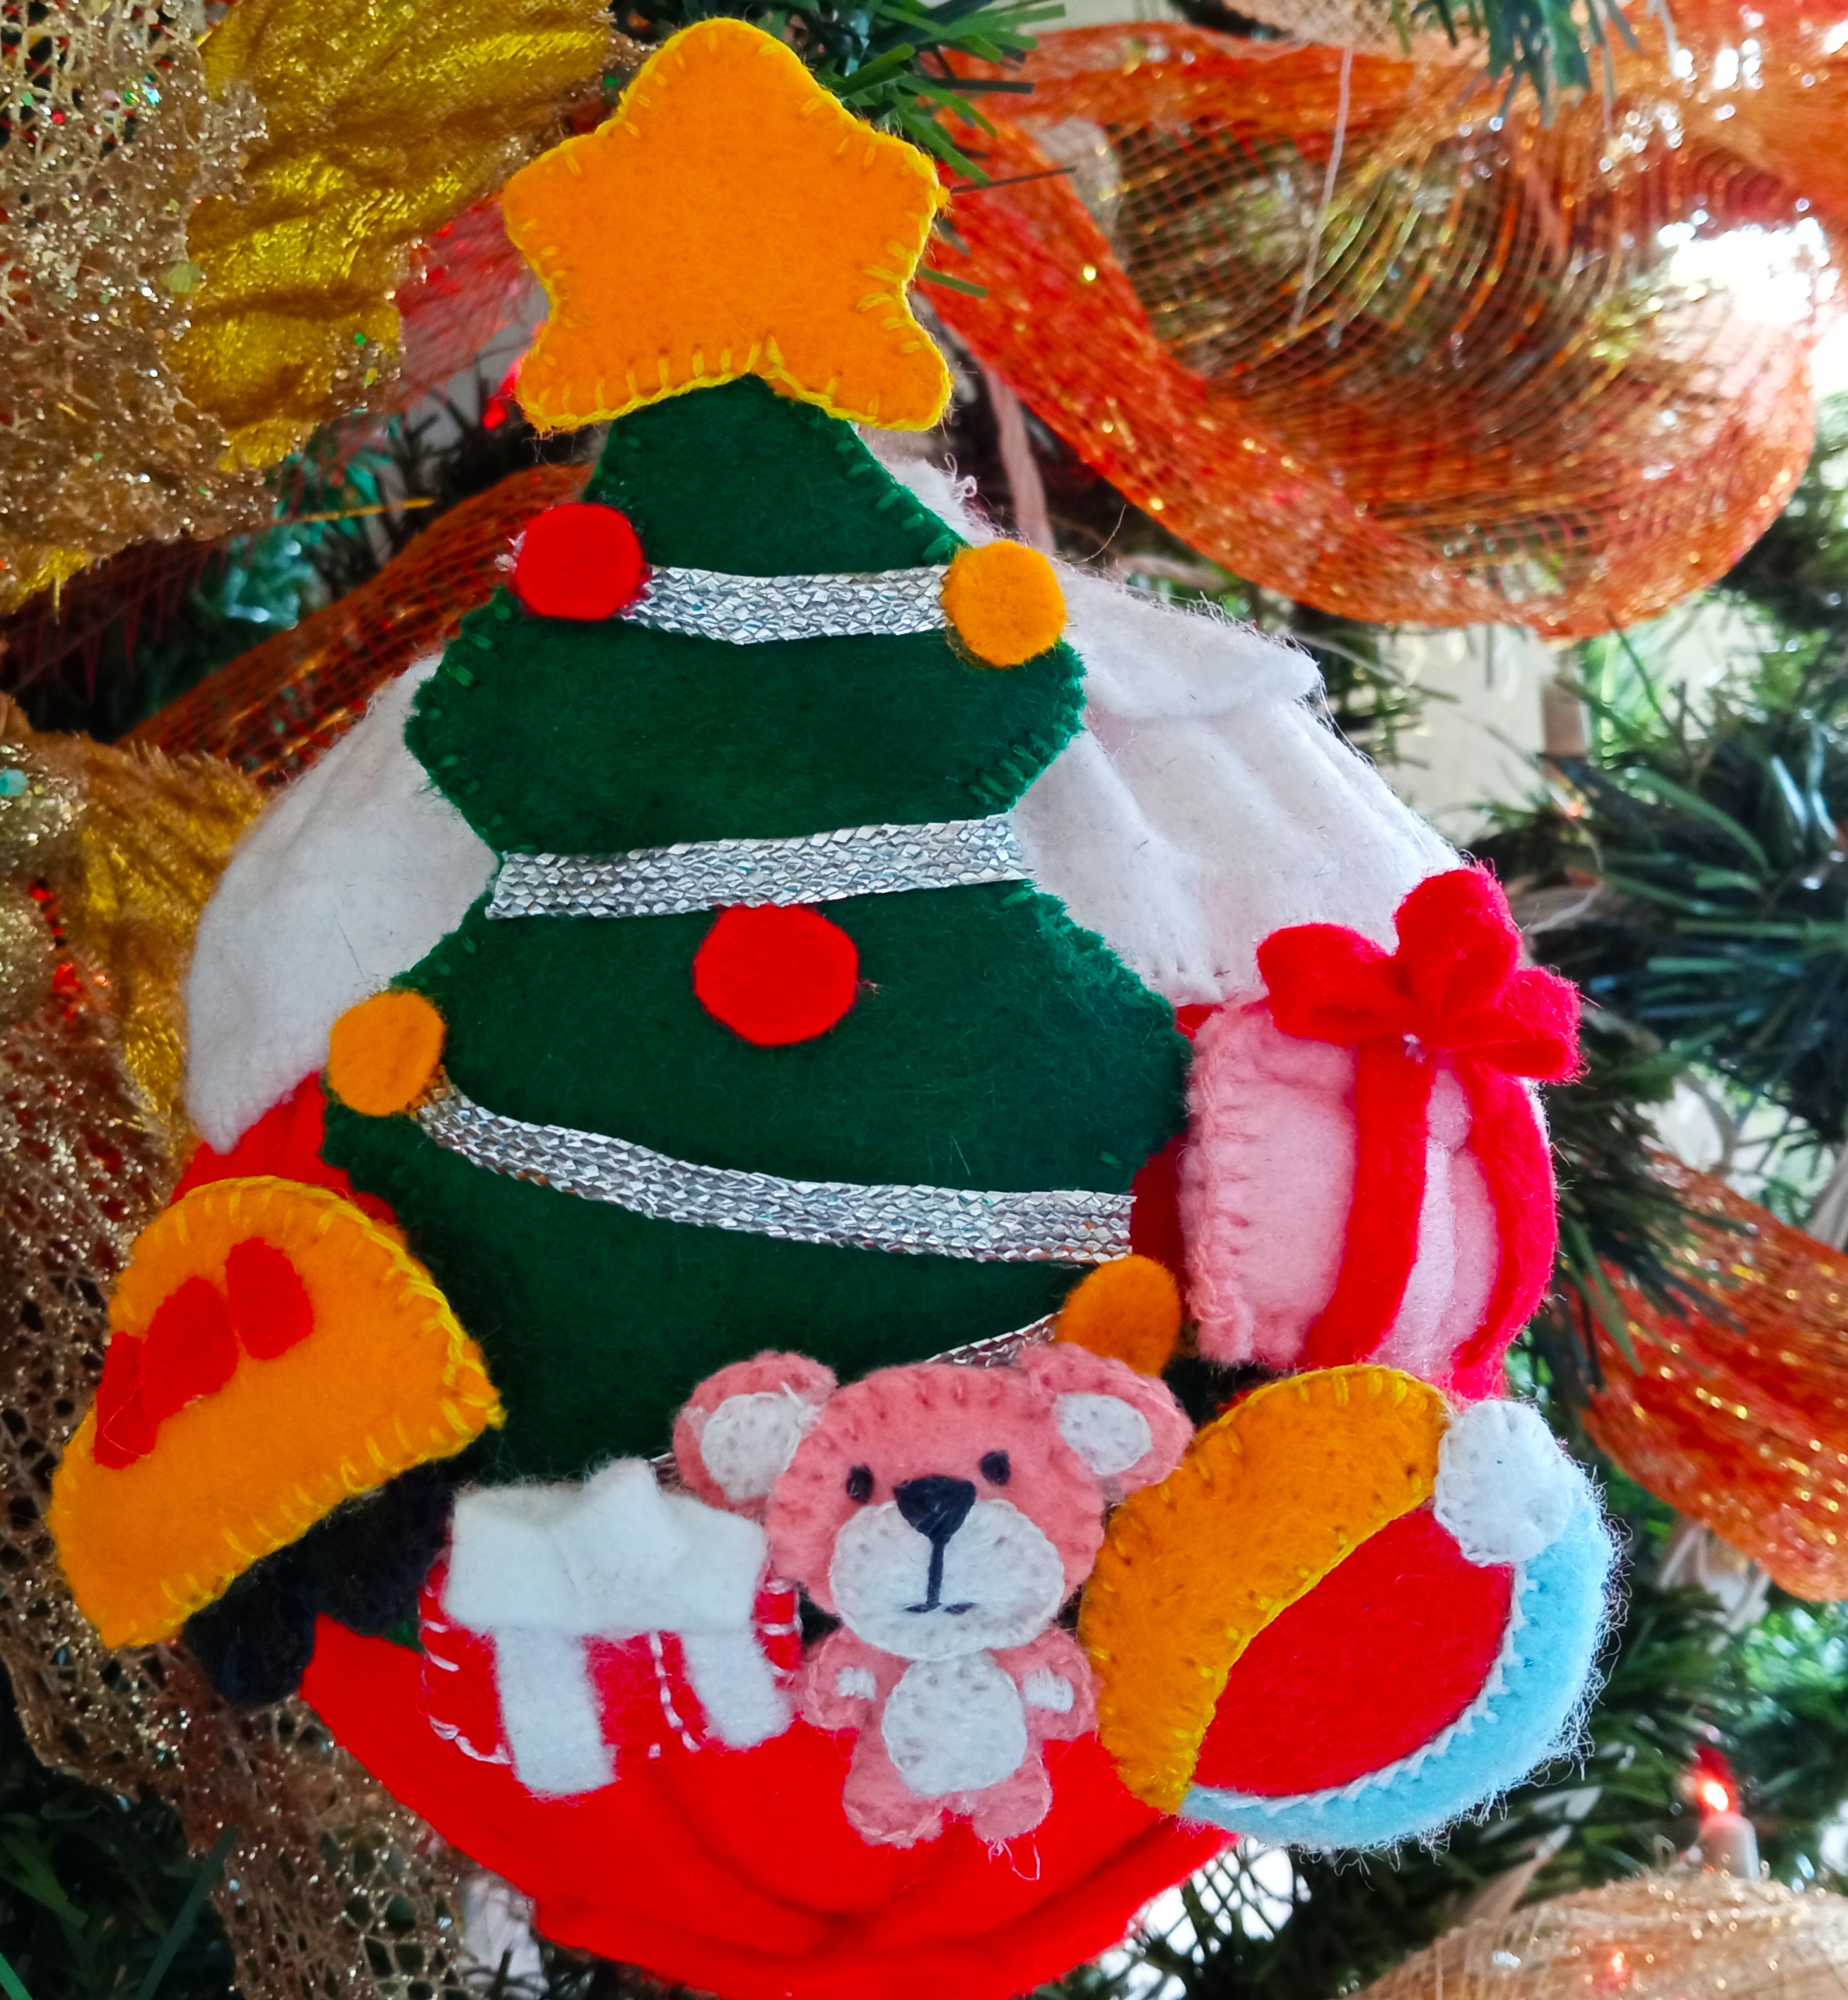
¡Ya mi Esfera está Decorada, Quedó hermosa 😍! / My Sphere is already decorated, it turned out beautiful 😍!
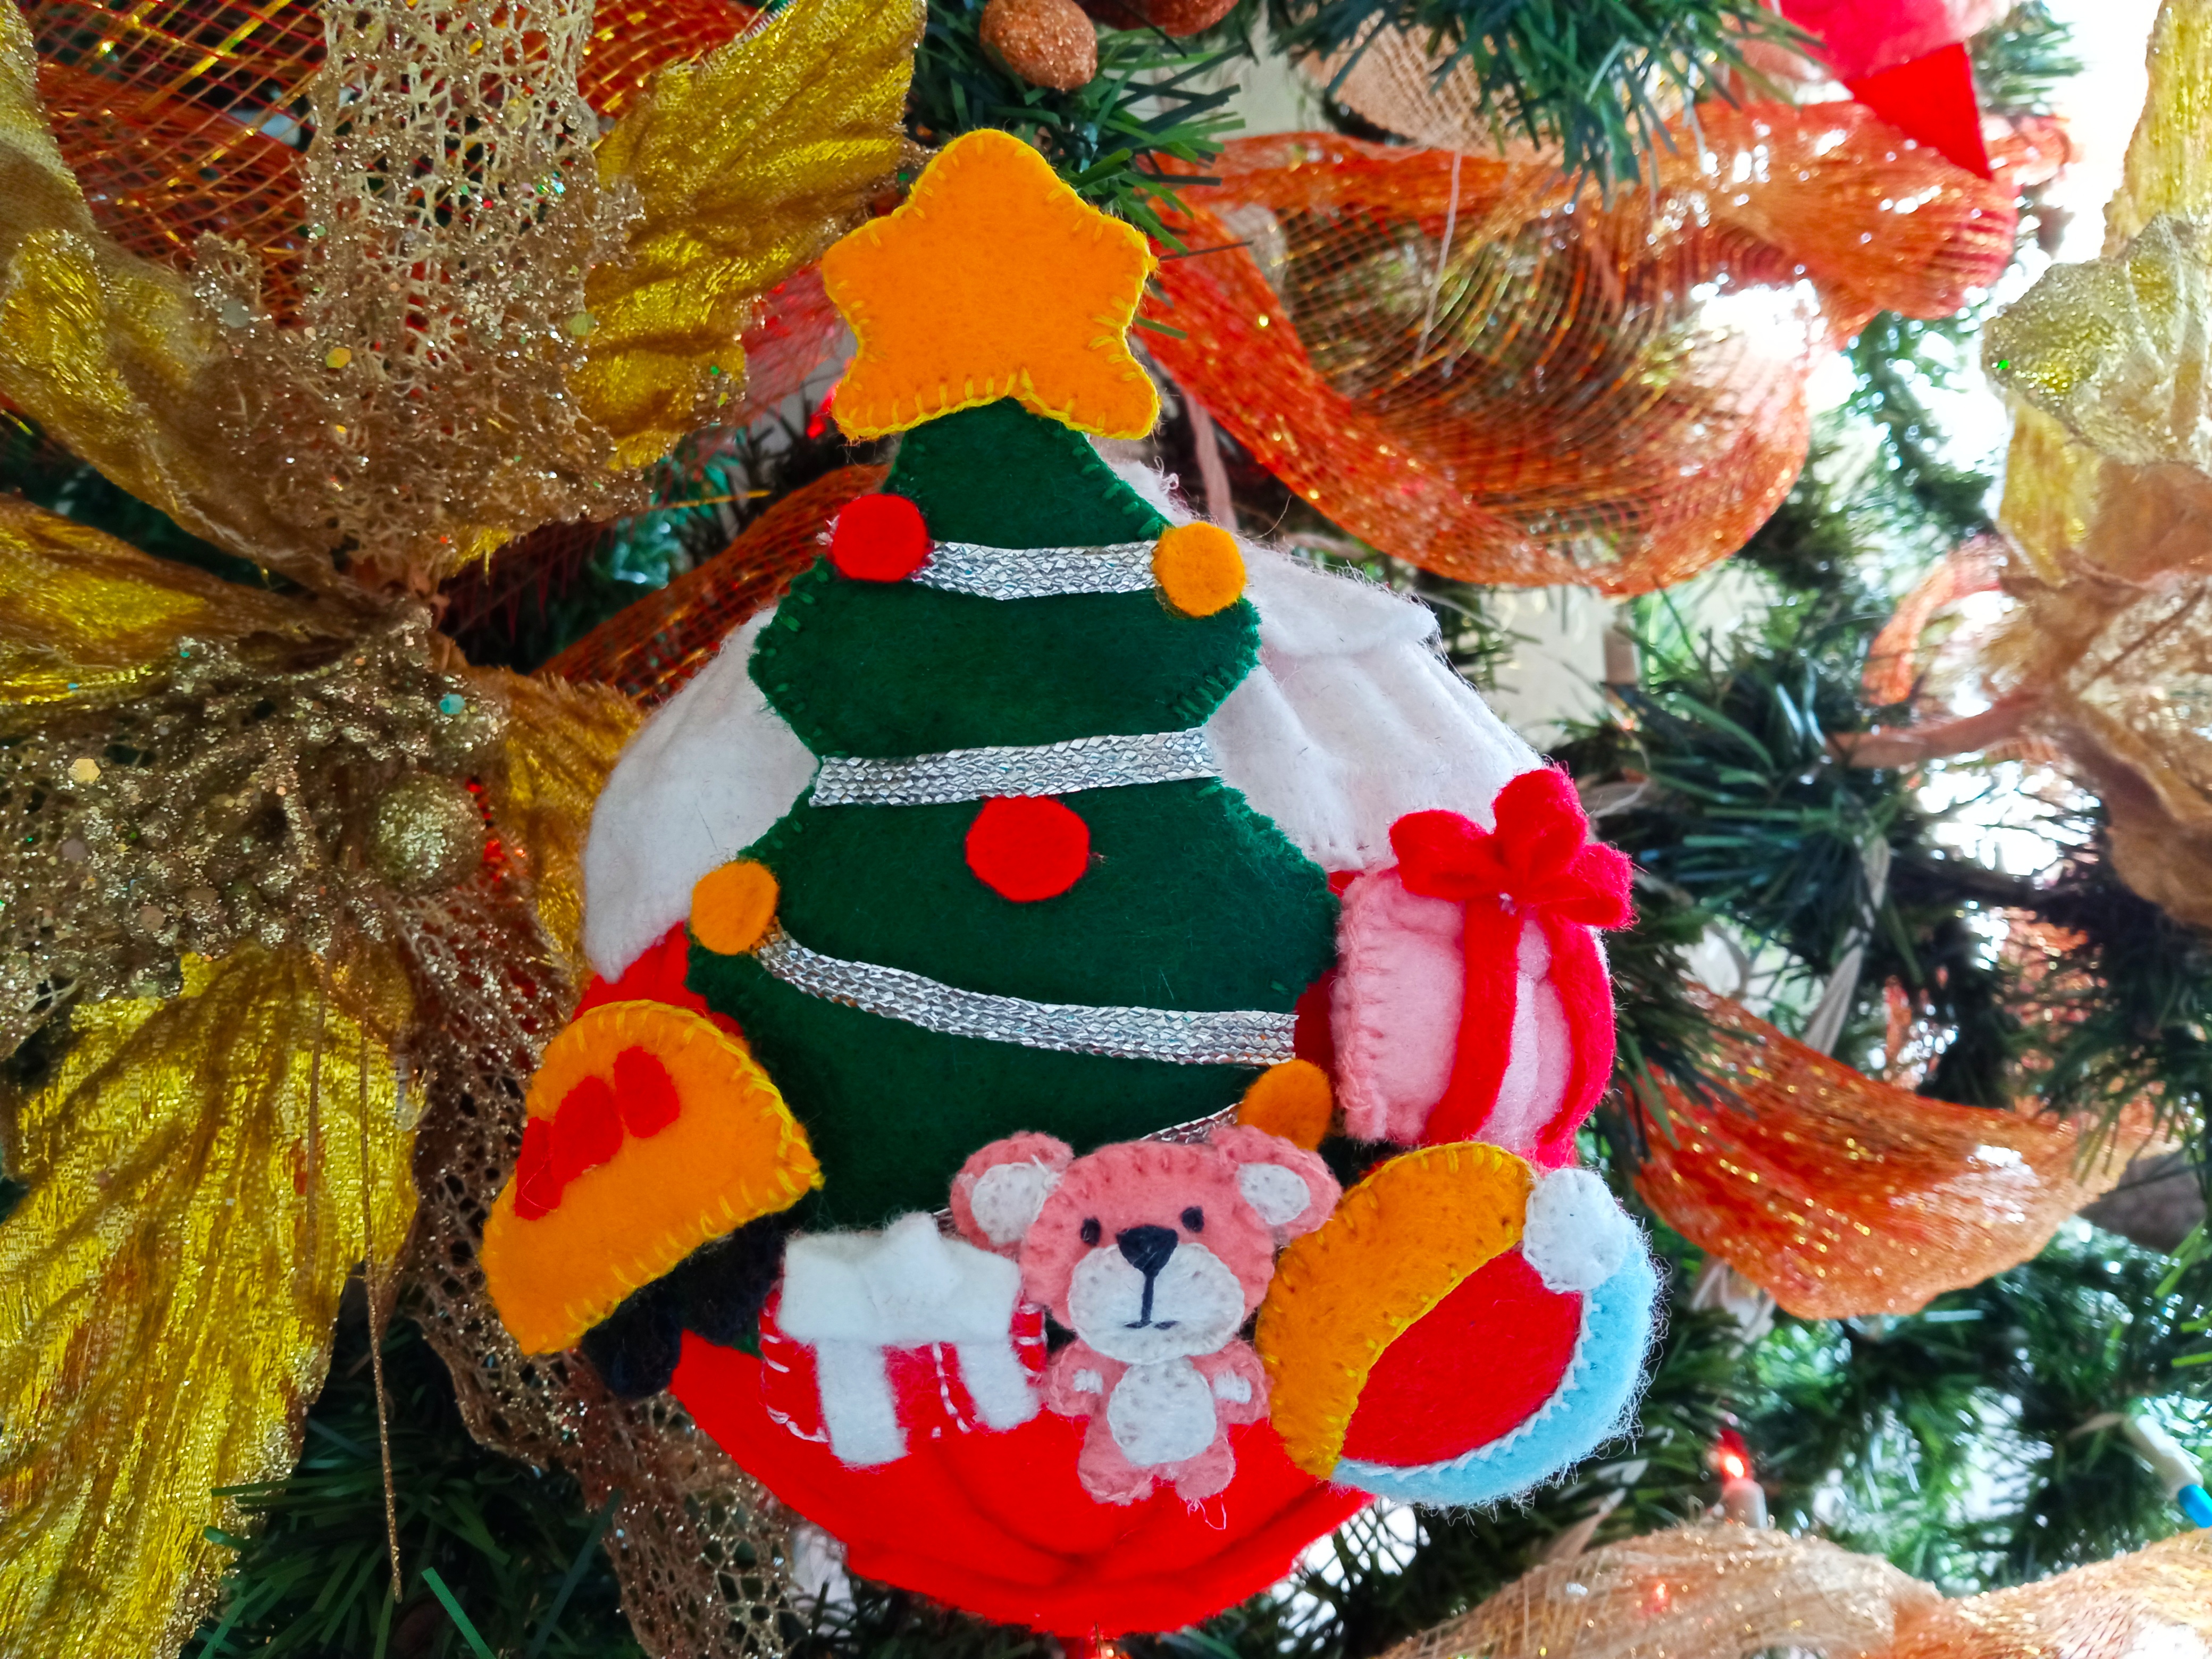
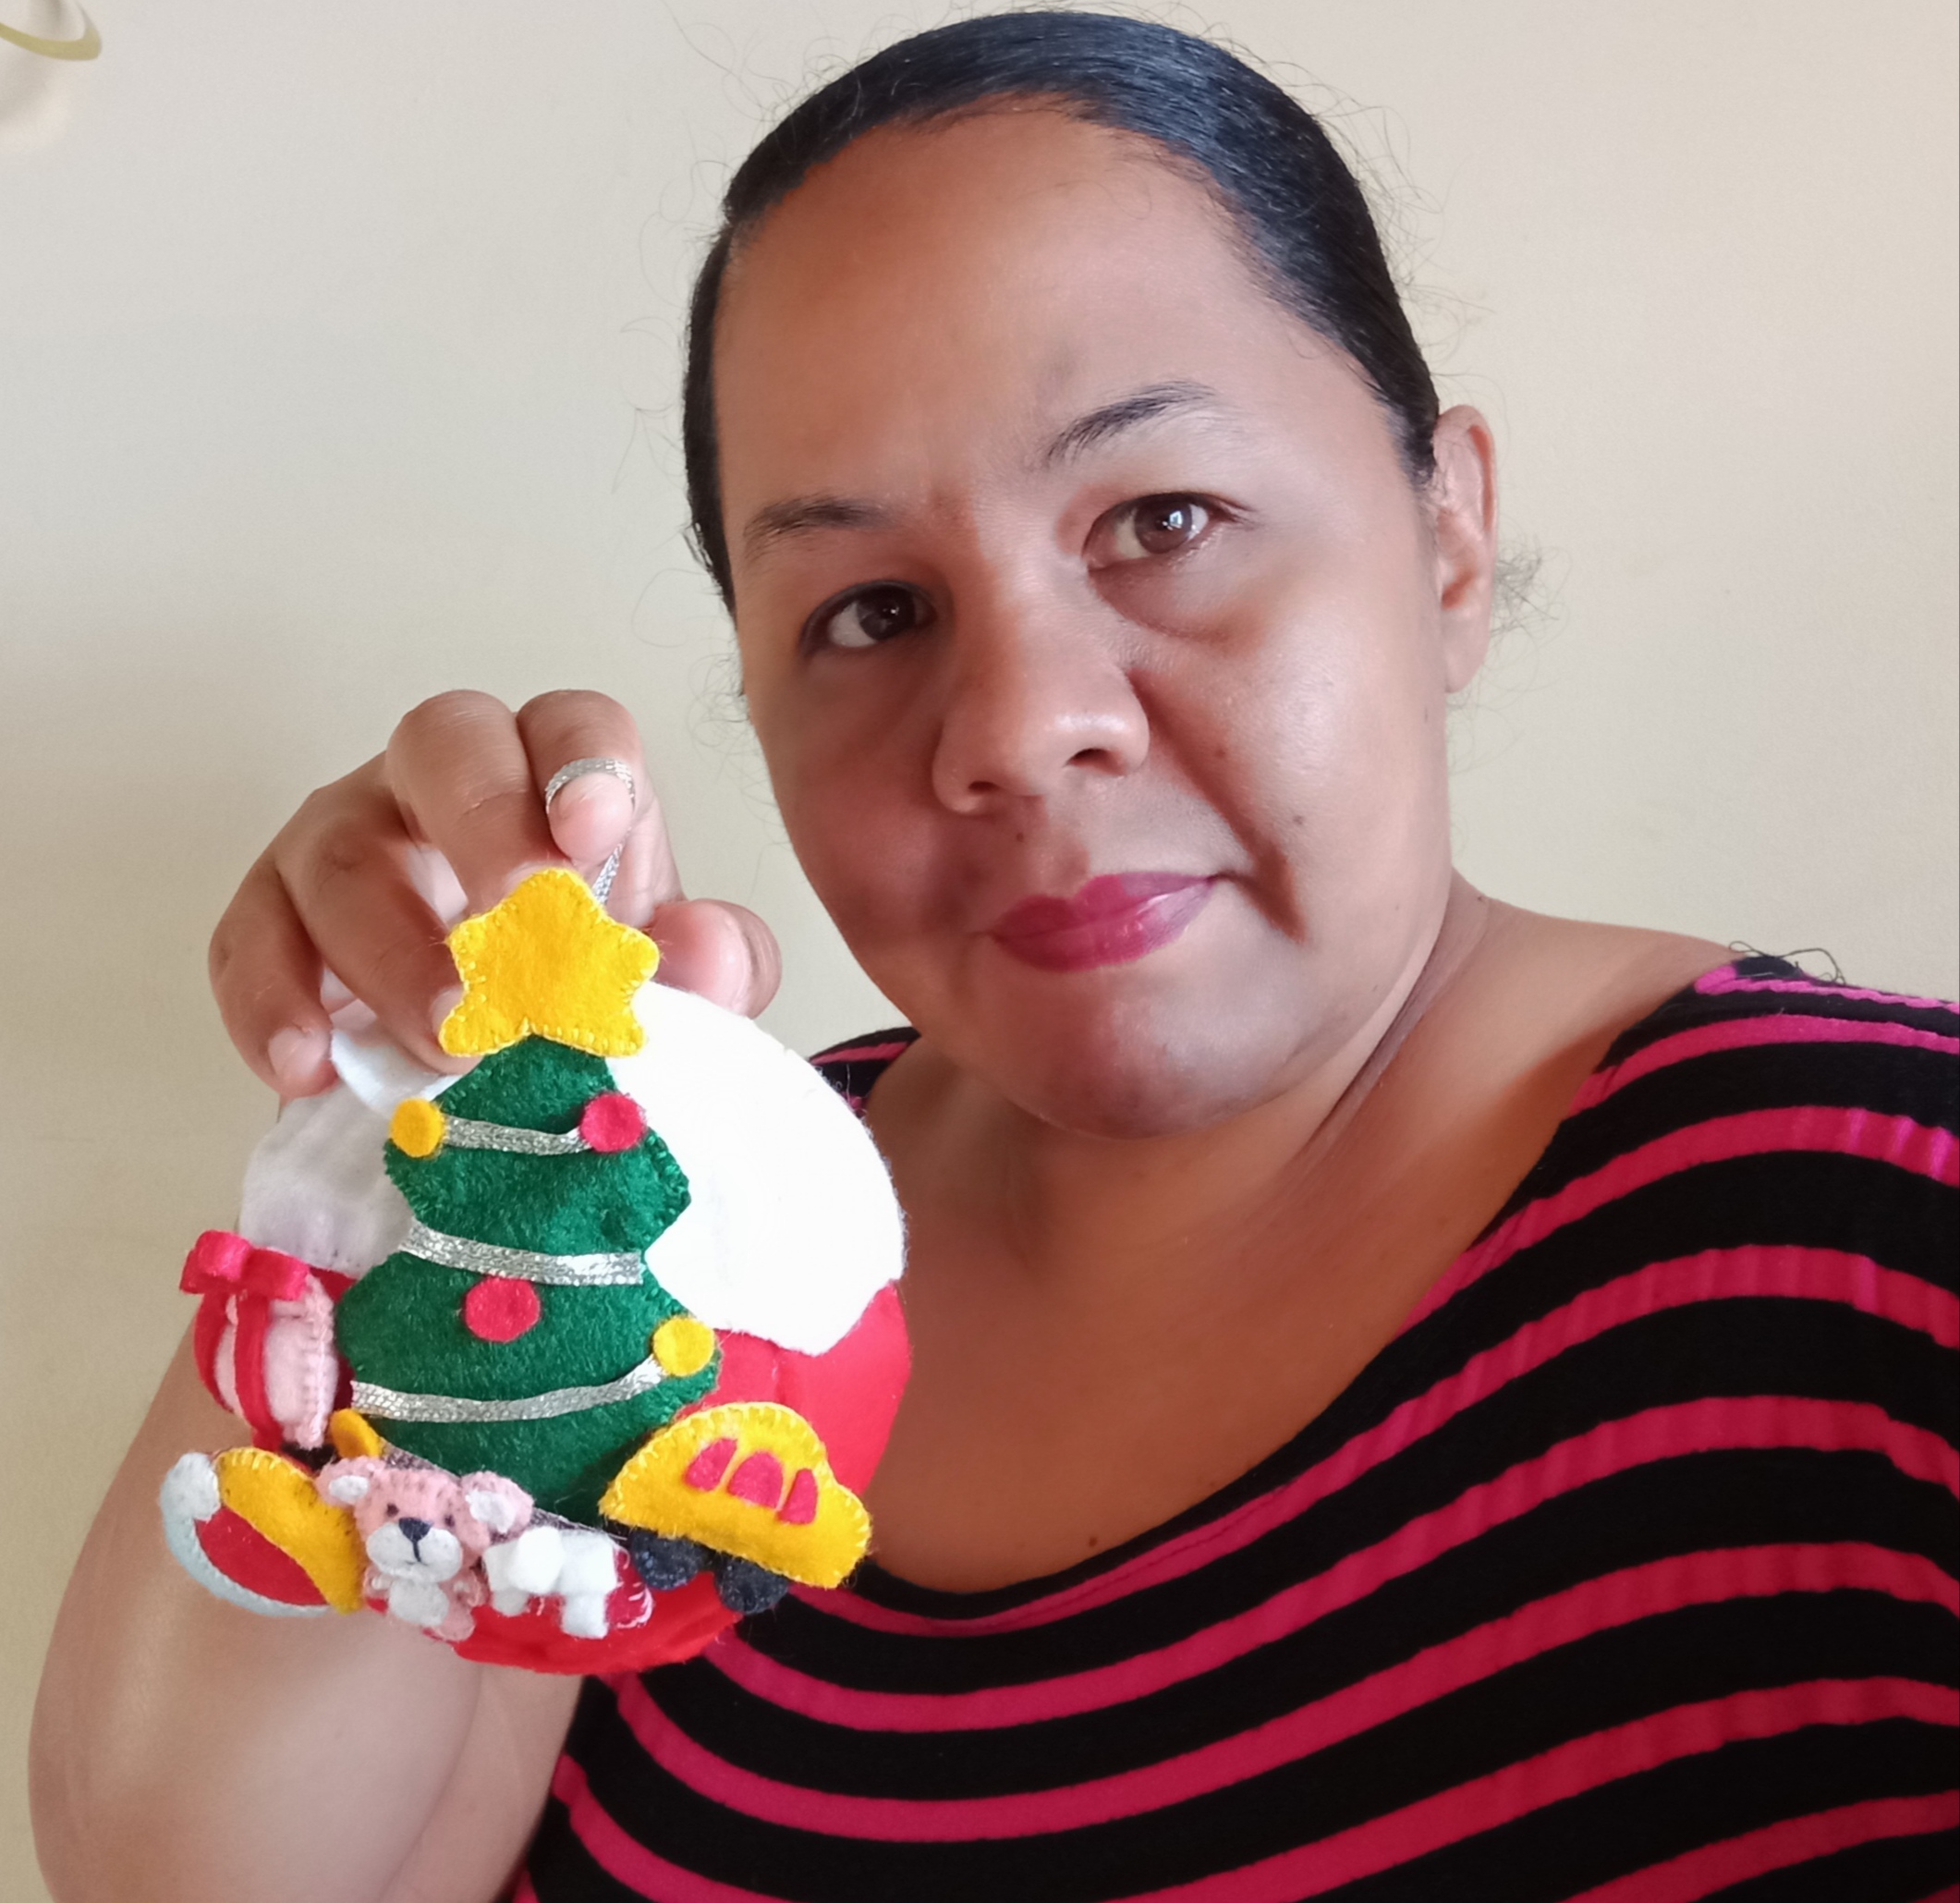
En la elaboración de este trabajo quise resaltar ese día tan especial que espera todos los niños, los regalos bajo el Árbol de Navidad! Es sin duda un momento mágico para ellos 🙂 en encontrar ese juguete tan deseado.
In the elaboration of this work I wanted to highlight that special day that awaits all children, the gifts under the Christmas tree! It is undoubtedly a magical moment for them 🙂 to find that much desired toy.
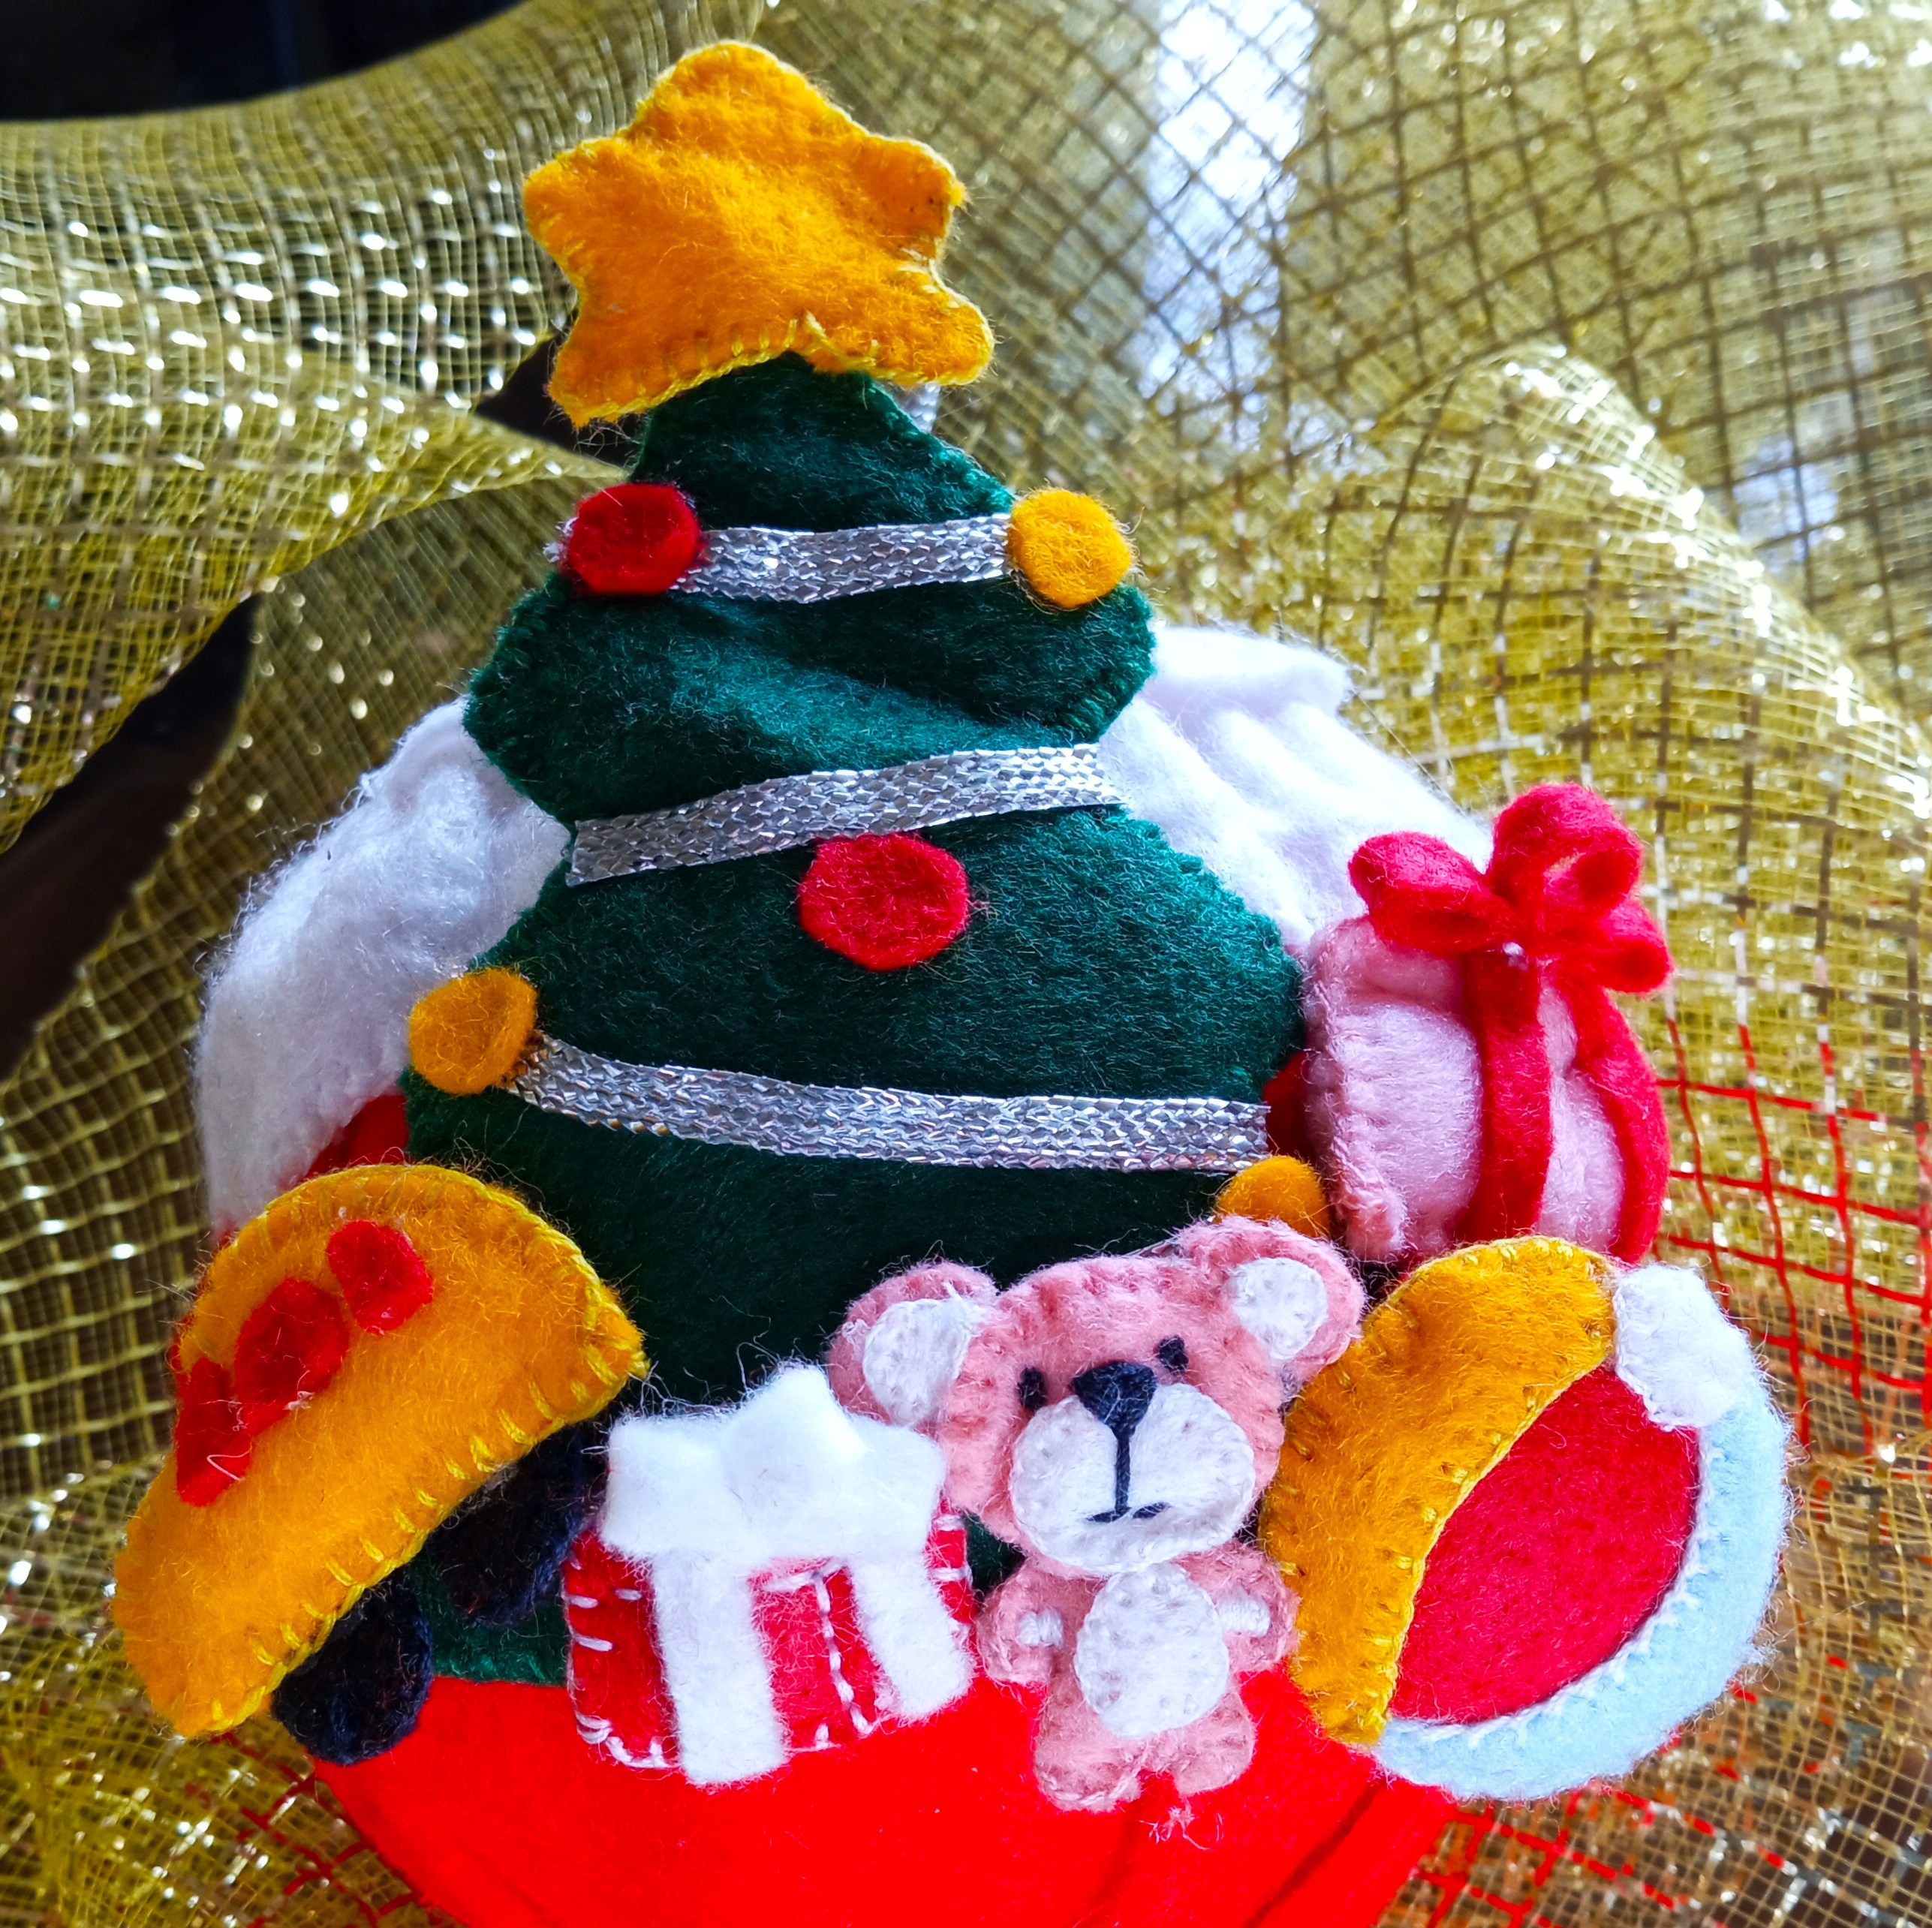
Espero que le hayan gustado este hermoso trabajo el cual elaboré con mucha dedicación y amor para mostrale el paso a paso. Quisiera que se animarán en elaborar está esfera decorativa para adornar su Arbolito de Navidad.
I hope you liked this beautiful work which I made with a lot of dedication and love to show you the step by step. I would like to encourage you to elaborate this decorative sphere to decorate your Christmas tree.
All pictures were taken with my Redmi 9 phone. Image edited in Photo Collage Maker.
¡Gracias 😁 por Visitar mi Blog!Thank you 😁 for Visiting my Blog!
Translación performed with the free version of the translatorwww.deepl.com/translator
Cuantos detalles has agregado a la esfera!!!, te ha quedado espectacular. Muchas gracias por participar, mucha suerte en el concurso. Bienvenida a nuestra comunidad.
Saludos amiga, me contenta que te gustará está hermosa esfera. Muchas gracias por la bienvenida, seguiré mostrando mis trabajos manuales por esta maravillosa comunidad.
Besos!!
Hola @yurimar, te ha quedado muy hermosa la esfera. me encantan el colorido que tiene, el osito es un encanto.
Un abrazo desde la Isla de Margarita, 🤗
Hola amiga 👋, muchas gracias! es un poco complicado trabajar con miniaturas pero era necesario para incorporarlo en la esfera.
Besos!
Hola @yurimar, te quedo hermosa tu esfera. Suerte en el concurso.
Hola amiga guada1, me encantó que te gustará mi esfera decorativa fue un trabajo con mucha dedicación.
Gracias 😀 por tu apoyo y comentario!!
Congratulations @yurimar! You have completed the following achievement on the Hive blockchain and have been rewarded with new badge(s):
Your next target is to reach 600 upvotes.
You can view your badges on your board and compare yourself to others in the Ranking
If you no longer want to receive notifications, reply to this comment with the word
STOPCheck out the last post from @hivebuzz:
Gracias por el apoyo!!
De nada @yurimar 🌹🌹🌹
Apóyenos también y vote por nuestro testigo.
Recibirá una insignia adicional y un voto más fuerte de nuestra parte cuando le notifiquemos.
Te quedaron hermosas amiga, tiene muchos detalles y dedicación, muchas gracias por la invitación.
Hola amiga, gracias por la visita, me contenta mucho que te gustará besos 😘!
Felicidades amiga, te quedó muy hermosa tu esfera.
Gracias amiga me contenta que te gustará, besos 😘.