¡Saludos 👋 Queridos 💞 Amigos de #HiveDiy😘! // Greetings 👋 Dear 💞 Friends of #HiveDiy😘!
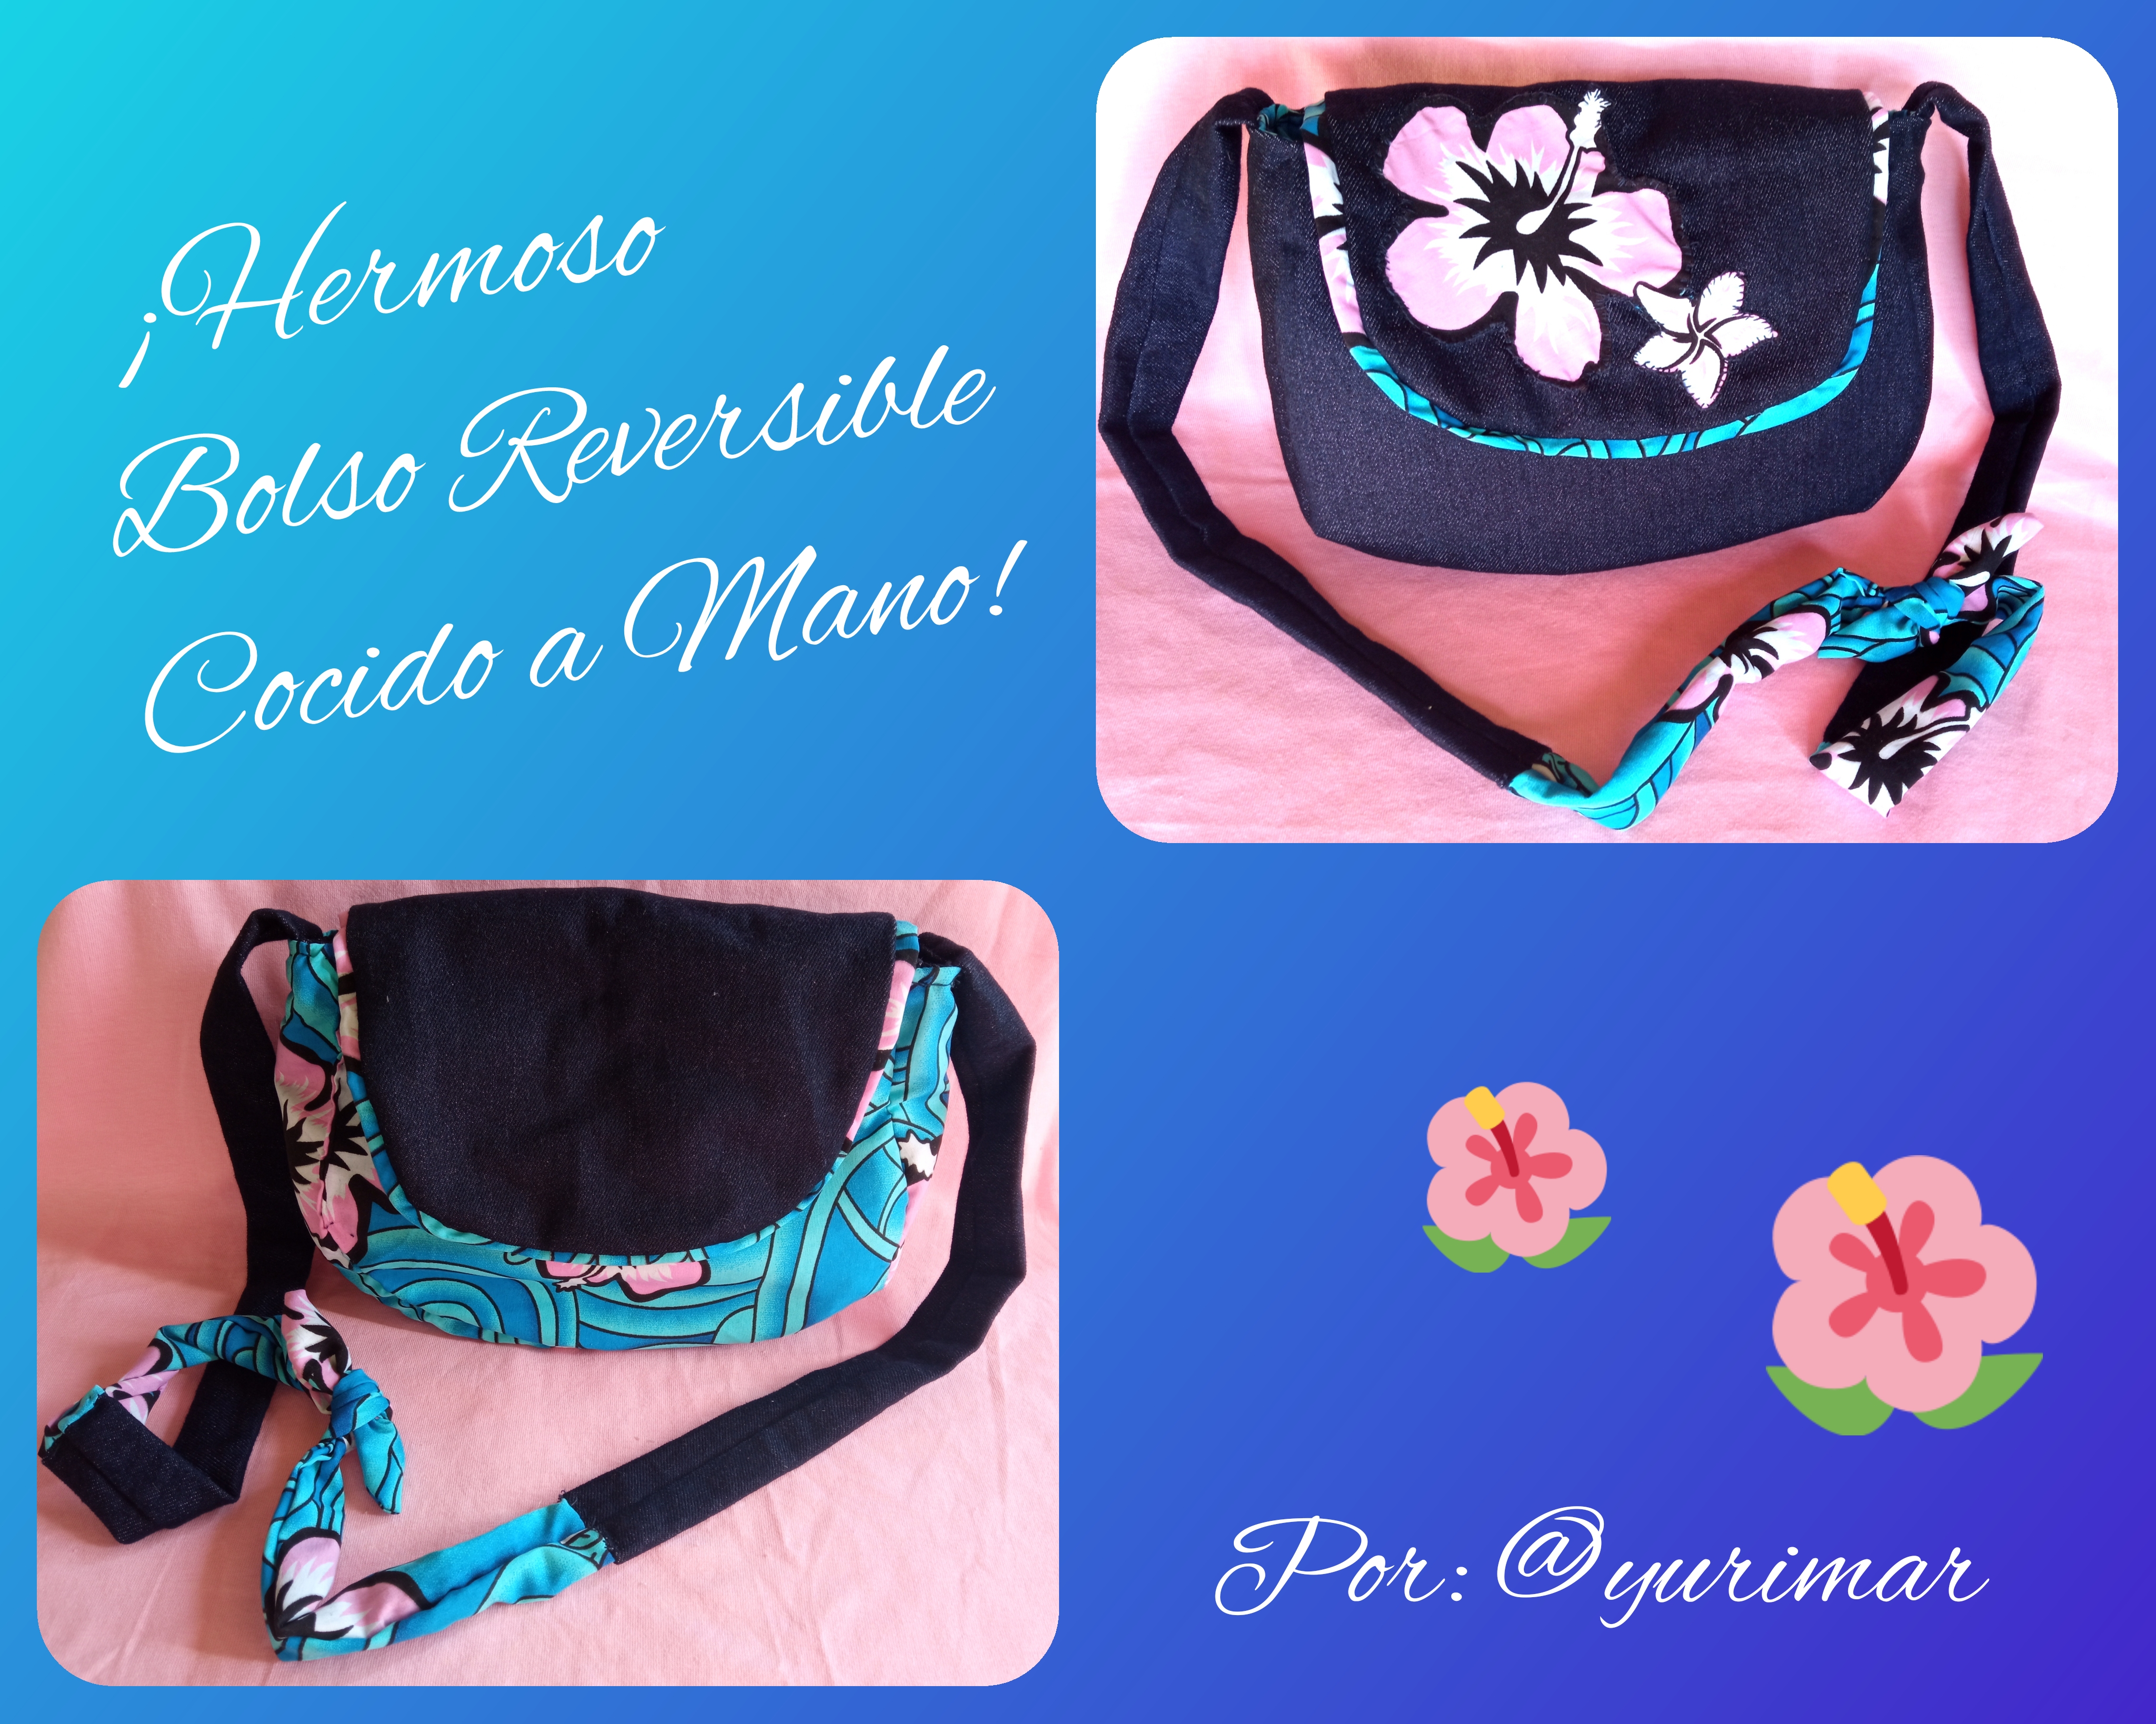
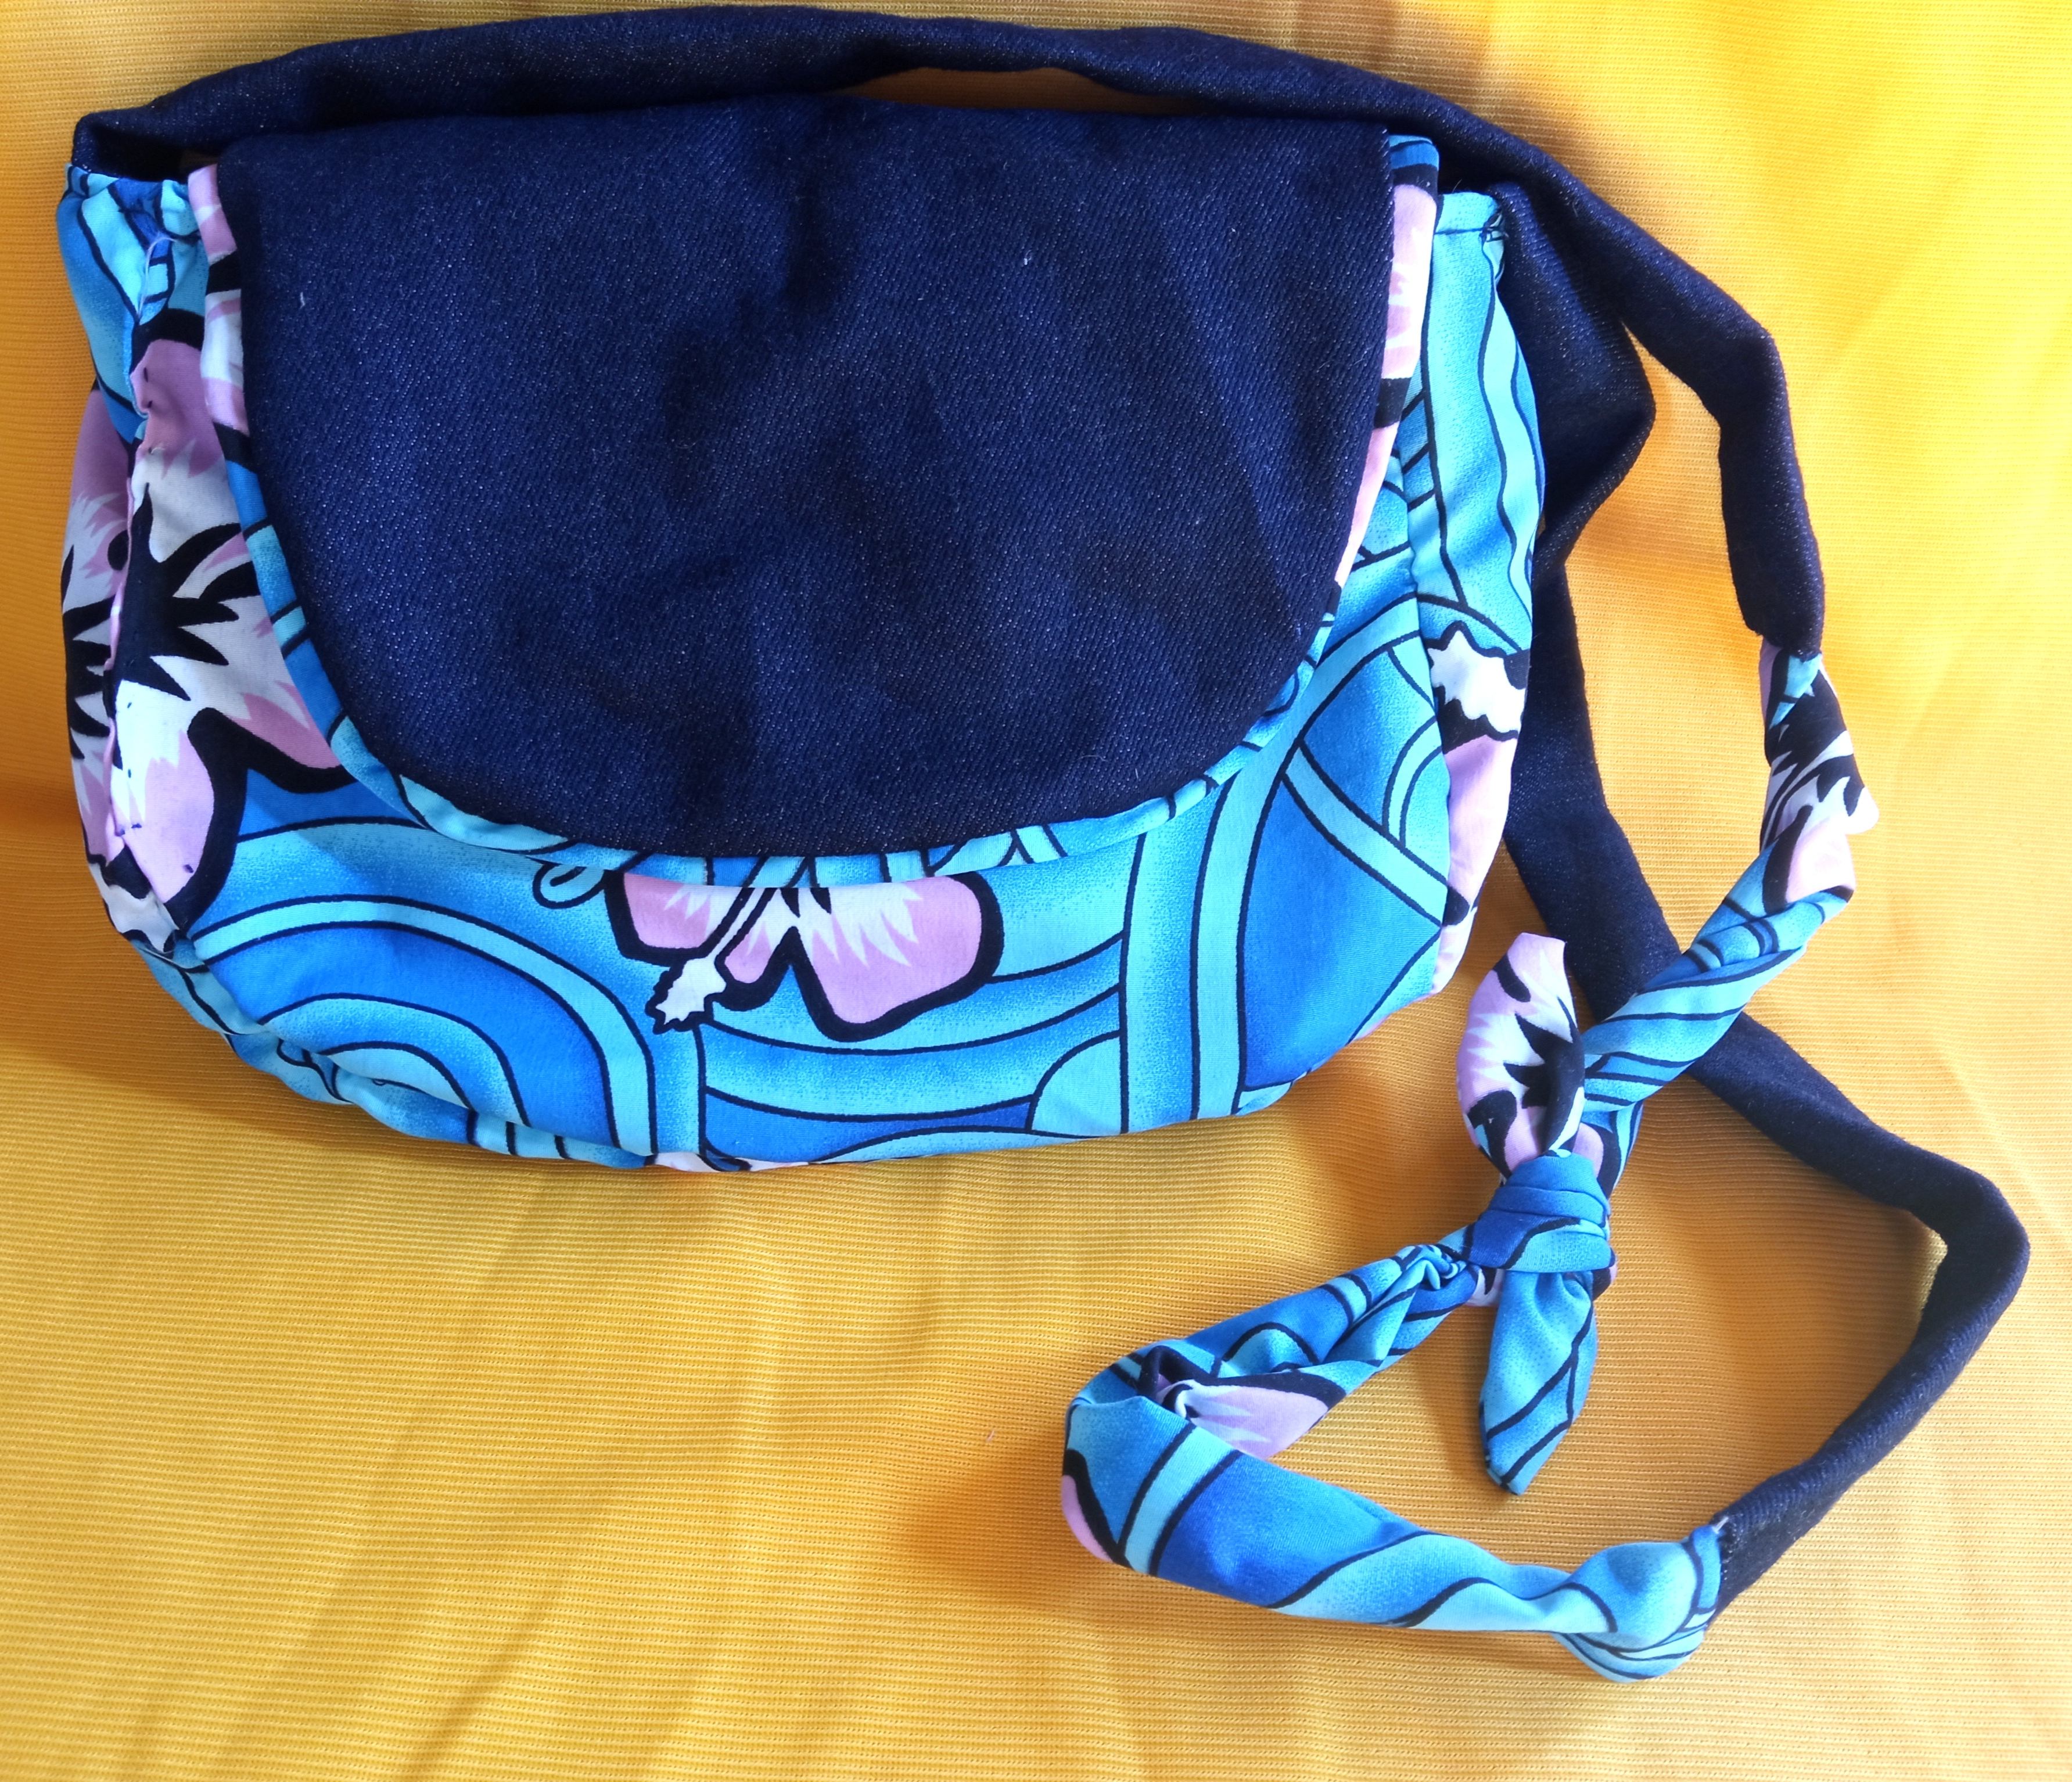
Hermoso 😍 Bolso 👜 Reversible #hechoamano // Beautiful 😍 Handbag 👜 Reversible 👜 Reversible #hechoamano
Hola! Espero se encuentren muy bien amigos, el día de hoy quiero compartir con ustedes un tutorial 😃 muy interesante en dónde les voy a explicar el paso a paso de cómo elaborar un bolso 👜 reversible cocido a mano.
Hello, I hope you are feeling well friends, today I want to share with you a very interesting tutorial 😃 where I'm going to explain you step by step how to make a reversible 👜 handmade reversible bag.
Tenía días en querer consentirme y hacerme un hermoso 😍 Bolso con tela de jeans que fuera reversible para usarlo cuando saliera con mi hija Camila al parque o cuando tenga que salir a comprar algunas cosas, el bolso que tengo en estos momentos está muy deteriorado así que le sale remplazo jejeje!!
I had days in wanting to pamper myself and make me a beautiful 😍 Bag with jeans fabric that would be reversible to use it when I go out with my daughter Camila to the park or when I have to go out to buy some things, the bag I have right now is very deteriorated so I leave replacement hehehe!!!!
Y como siempre no dude en coser a mano este hermoso 😍 trabajo el cual me lleno de mucha satisfacción el resultado, a mi hermana, vecina y madre les encantó! Ahora quieren uno jajajaja!! Me tocará coser a mano por muchos días, pero no me preocupo ya que al hacerlo me hace muy feliz.
And as always I did not hesitate to sew by hand this beautiful 😍 work which filled me with great satisfaction the result, my sister, neighbor and mother loved it! Now they want one hahahaha! I will have to sew by hand for days, but I don't worry because doing it makes me very happy.
Para comenzar les voy a detallar todos los materiales que utilice.
To begin with, I am going to detail all the materials I used.
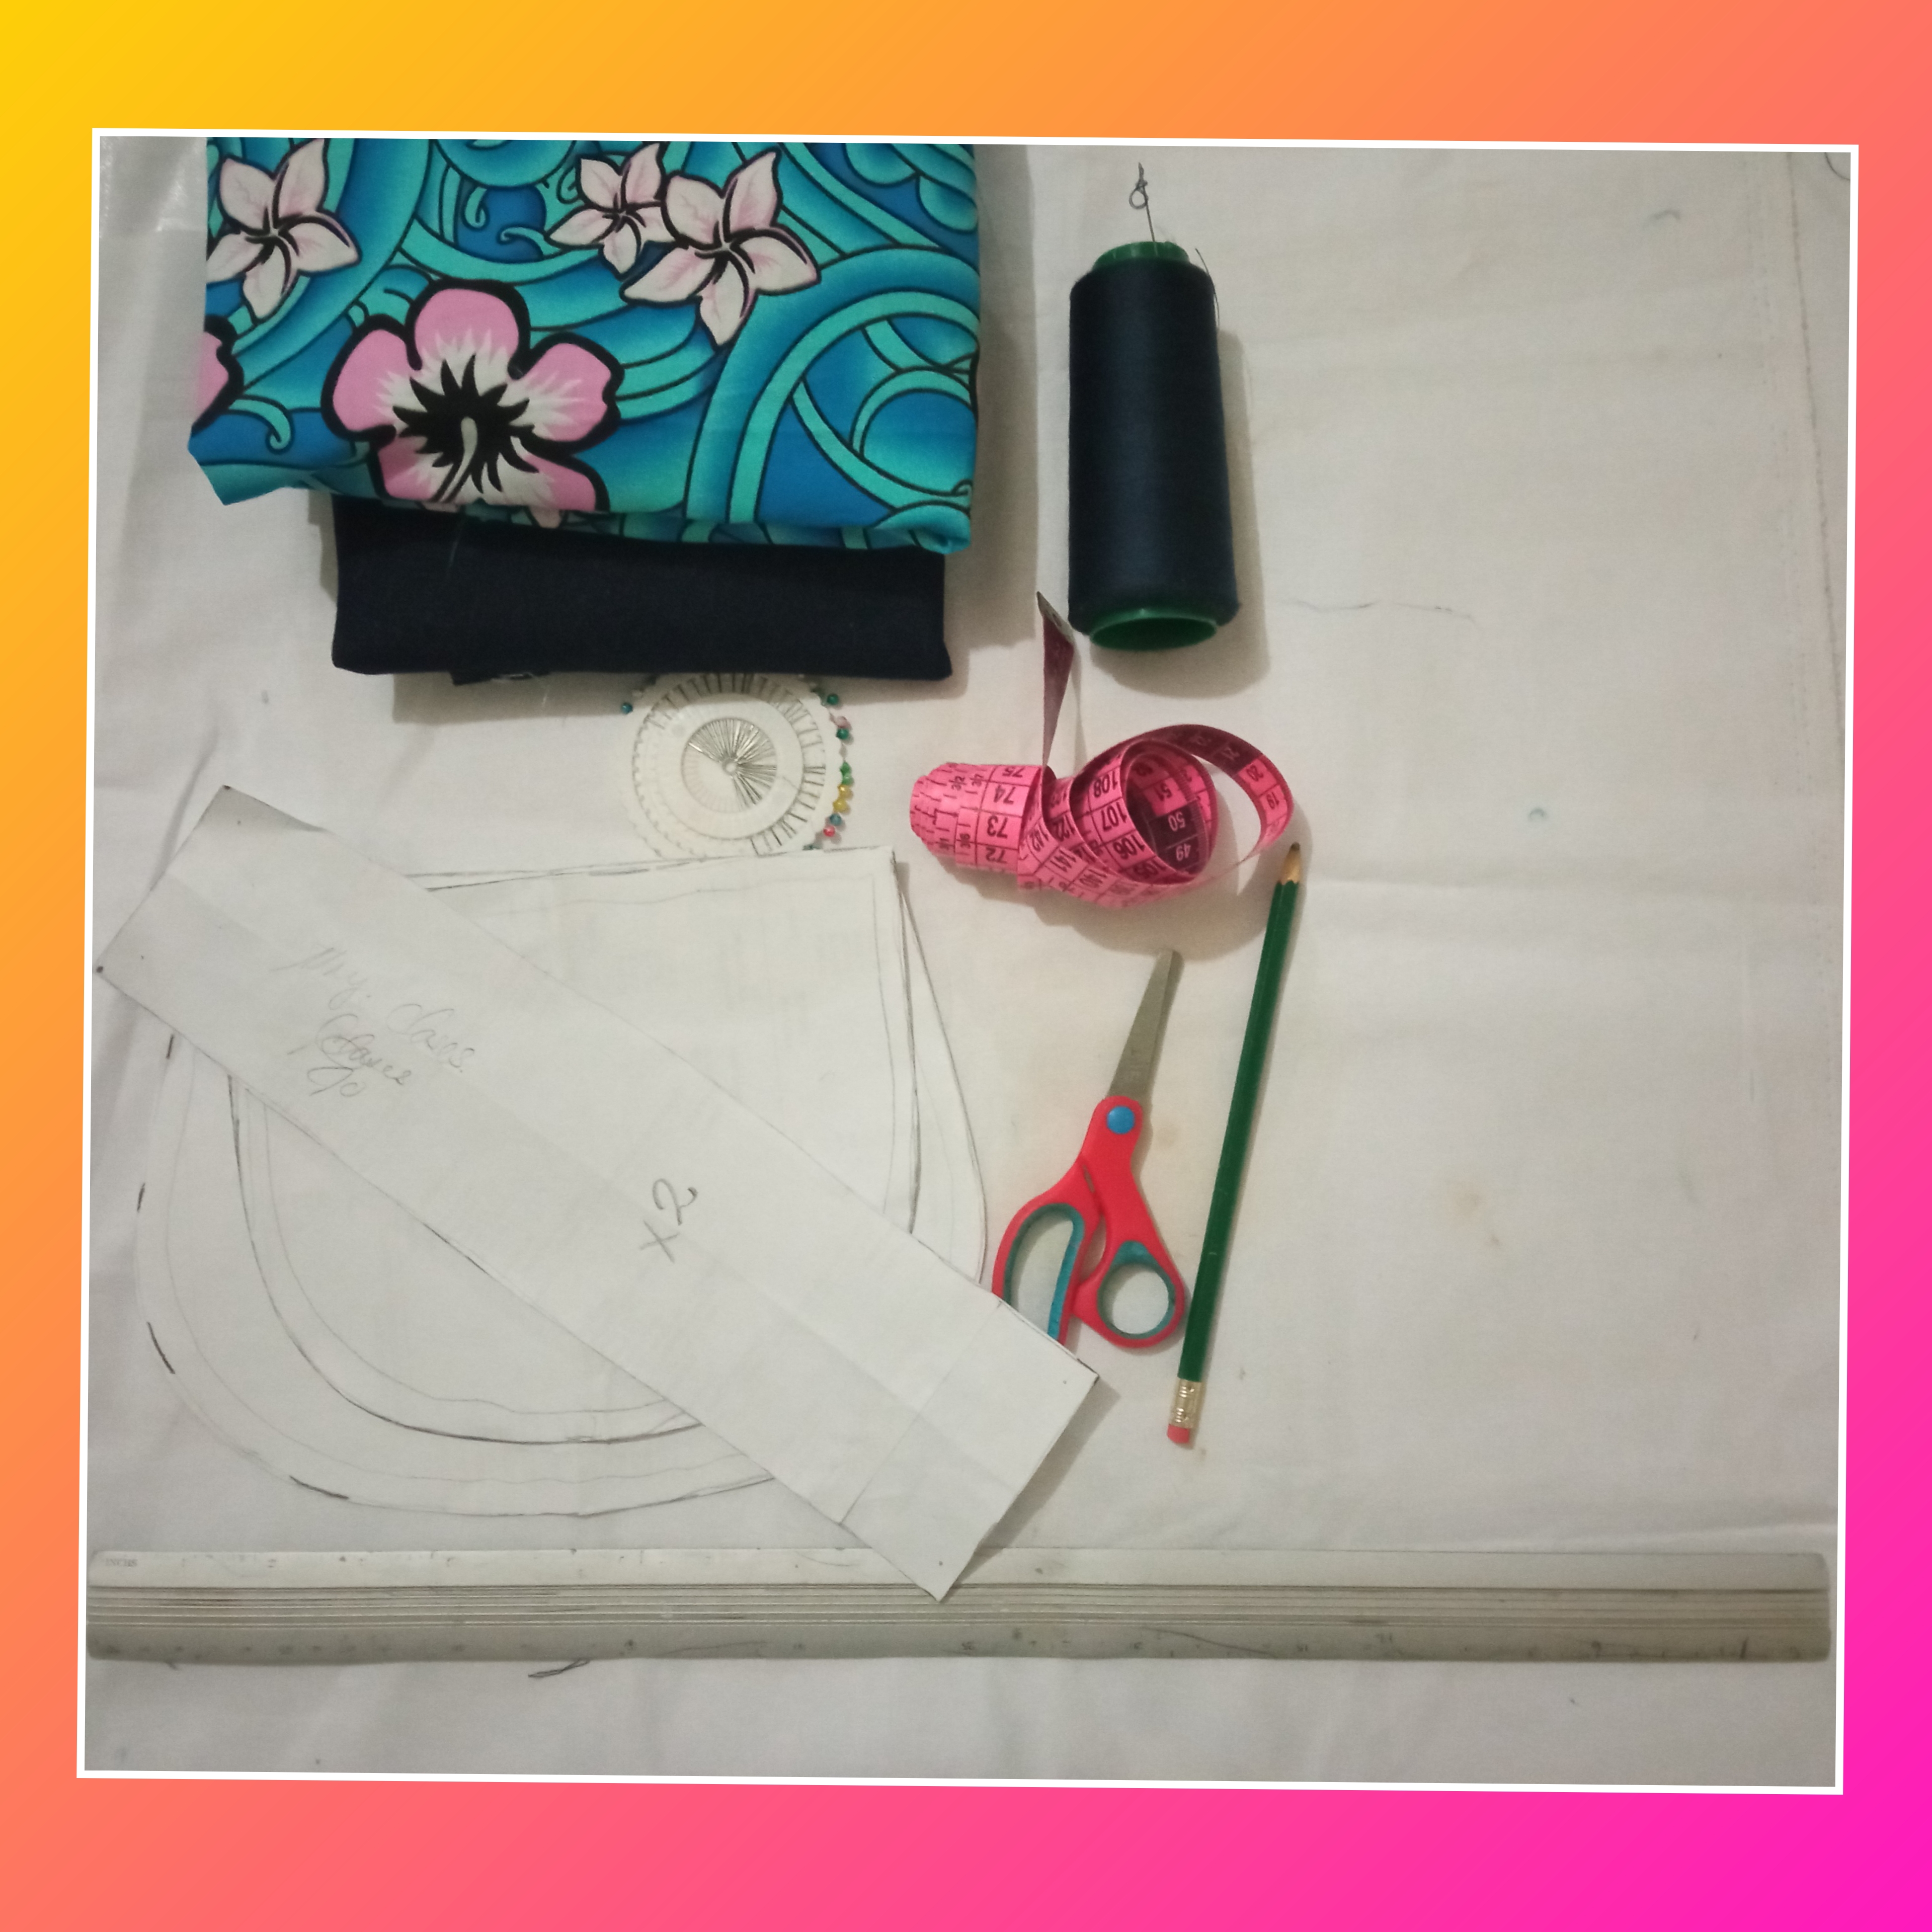
🌺 Materiales:🌺
- Tela de jeans azul marino.
- Tela estampada de su preferencia.
- Hilo de color azul oscuro.
- Aguja.
- Tijera.
- Alfileres.
- Hojas blancas para dibujar los patrones.
- Lápiz.
- Cinta métrica.
- Regla de 50 cm.
🌺 Materials:🌺
- Navy blue jeans fabric.
- Printed fabric of your choice.
- Dark blue thread.
- Needle.
- Scissors.
- Pins.
- White sheets to draw the patterns.
- Pencil.
- Tape measure.
- 50 cm. ruler.
🌺 Elaboración:🌺 // 🌺 Elaboration:🌺
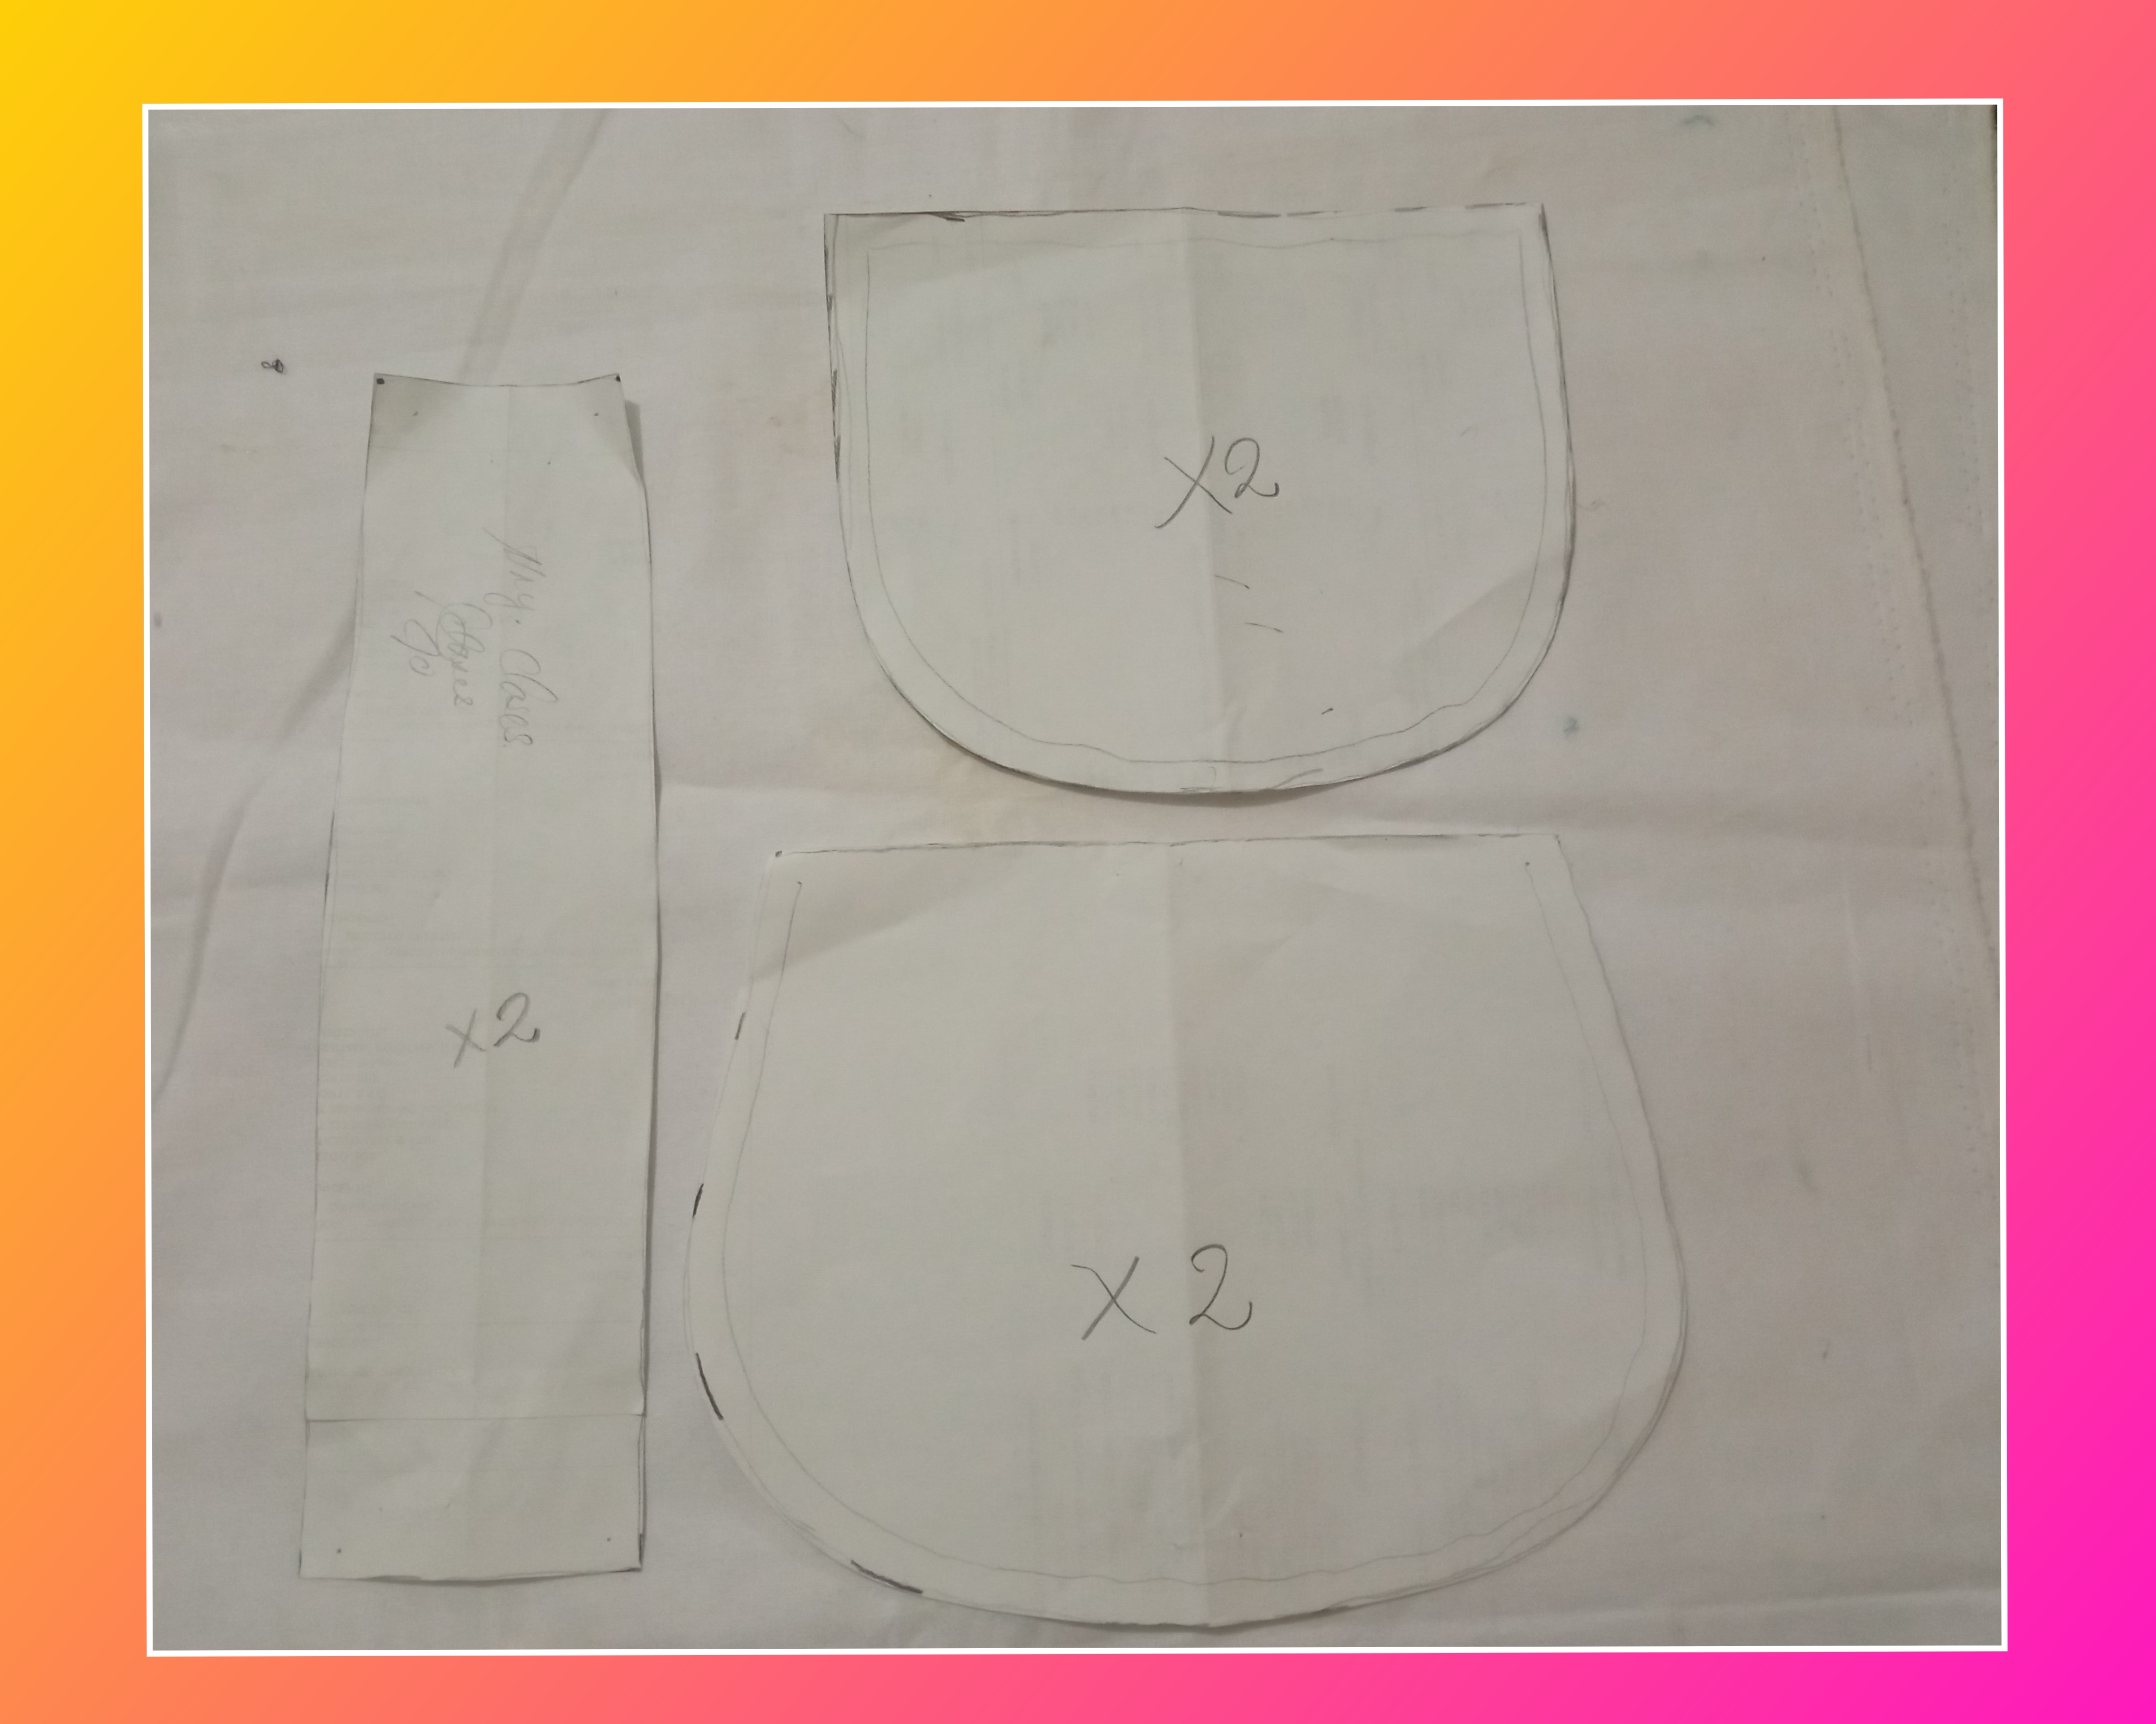
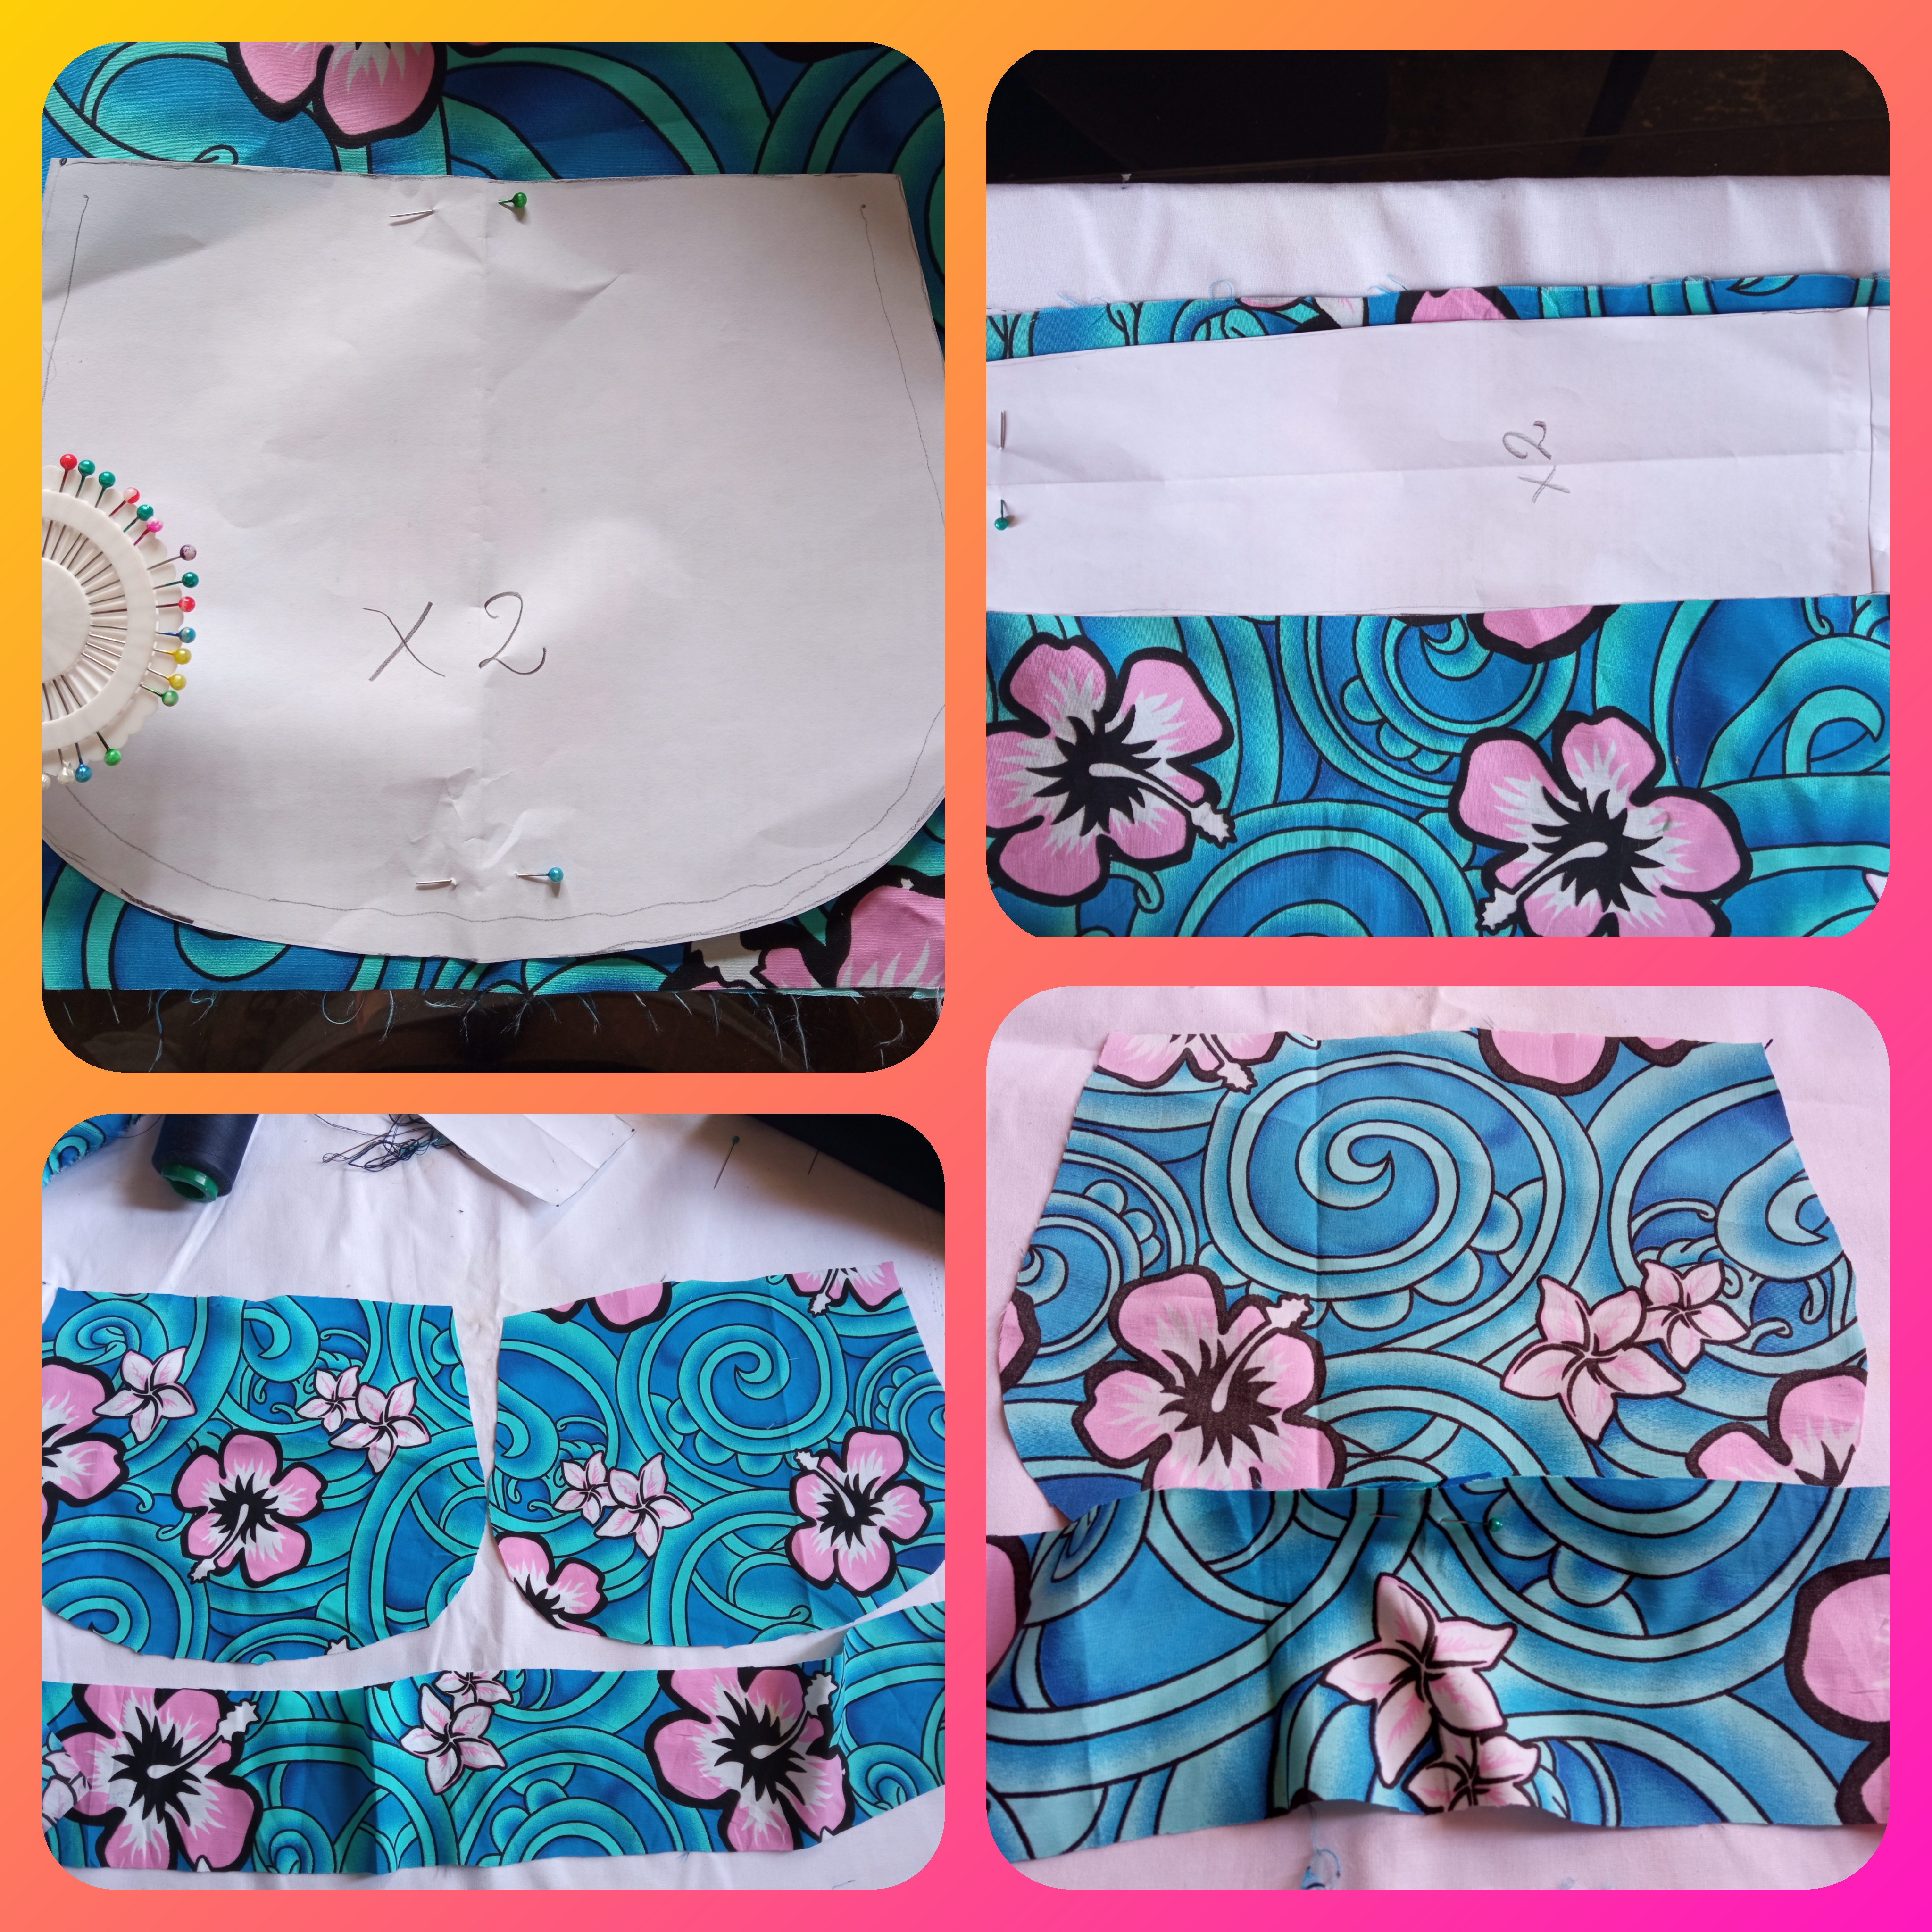
Paso 1:
Para comenzar vamos a dibujar los patrones del Bolso 👜 en una hoja luego lo recortamos para usarlo más adelante.
Step 1:
To start we are going to draw the patterns of the Purse 👜 on a sheet then cut it out for later use.
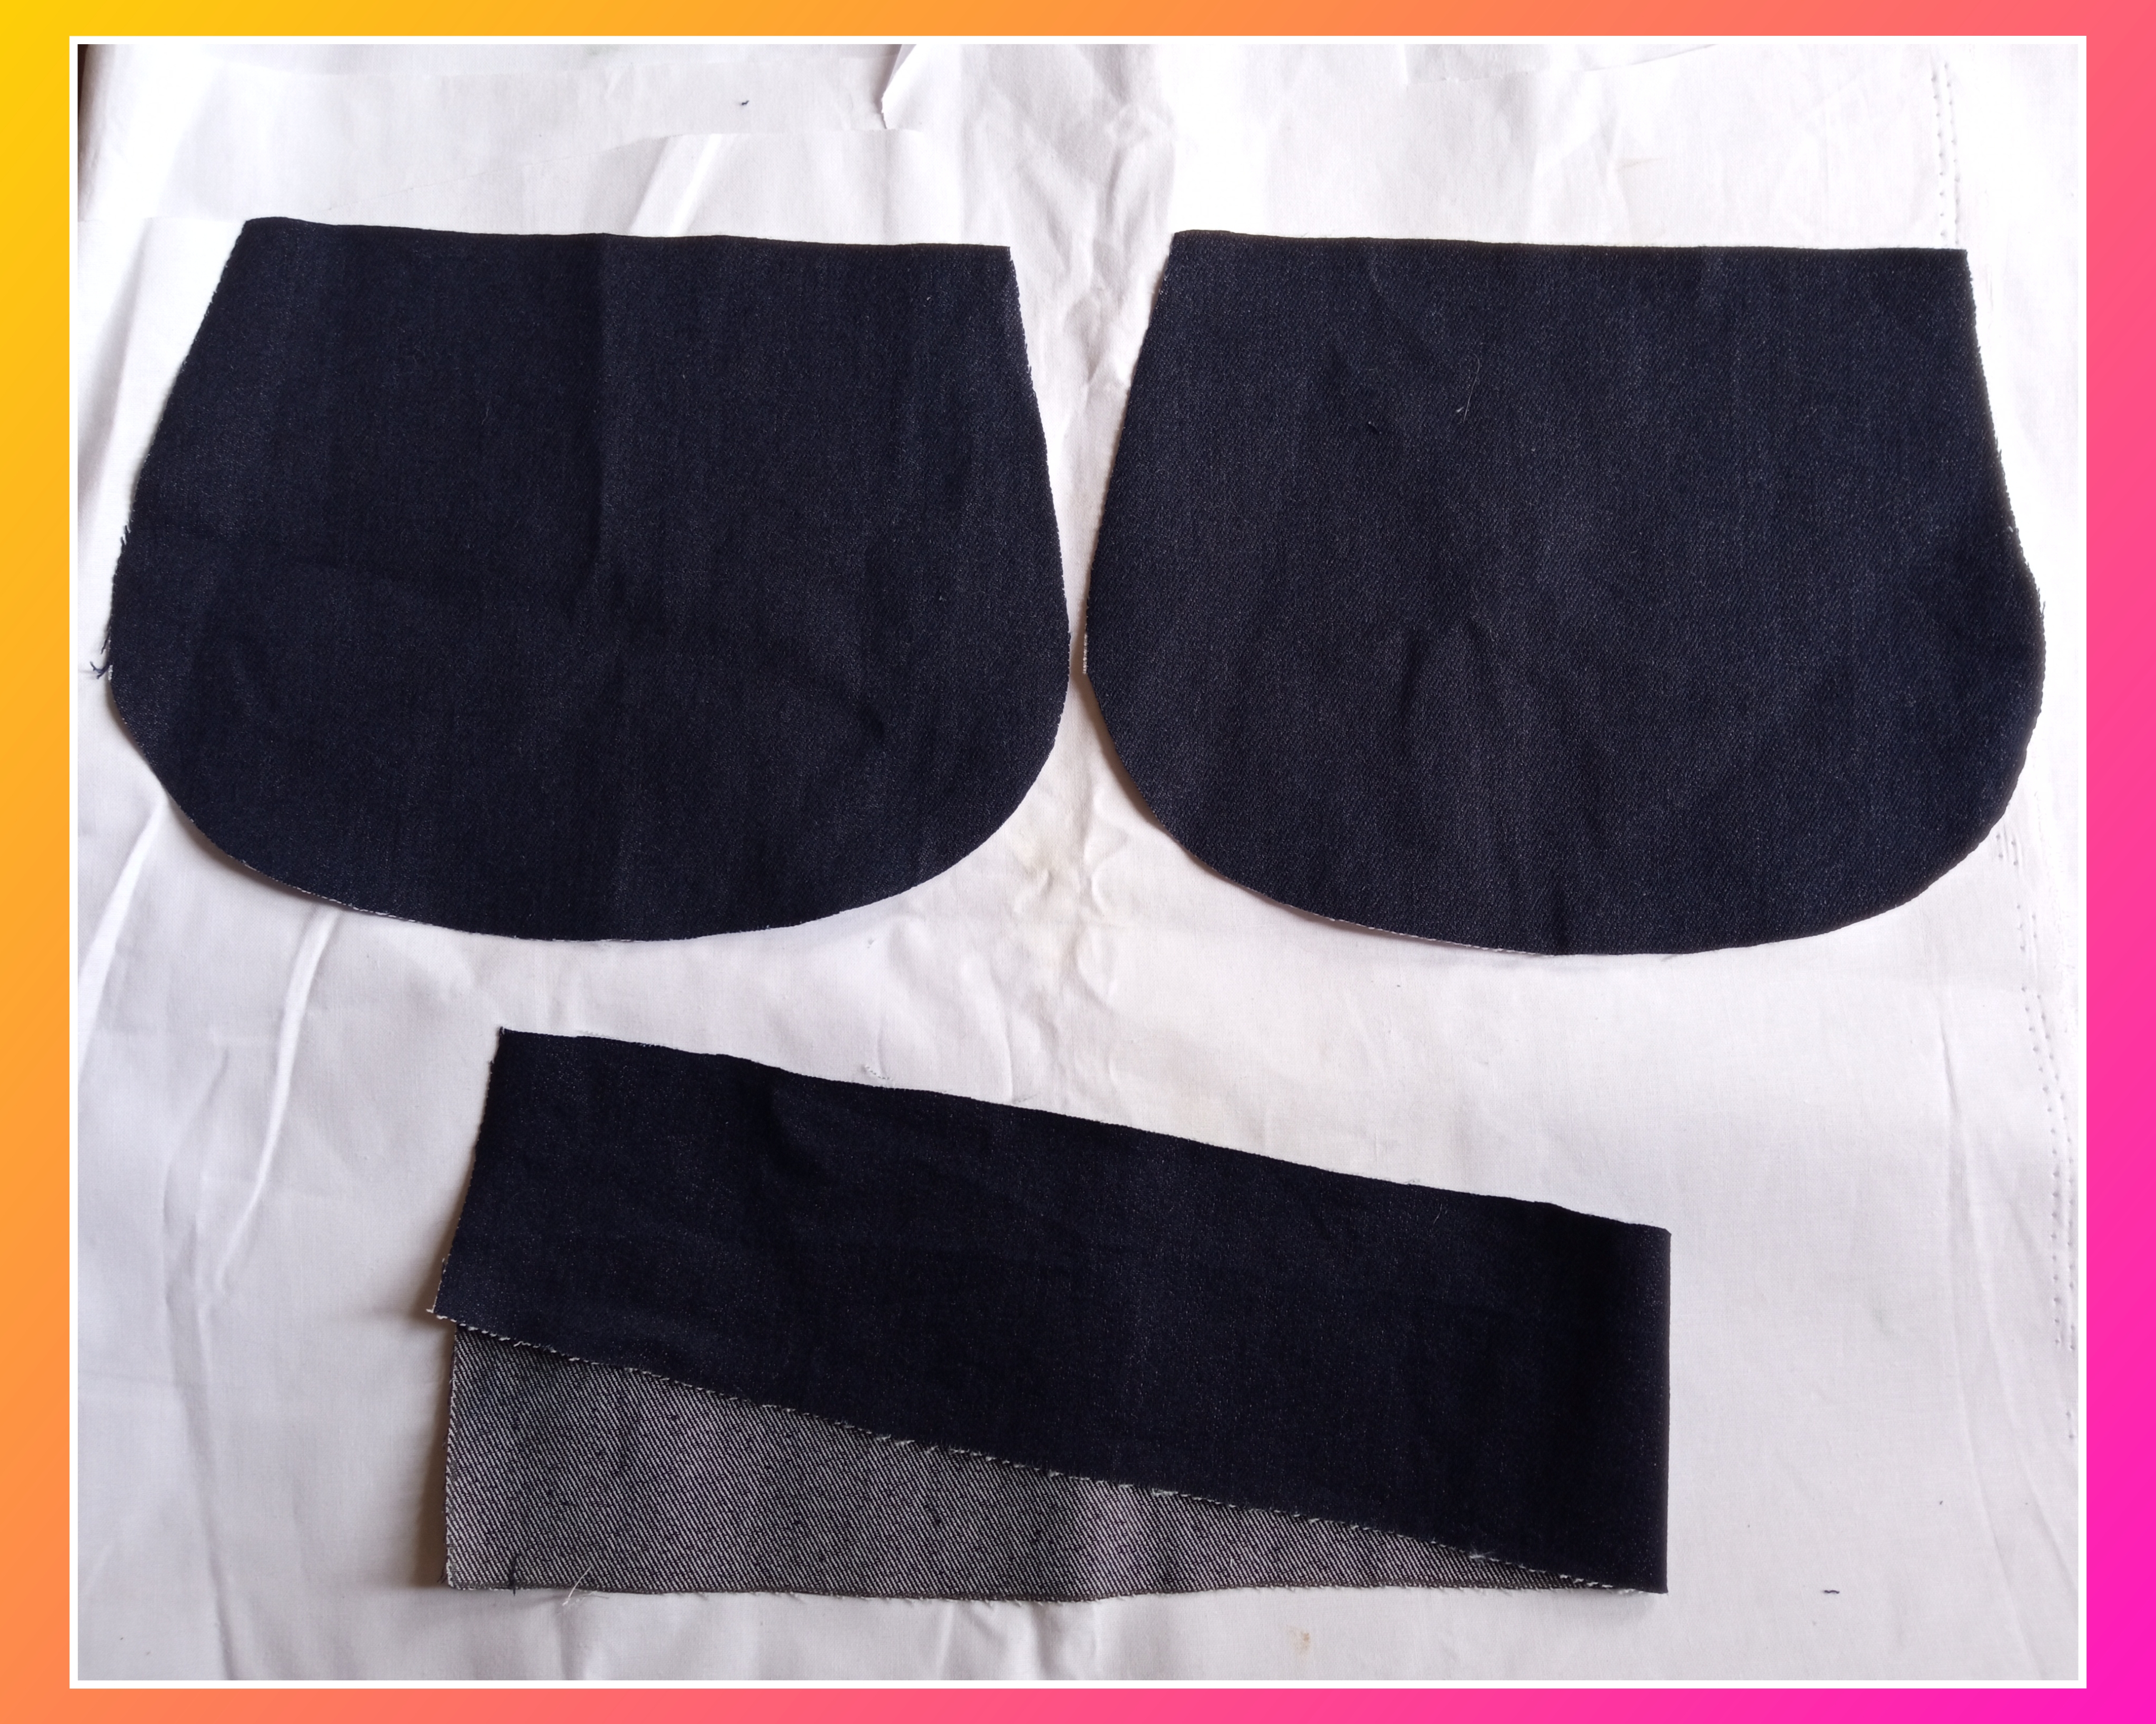
Paso 2:
Tomamos los patrones del Bolso 👜 y marcamos en la Tela de jeans dos piezas de cada uno, el contorno del bolso marcamos luego volteamos que quedé junto para que quede una sola tirá, después cortamos así como ven en la imagen.
Step 2:
We take the patterns of the Purse 👜 and we mark on the jeans fabric two pieces of each one, the outline of the purse we mark then we flip it together so that it is a single strip, then we cut as you see in the image.

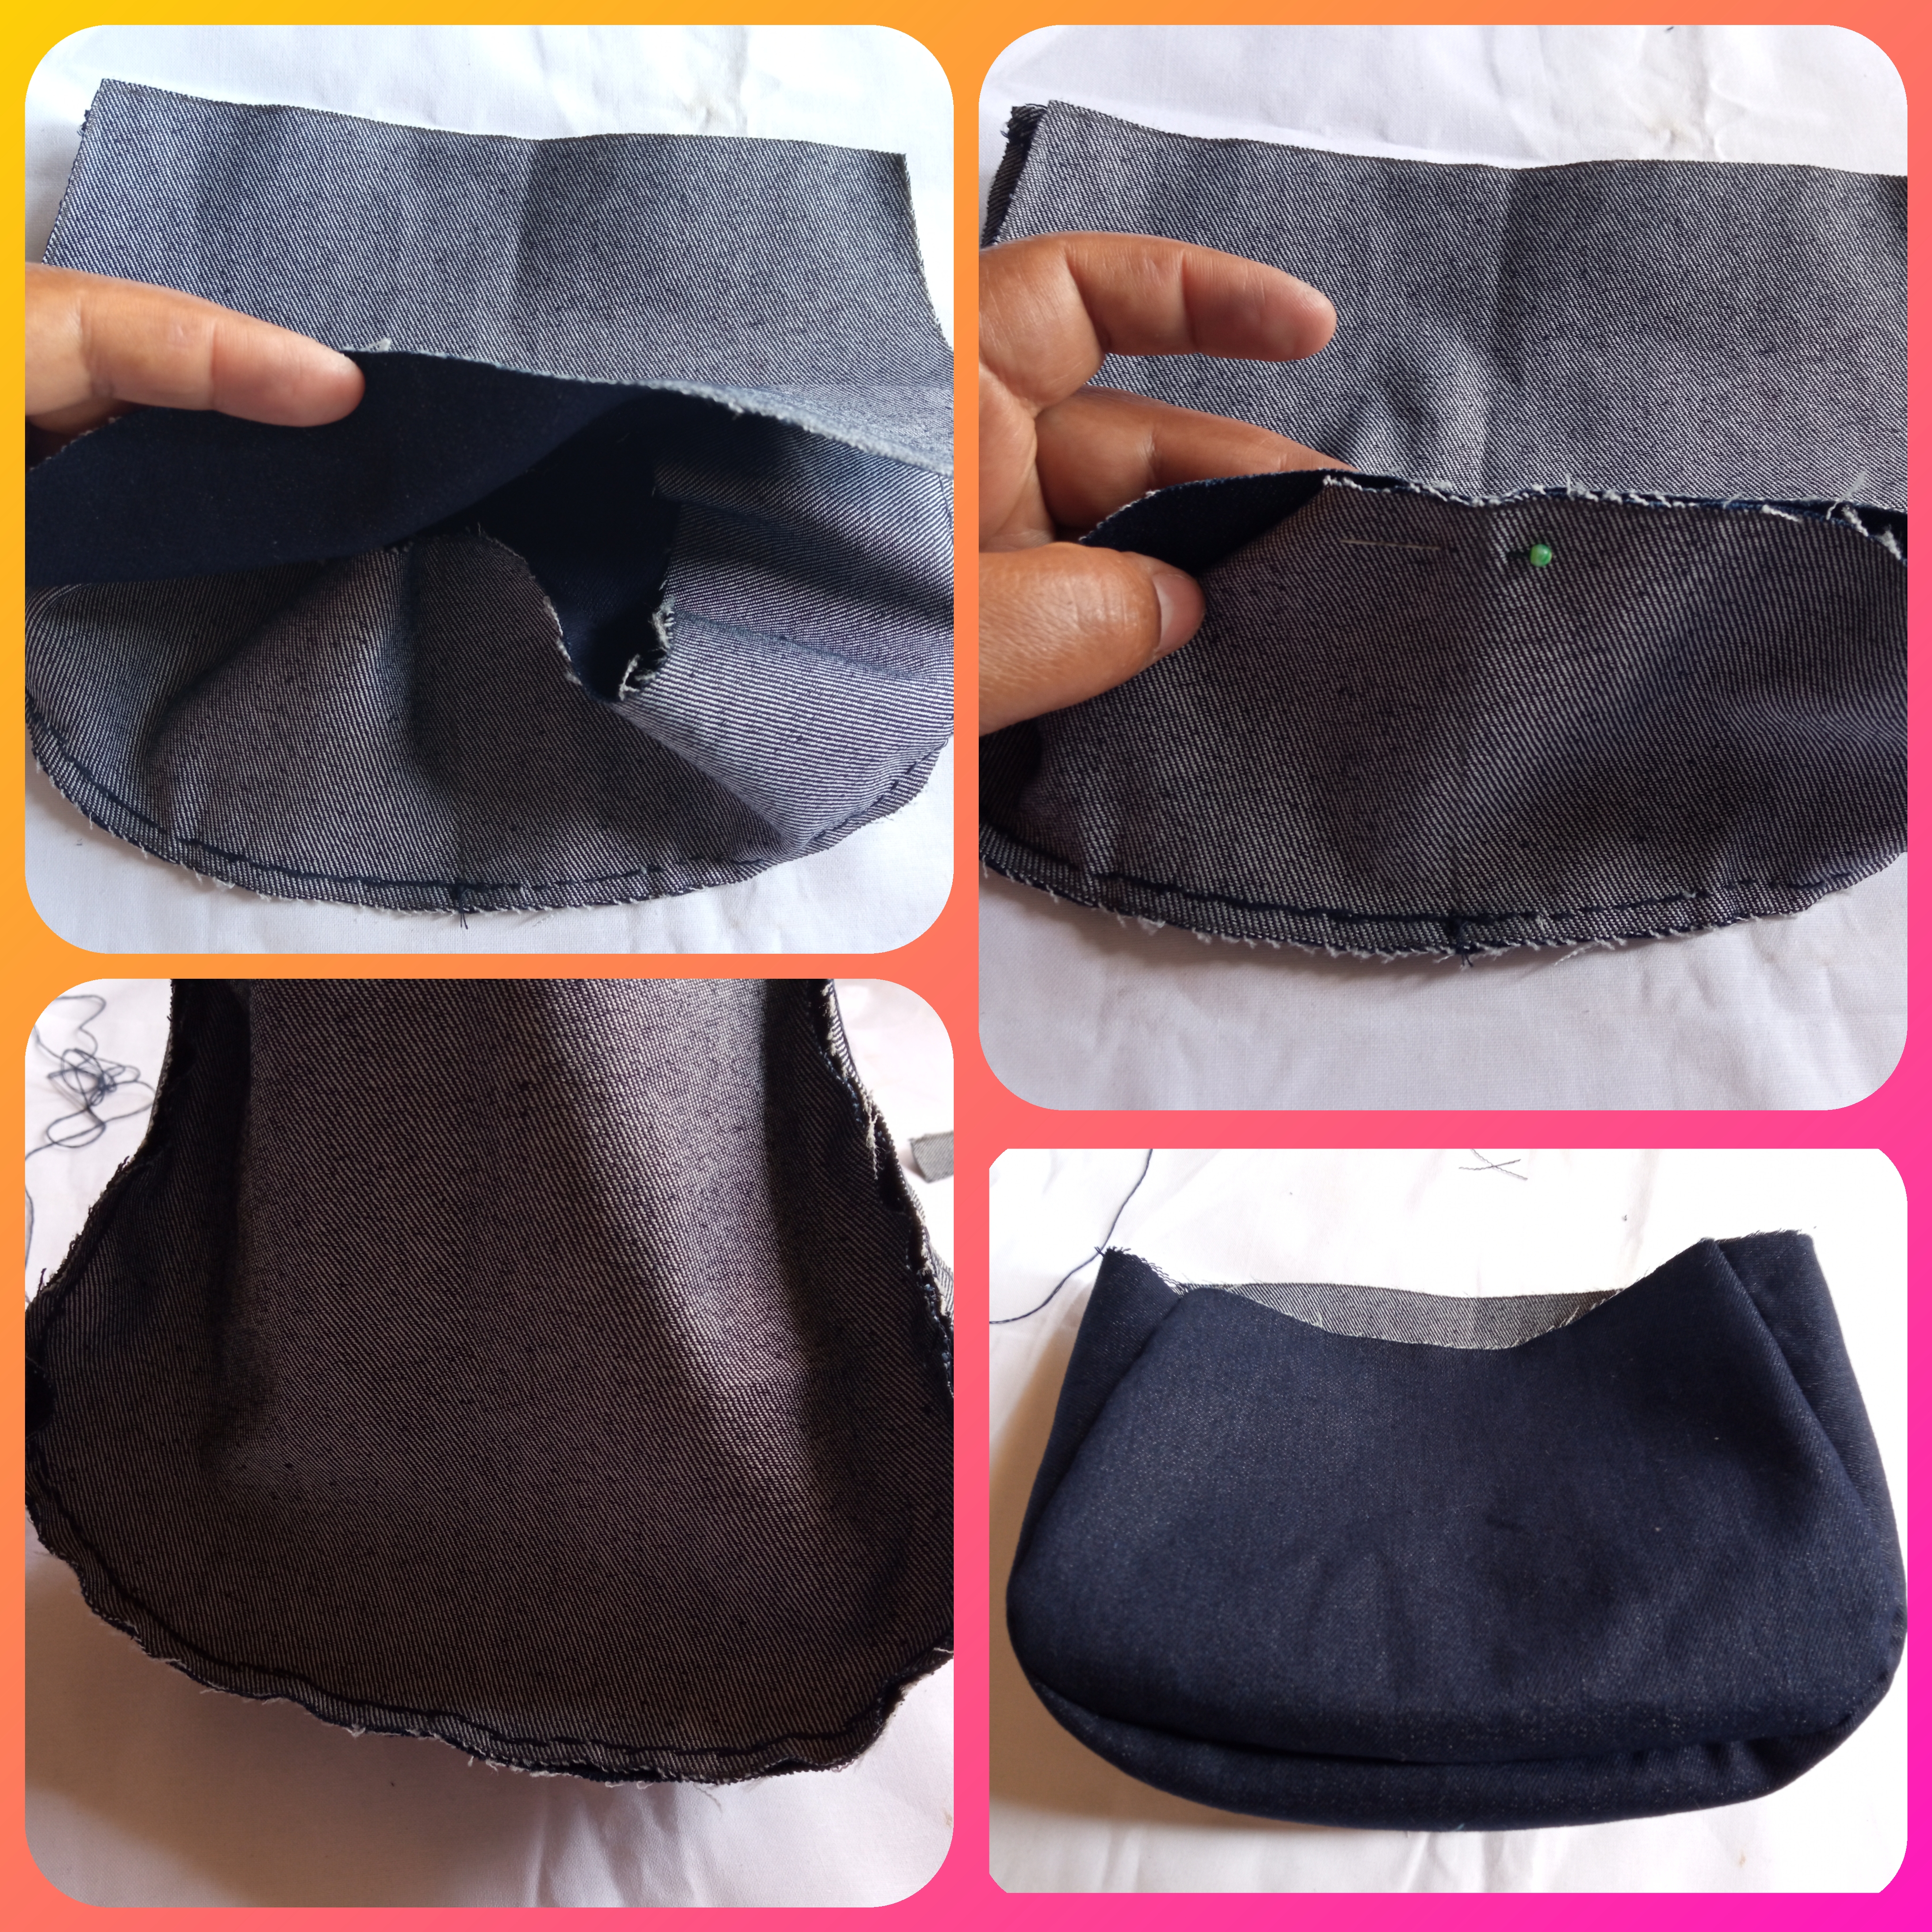
Paso 3:
Tomamos las piezas del bolso y marcamos el centro al igual que el contorno, con ayuda de alfiler fijamos el contorno en una pieza del bolso de manera que el centro marcado concuerden y cosemos punto atrás con hilo azul marino.
Step 3:
We take the pieces of the bag and mark the center as well as the outline, with the help of a pin we fix the outline on a piece of the bag so that the marked center matches and we sew back stitch with navy blue thread.

Paso 4:
Al finalizar tomamos la otra pieza del bolso y siguiendo el centro fijamos con un alfiler y cosemos con punto atrás en hilo azul marino, al finalizar volteamos el bolso.
Step 4:
At the end we take the other piece of the bag and following the center we fix it with a pin and sew with a back stitch in navy blue thread, at the end we turn the bag over.
Paso 5:
Ahora con la ayuda del patrón vamos a corta dos piezas de la tapa del bolso en la tela jeans y cortamos, después con ayuda de una cinta métrica medimos una tira de 30cm de largo y 3 cm de ancho en la tela estampada, luego con ayuda de los afileres doblamos la tira a la mitad y la vamos colocando en unas de las bases de la tapa del bolso así como ven en la imagen, luego montamos la otra pieza con el derecho de frente hacia dentro y cosemos por todo el alrededor, al finalizar volteamos.
Step 5:
Now with the help of the pattern we are going to cut two pieces of the bag cover in the jeans fabric and cut, then with the help of a tape measure we measure a strip of 30cm long and 3 cm wide in the printed fabric, then with the help of the pins we fold the strip in half and we are placing it in one of the bases of the bag cover as you see in the picture, then we assemble the other piece with the right side facing in and sew all around, at the end we flip.

Paso 6:
Colocamos la tapa al bolso con ayuda de alfileres para que no se mueva y cosemos en punto ojal por toda la orilla al finalizar retiramos los Alfileres.
Step 6:
We place the cover to the bag with the help of pins so that it does not move and we sew in buttonhole stitch along the entire edge at the end we remove the pins.

Paso 7:
Vamos ahora a cortar las tiras del bolso, cortamos en tela de jeans dos tiras de 8 cm de ancho y 40 de largo y en la tela estampada cortamos dos tira de 8 cm de ancho y 30 cm de largo que suma el total el largo de la tira 140 cm de largo. A las tiras estampadas cortamos a un extremo en forma de punta. Después unimos las tiras estampadas a la tiras de jean haciendo dos tiras luego doblamos a la mitad y cosemos de extremo a extremo luego con ayuda de un palito volteamos las tiras.
Step 7:
Now we are going to cut the strips of the bag, we cut in jeans fabric two strips of 8 cm wide and 40 cm long and in the printed fabric we cut two strips of 8 cm wide and 30 cm long, the total length of the strip is 140 cm long. To the printed strips we cut at one end in the form of a point. Then we join the printed strips to the jean strips making two strips then we fold in half and sew end to end then with the help of a stick we flip the strips.

Paso 8:
Tomamos las dos tiras y la cosemos a los lados del bolso, cosemos muy bien que las tiras queden hacia bajo así como les muestro en la foto.
Step 8:
We take the two strips and sew them to the sides of the bag, sew very well so that the strips are facing downwards as shown in the photo.

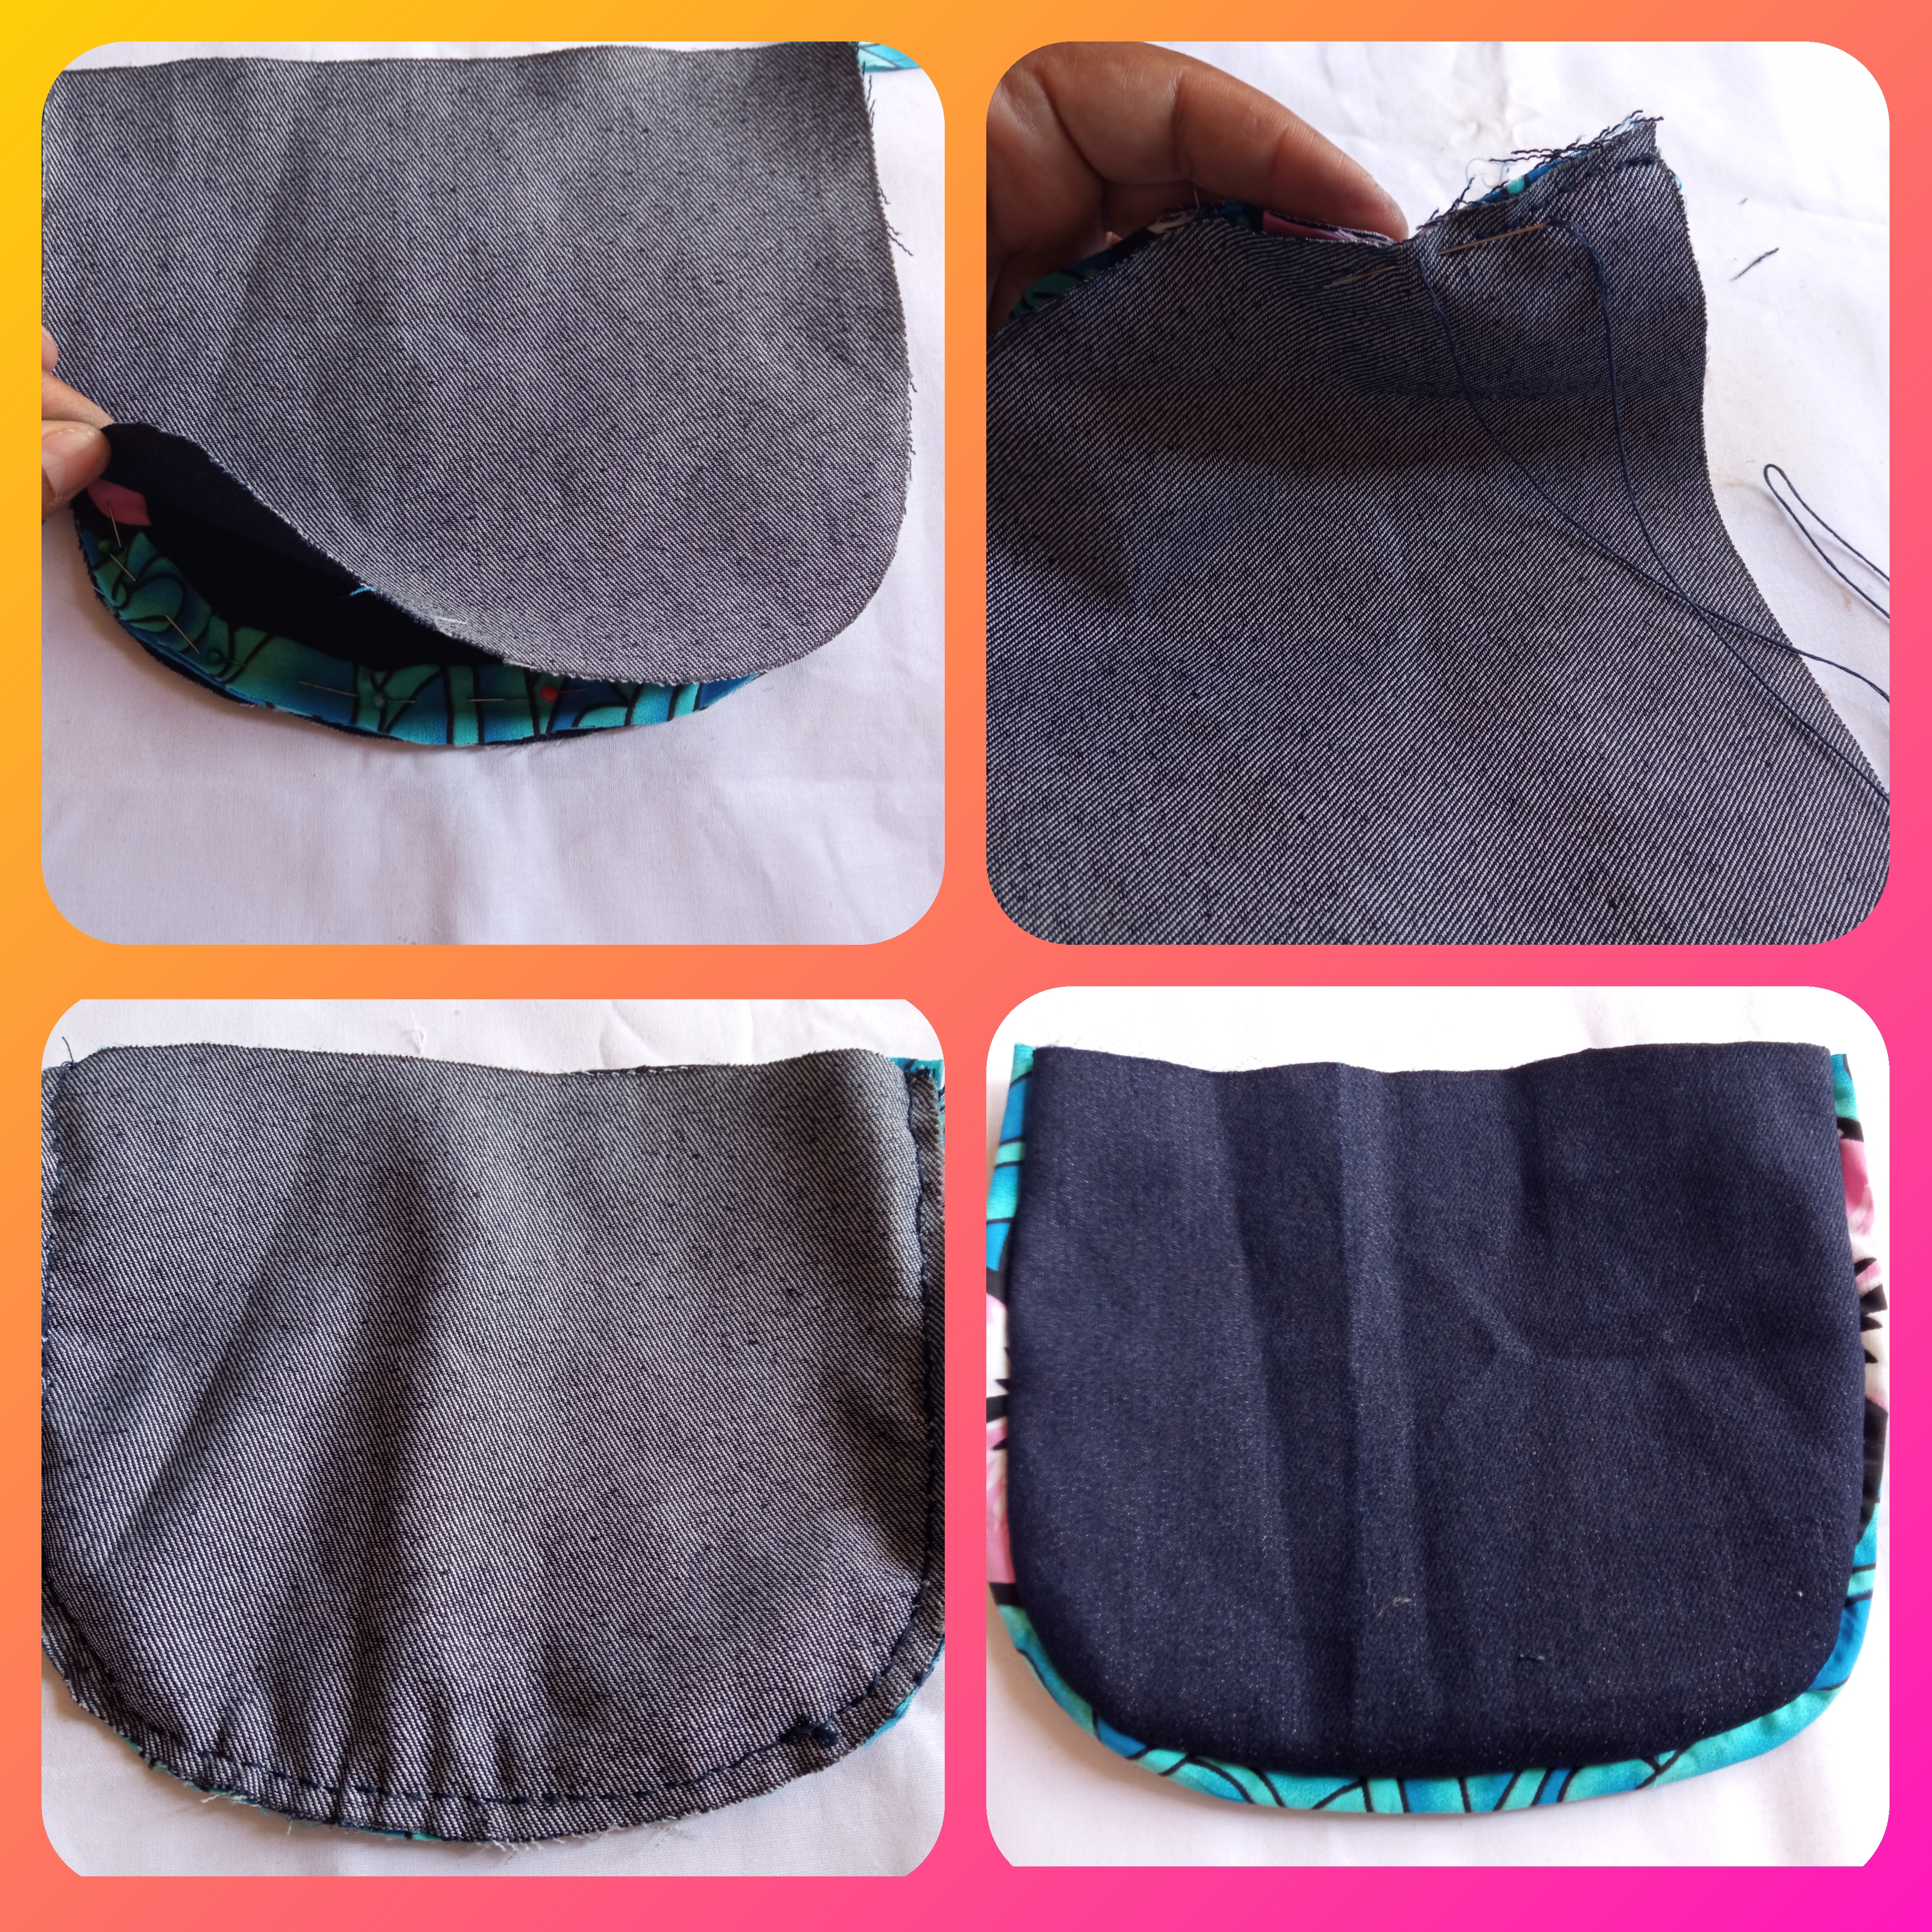
Paso 9:
Con ayuda del patrón cortamos en tela estampada dos piezas del bolso y el contorno, cosemos siguiendo los Pasos 3 y 4 está vez vamos a dejar un agujero ya que por hay vamos a voltear el bolso.
Step 9:
With the help of the pattern we cut in printed fabric two pieces of the bag and the outline, we sew following Steps 3 and 4 this time we are going to leave a hole since we are going to turn the bag over.

Paso 10:
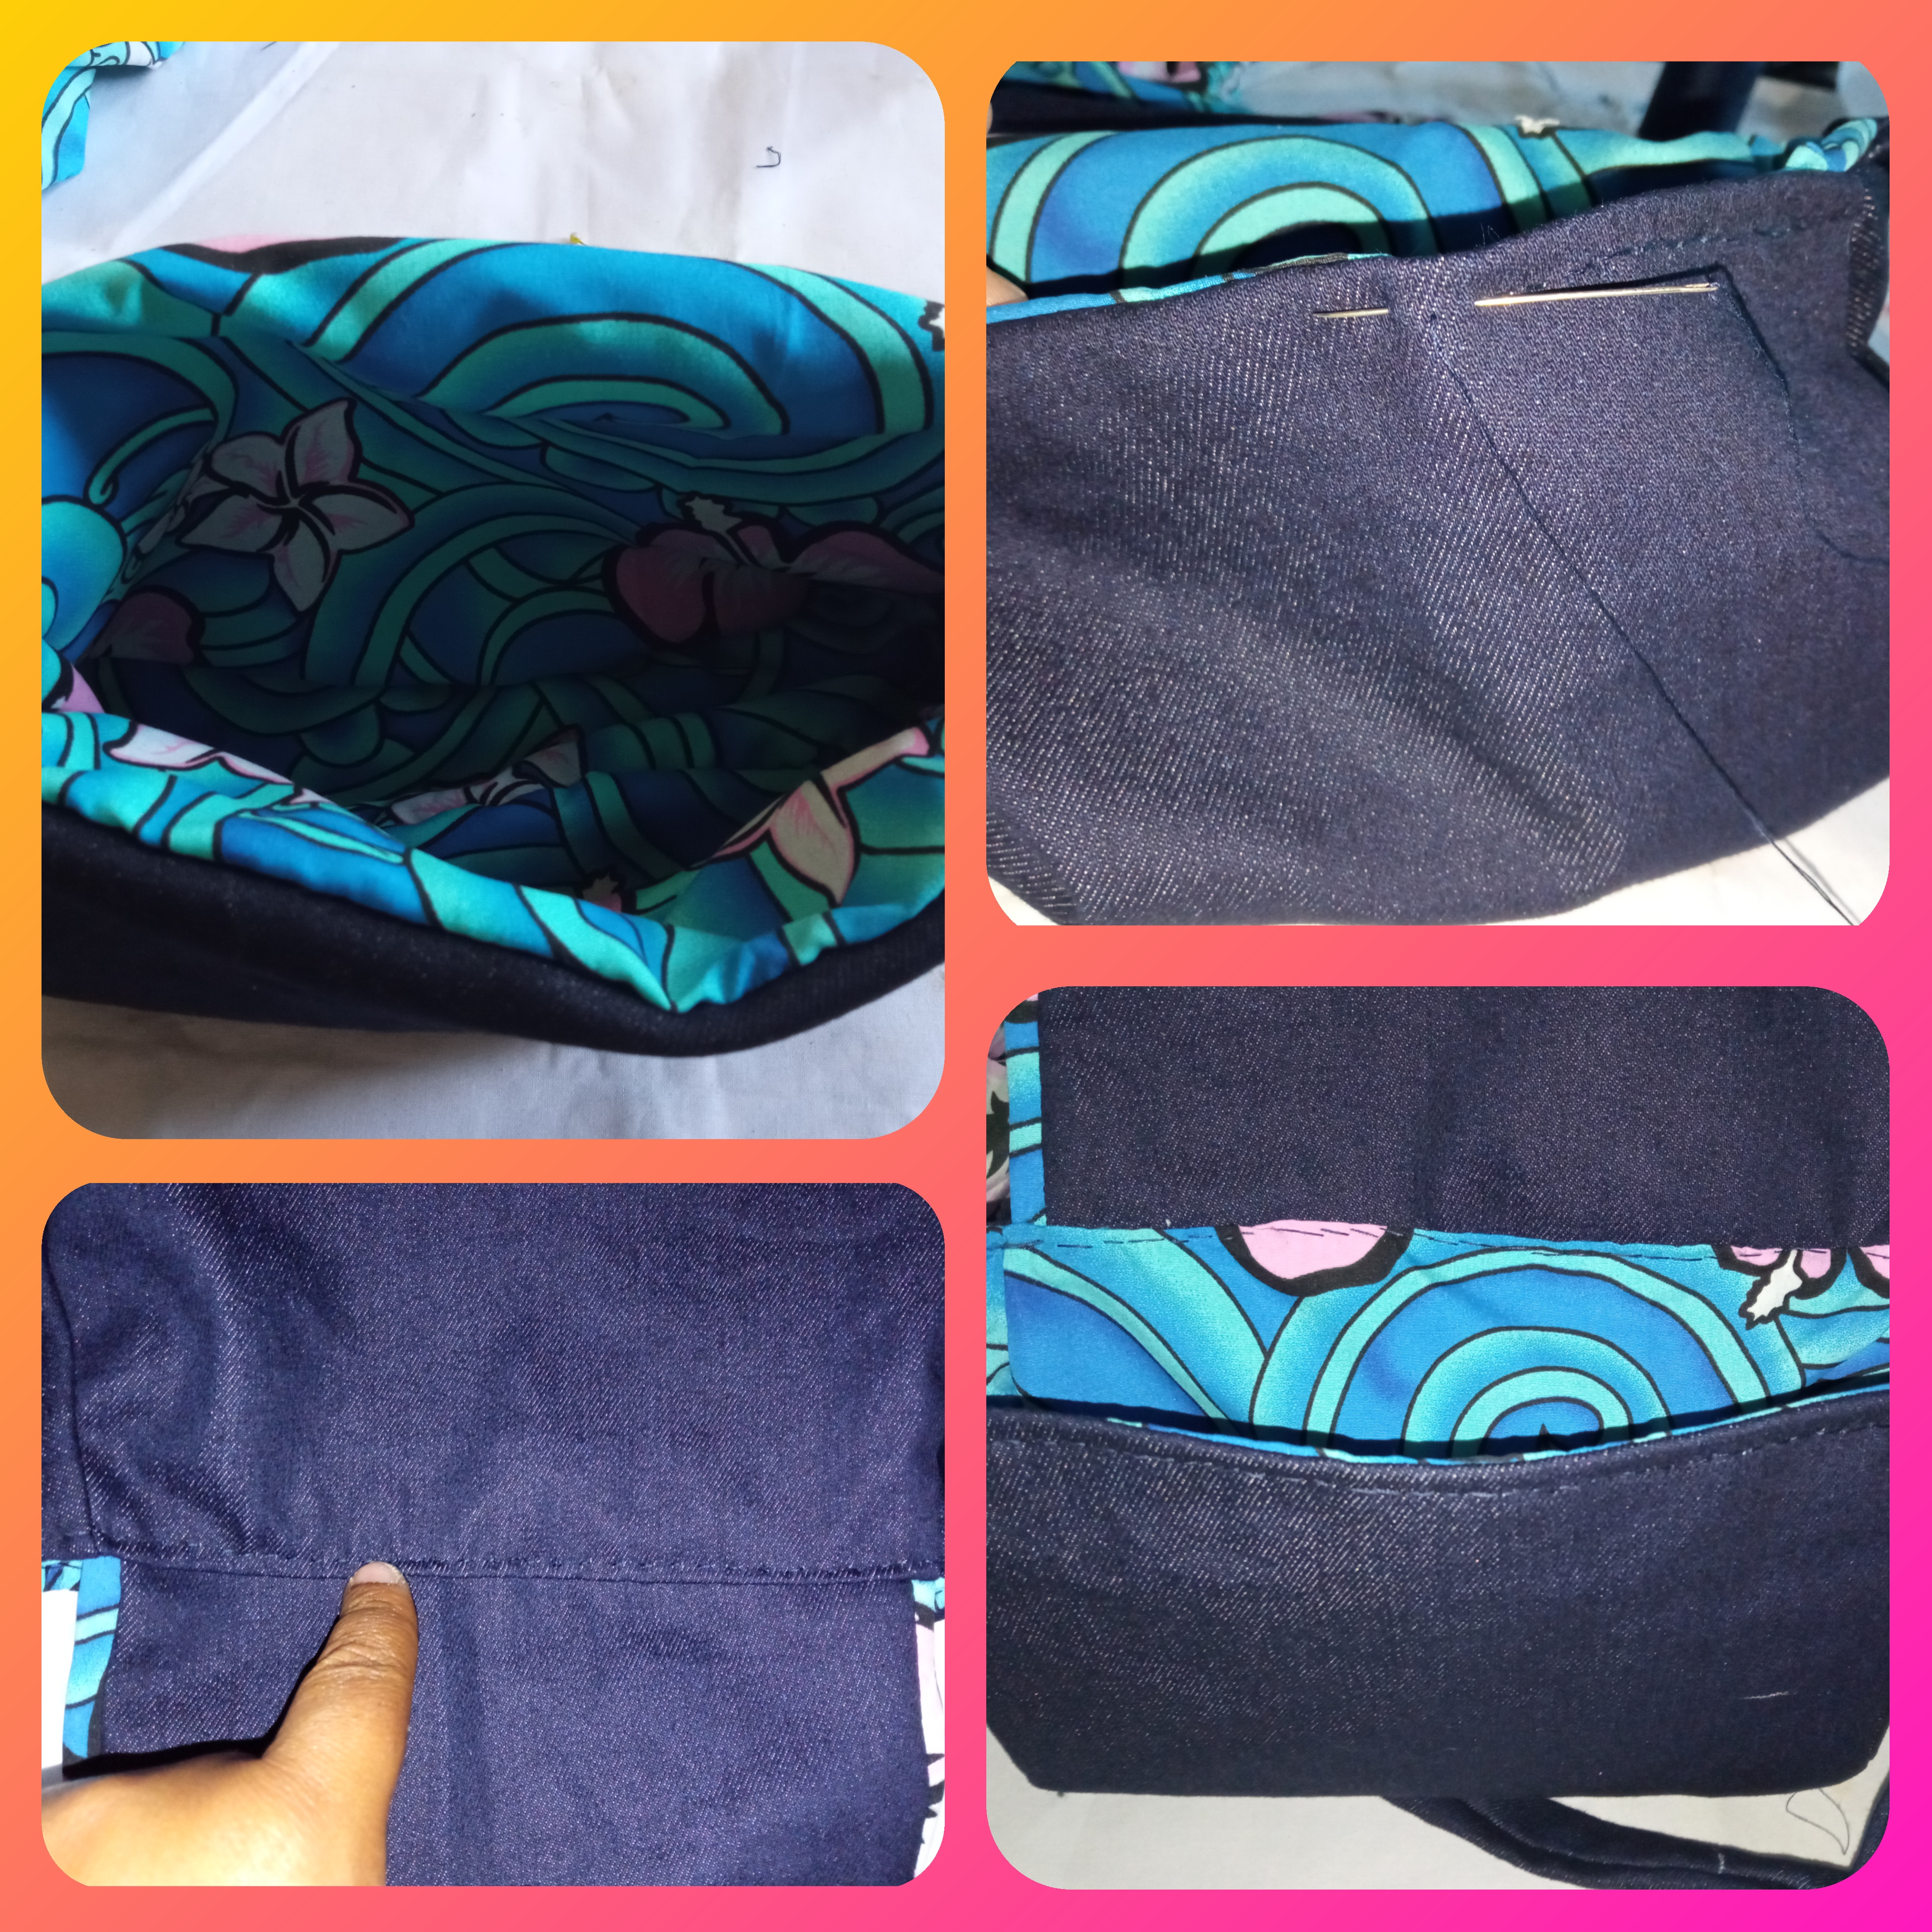
Ya teniendo la tapa y las tiras cocidas al bolso de jeans ahora vamos a meterlo dentro del bolso estampado este estará al revés y cosemos por toda la orilla, al terminar por el agujero que dejamos volteamos el bolso luego cosemos el agujero con una puntada pequeña para que no se note.
Step 10:
Once we have the cover and the strips sewn to the jeans bag, now we are going to put it inside the printed bag, this will be upside down and we sew all around the edge, when we finish through the hole we left we turn the bag over and then we sew the hole with a small stitch so that it is not noticeable.
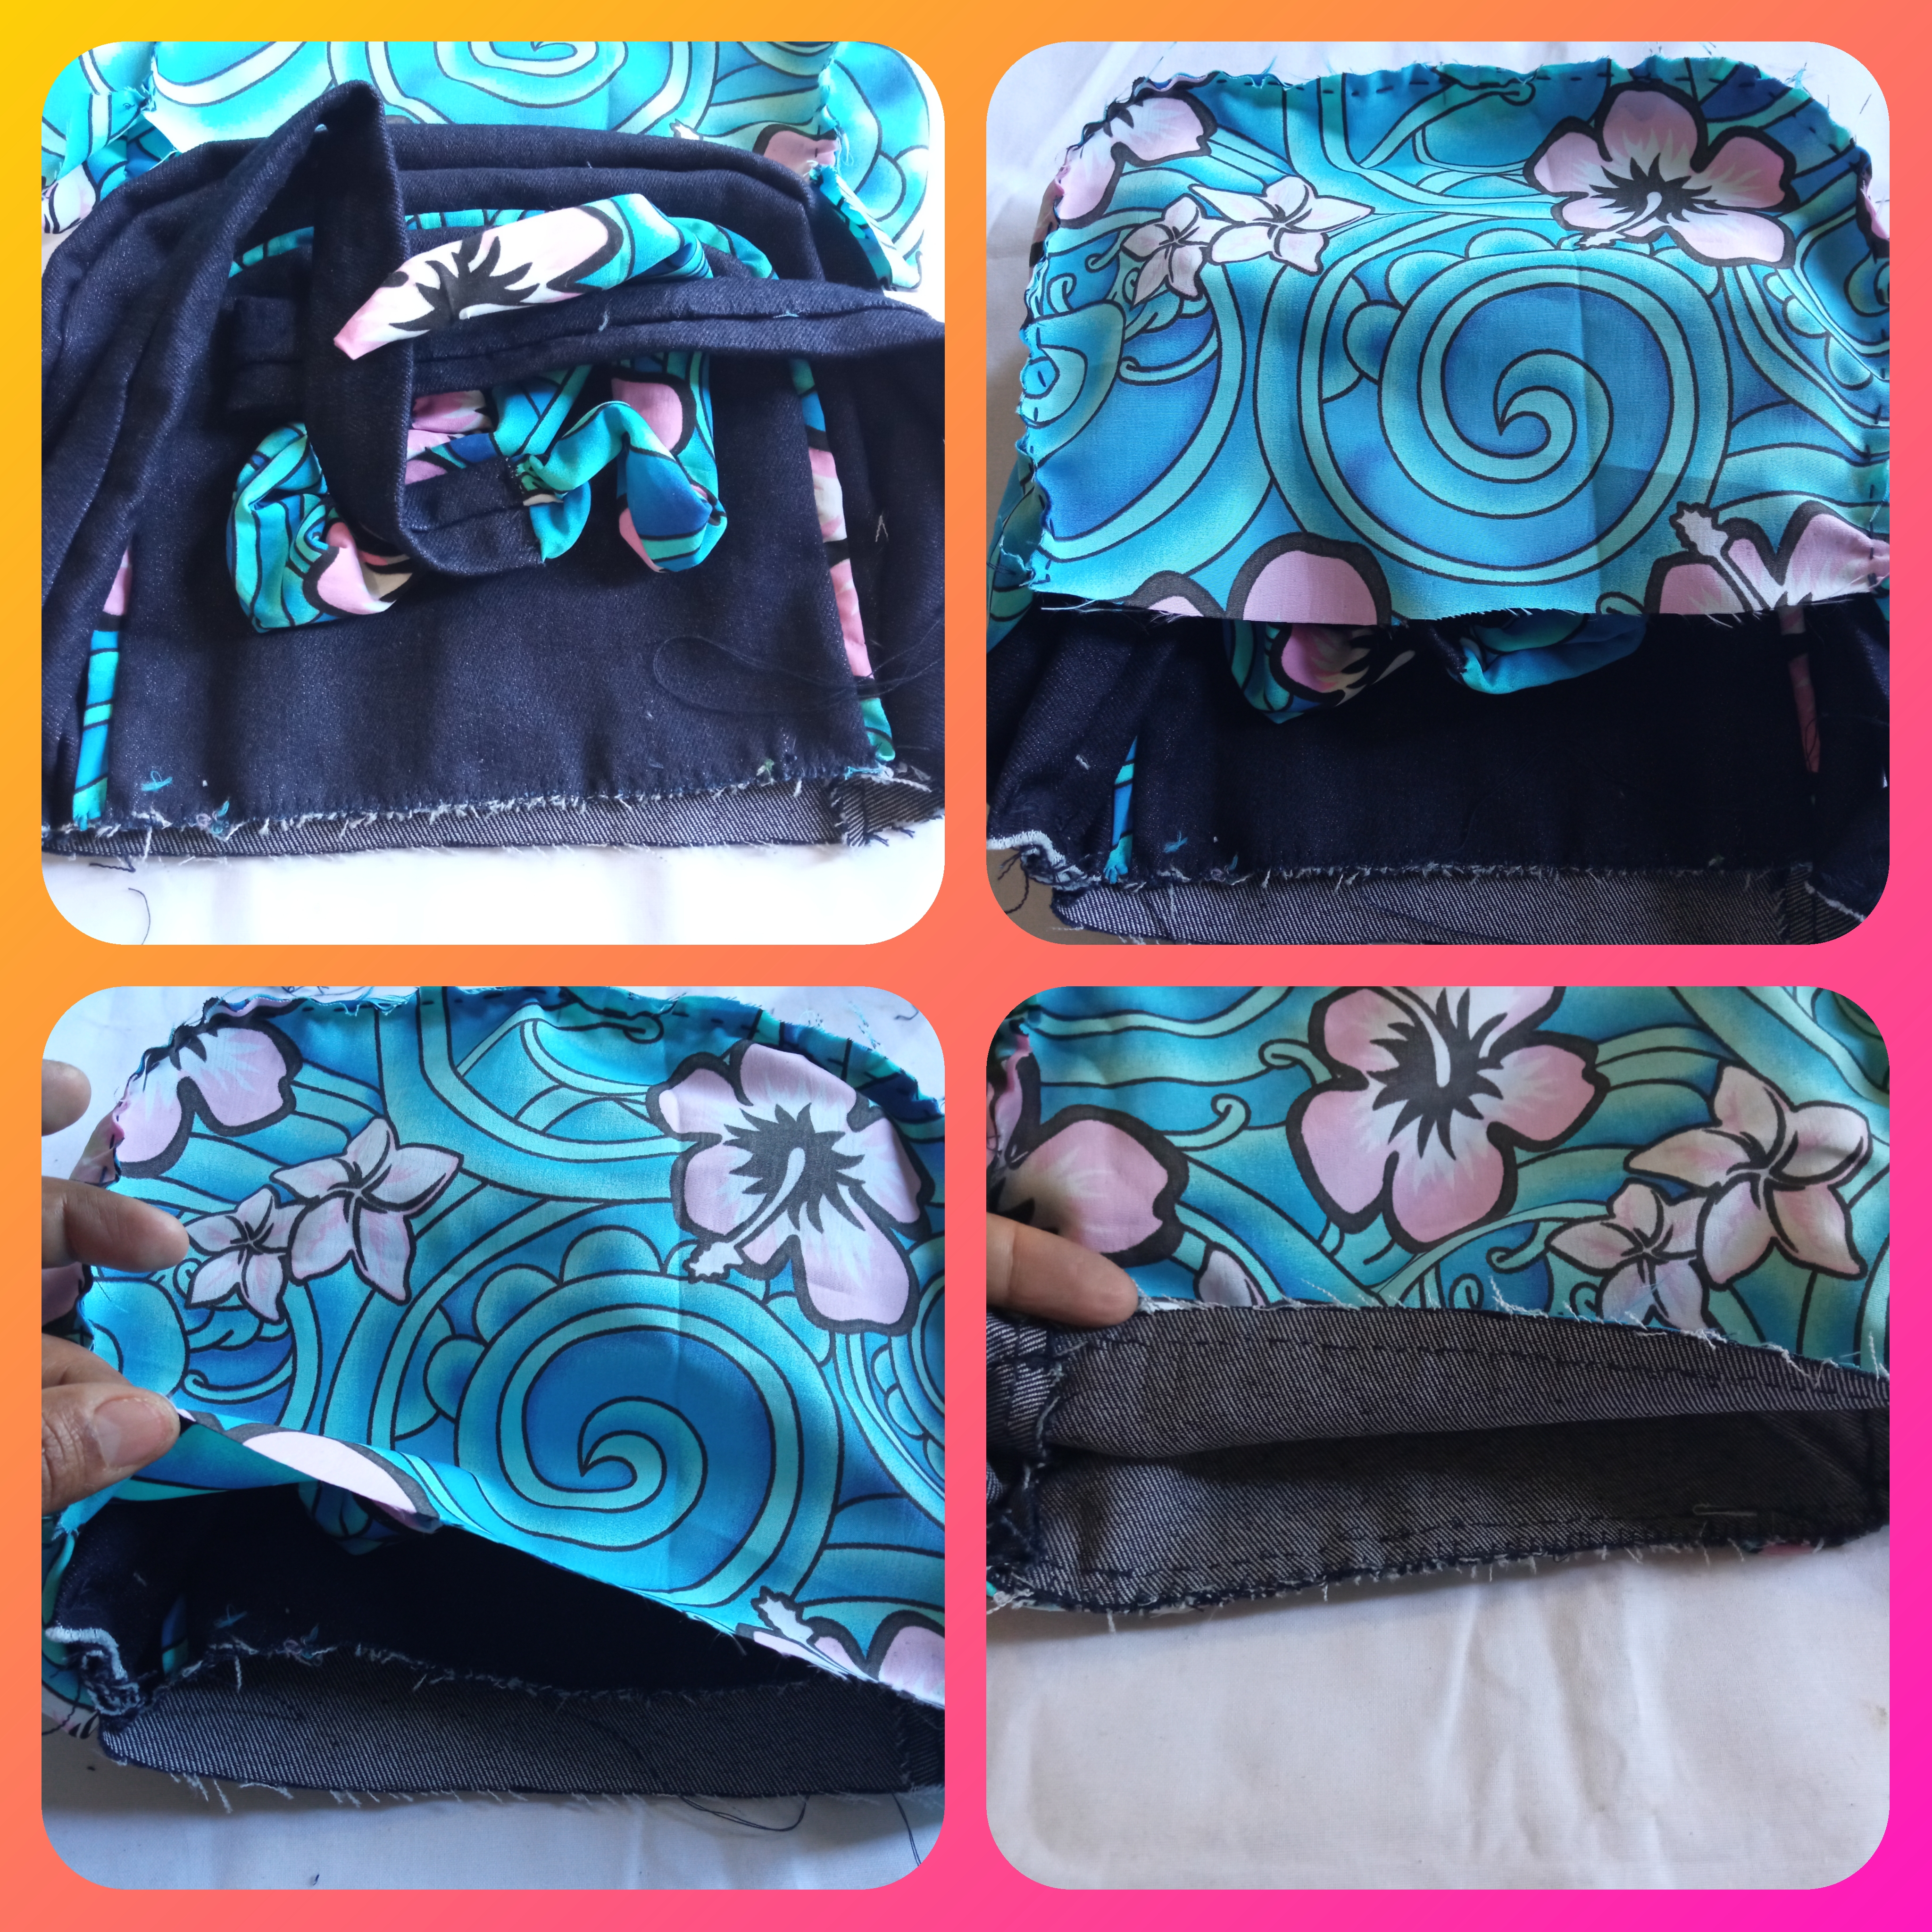

Paso 11:
Ahora metemos el bolso o forro estampado dentro del bolso de jeans y cosemos en punto atrás por toda la orilla para que el forro no se suba.
Step 11:
Now we put the bag or printed lining inside the jeans bag and sew in back stitch all around the edge so that the lining does not ride up.
Paso 12:
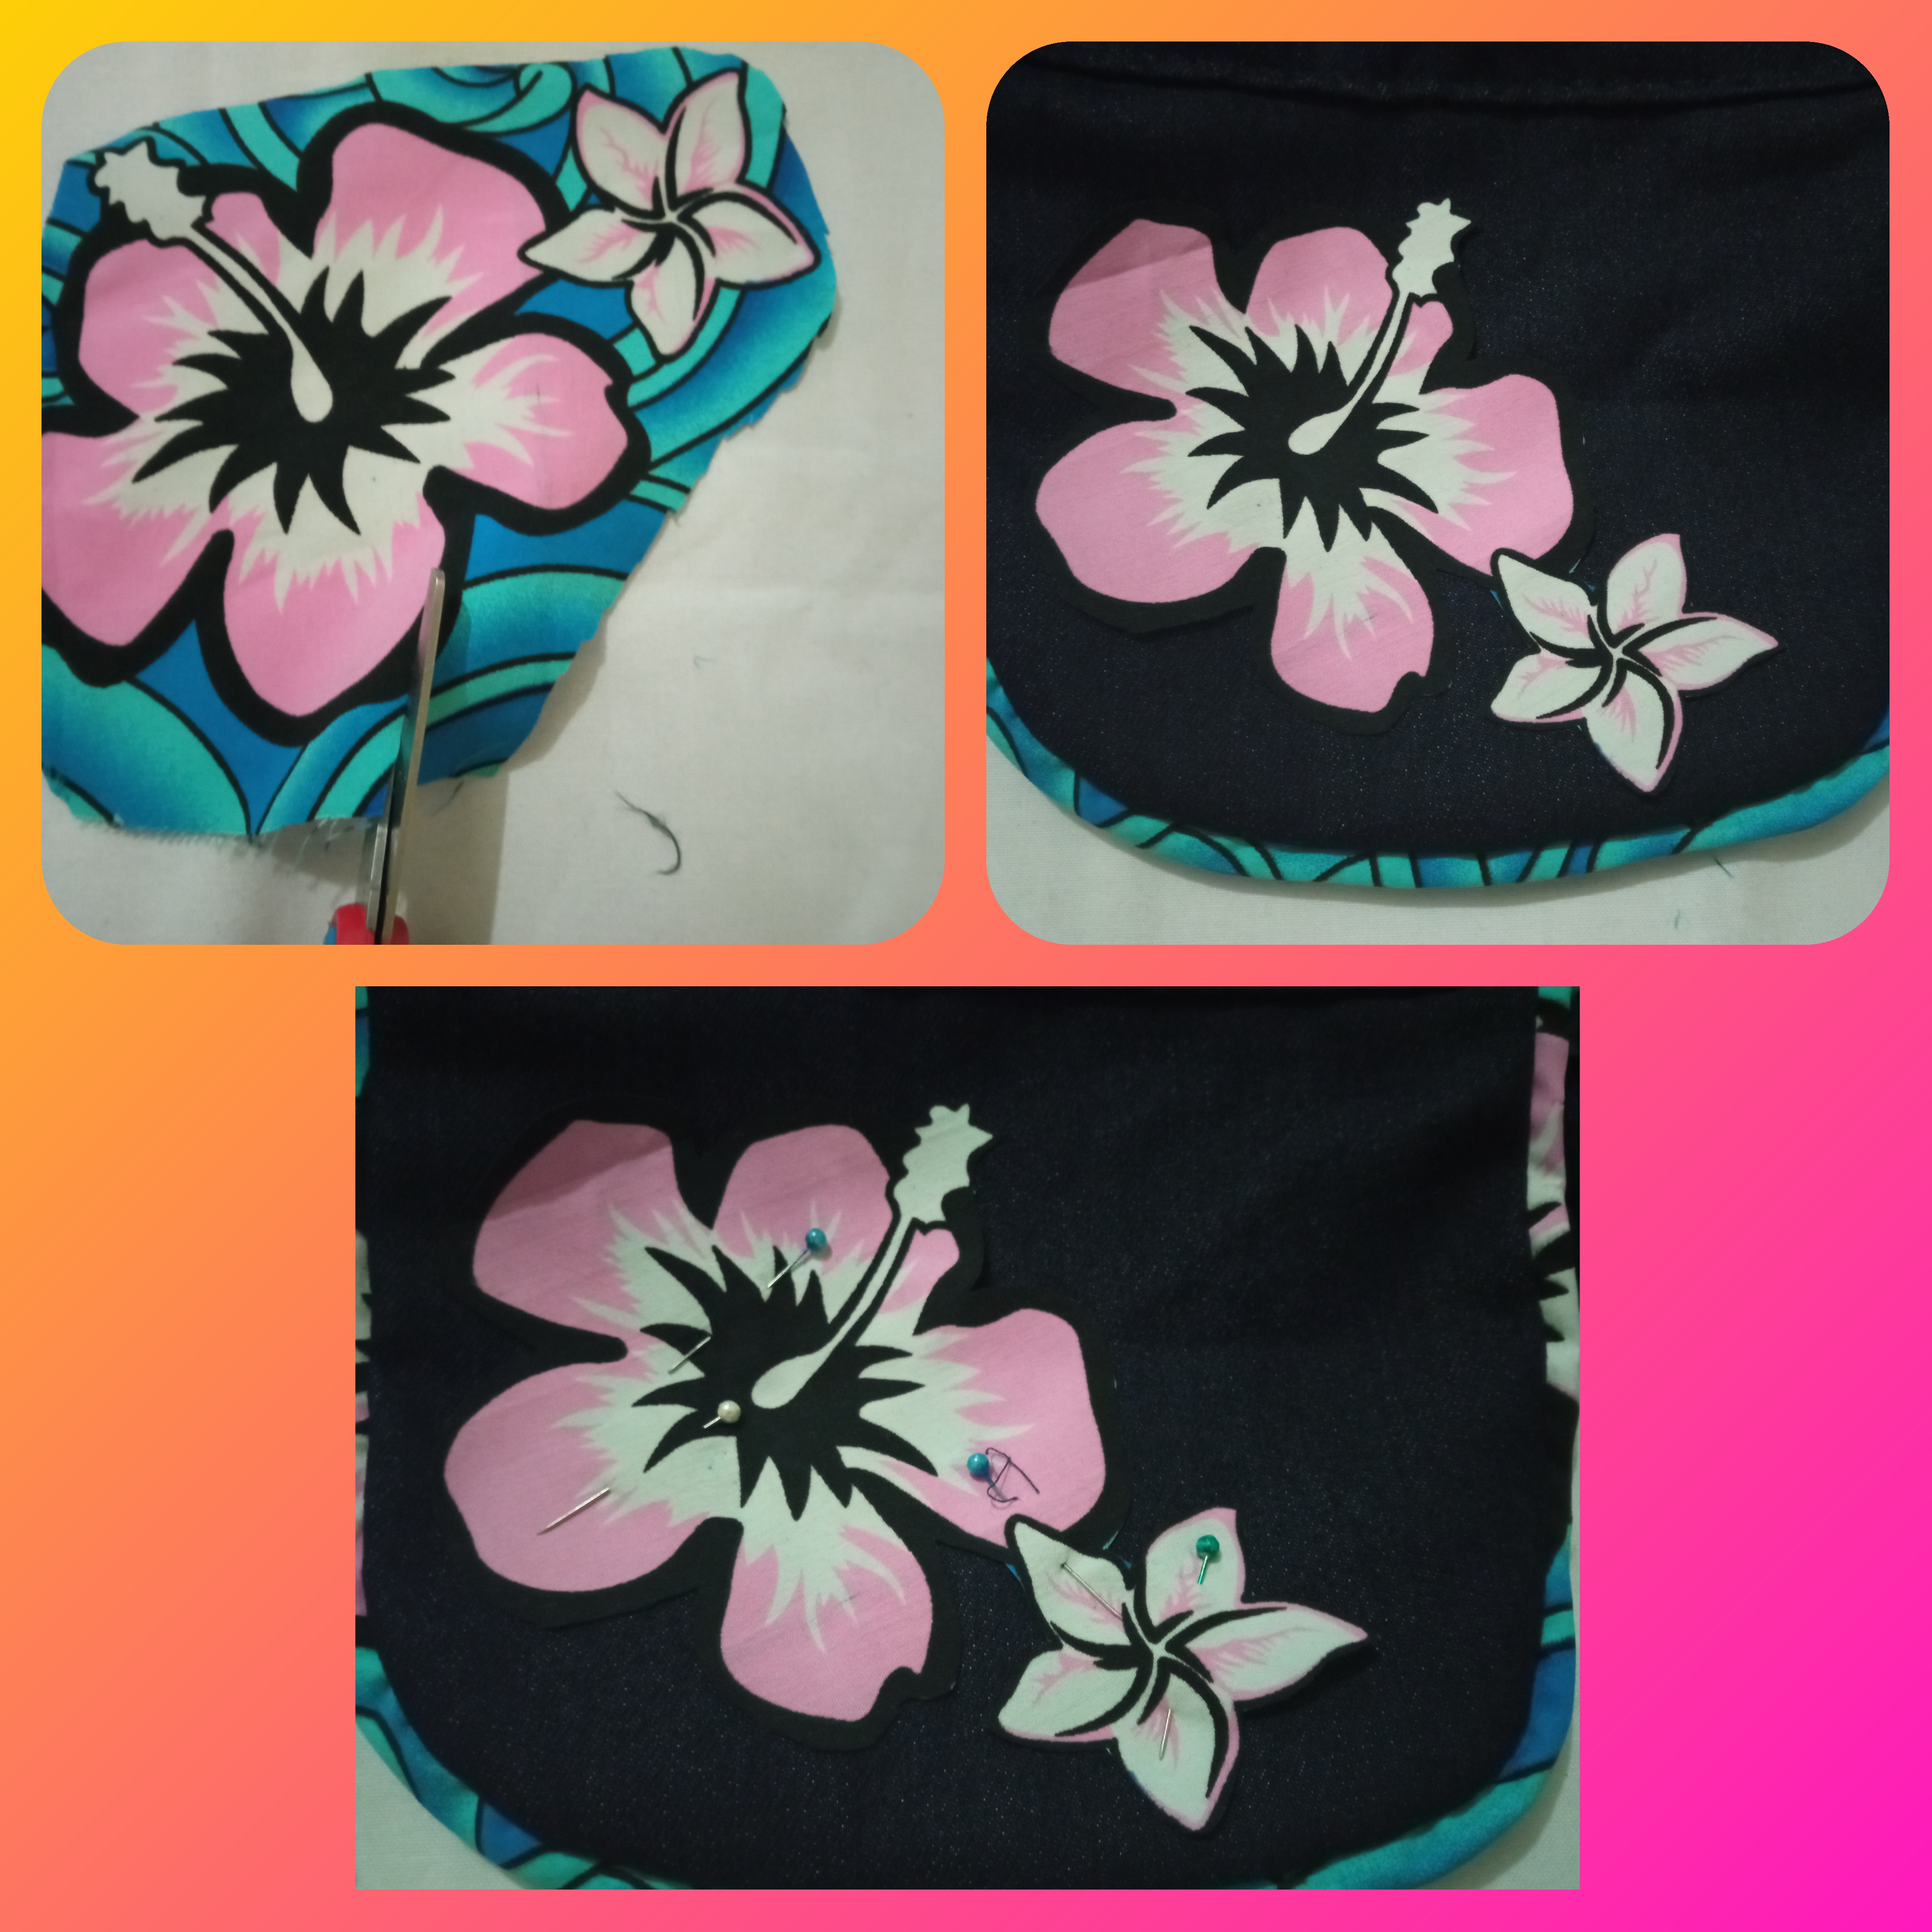
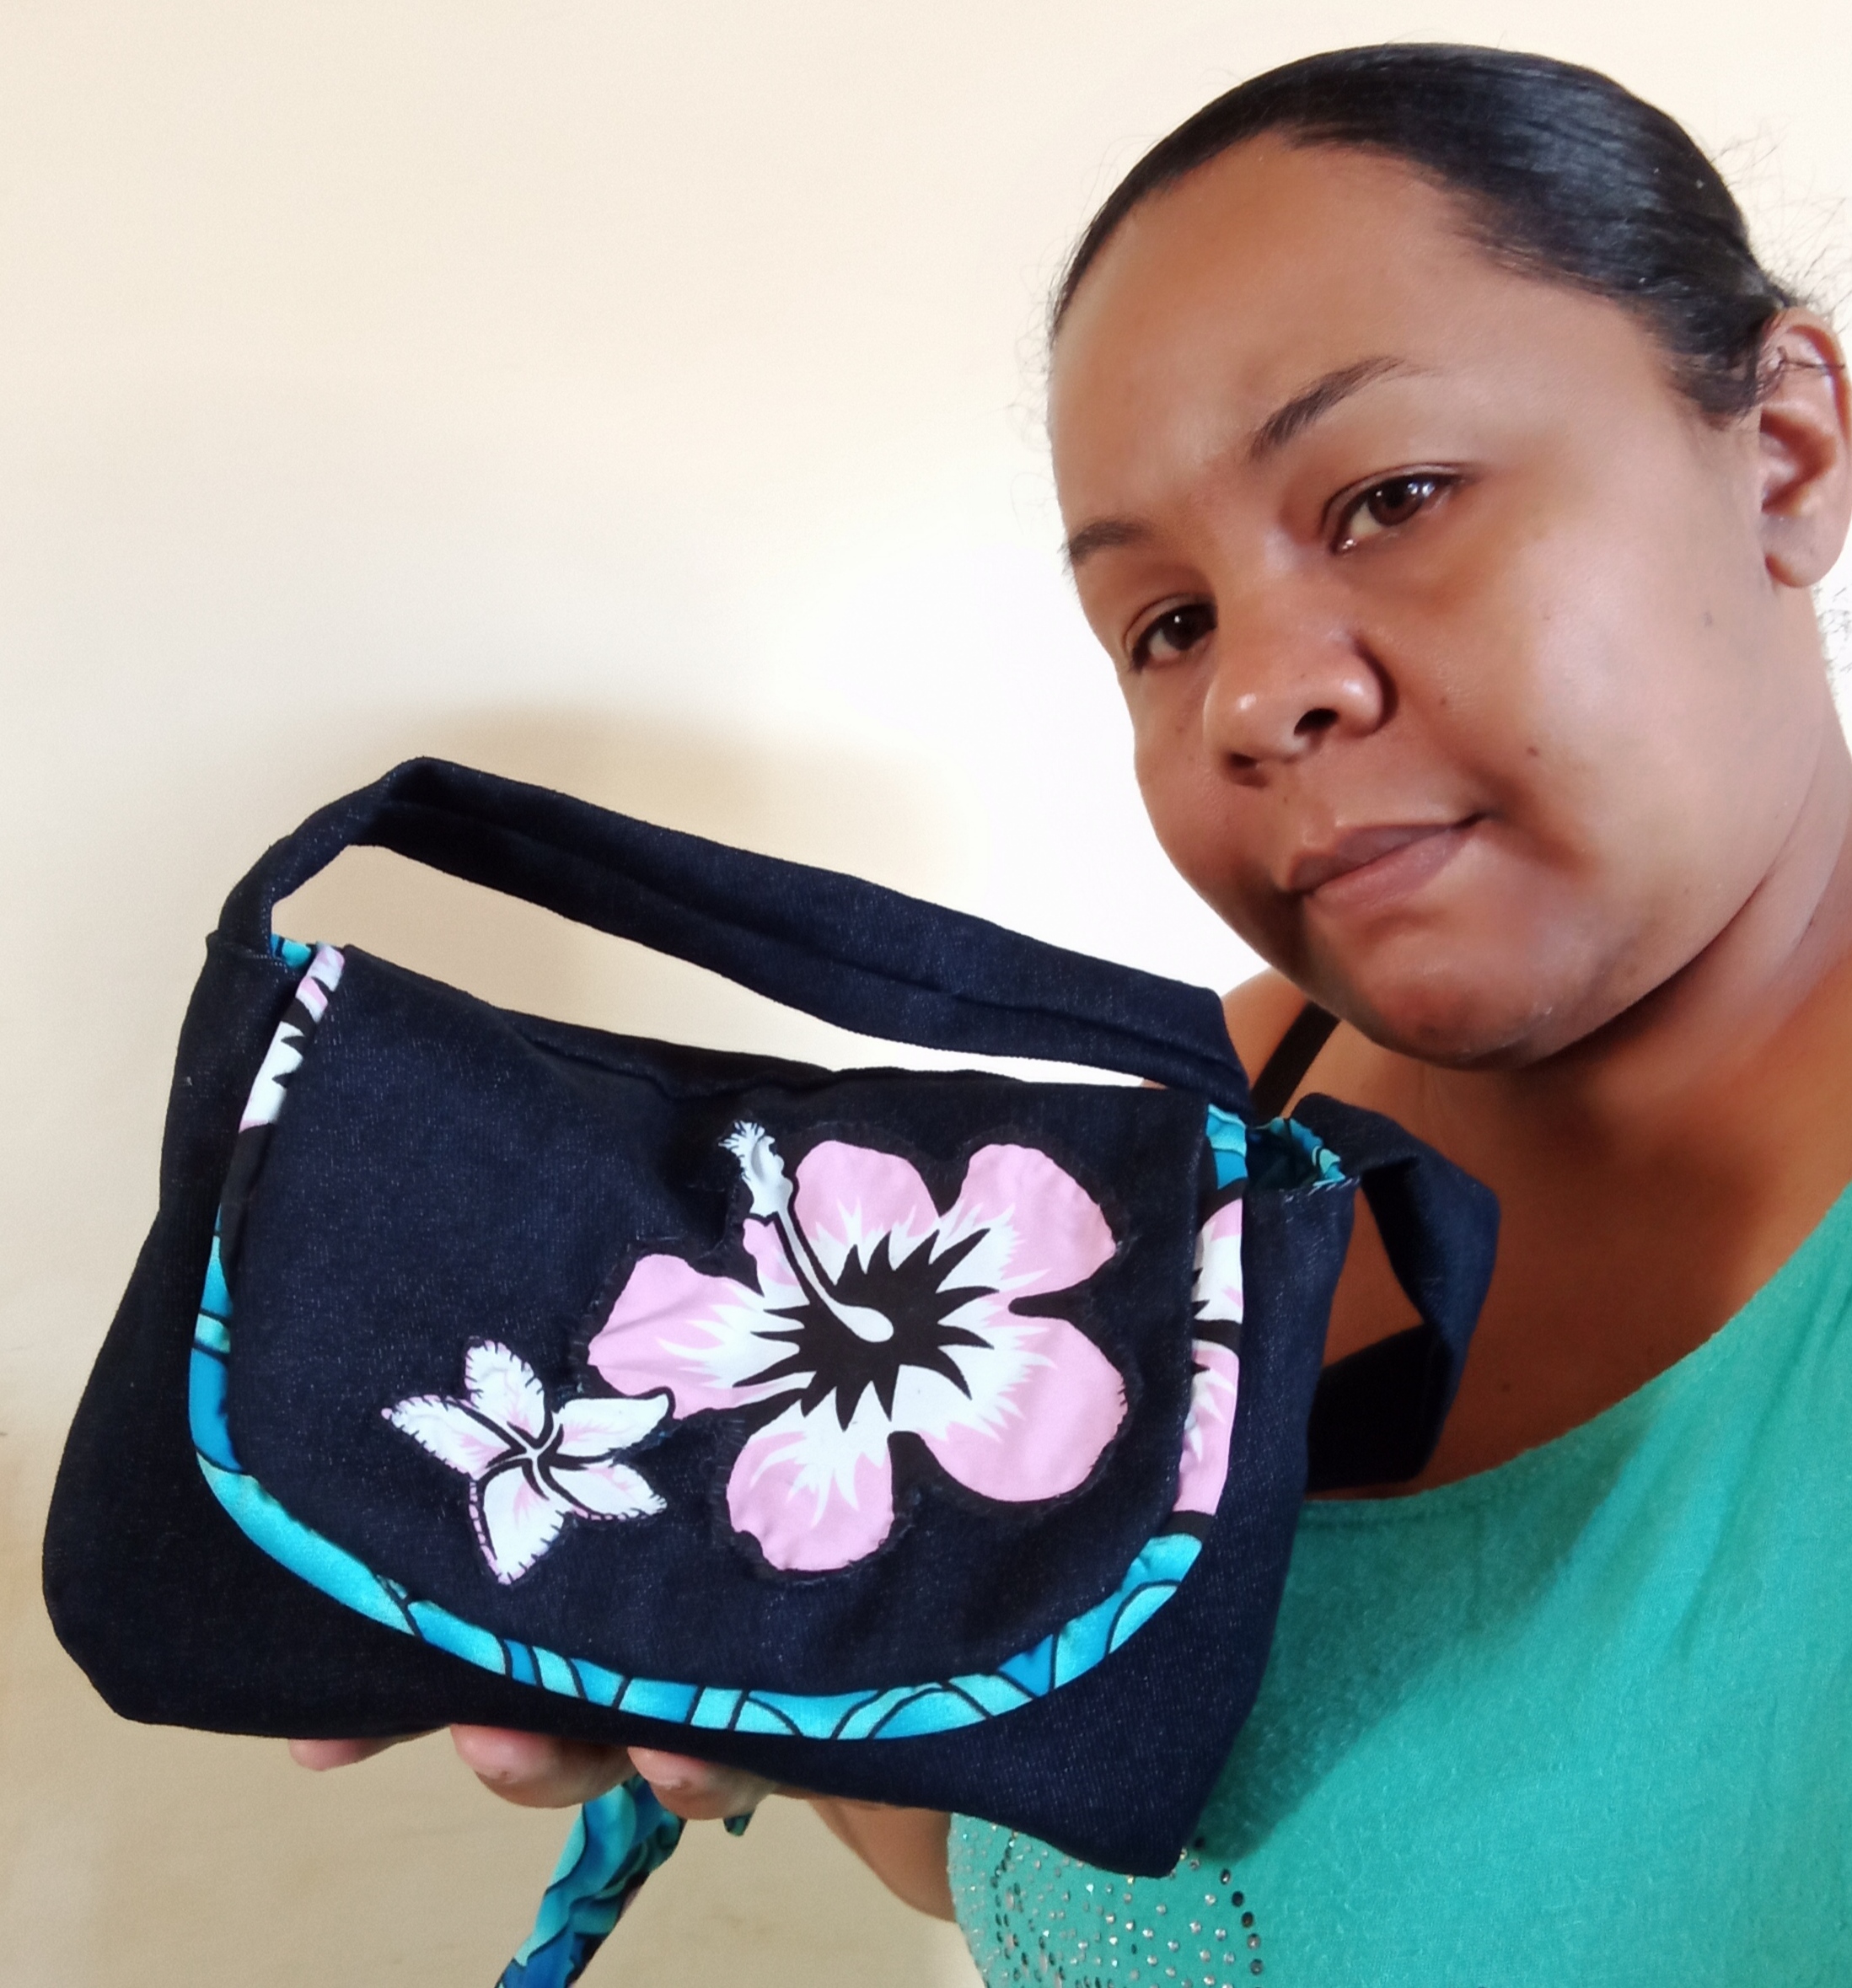
Quise hacerle un detalle a mi bolso y tuve la genial idea de cortar una flor de la tela estampada y la coloque en mi bolso con alfileres luego borde en hilo negro.
Step 12:
I wanted to make a detail to my bag and I had the great idea to cut a flower from the printed fabric and place it on my bag with pins then border in black thread.
Paso 13:
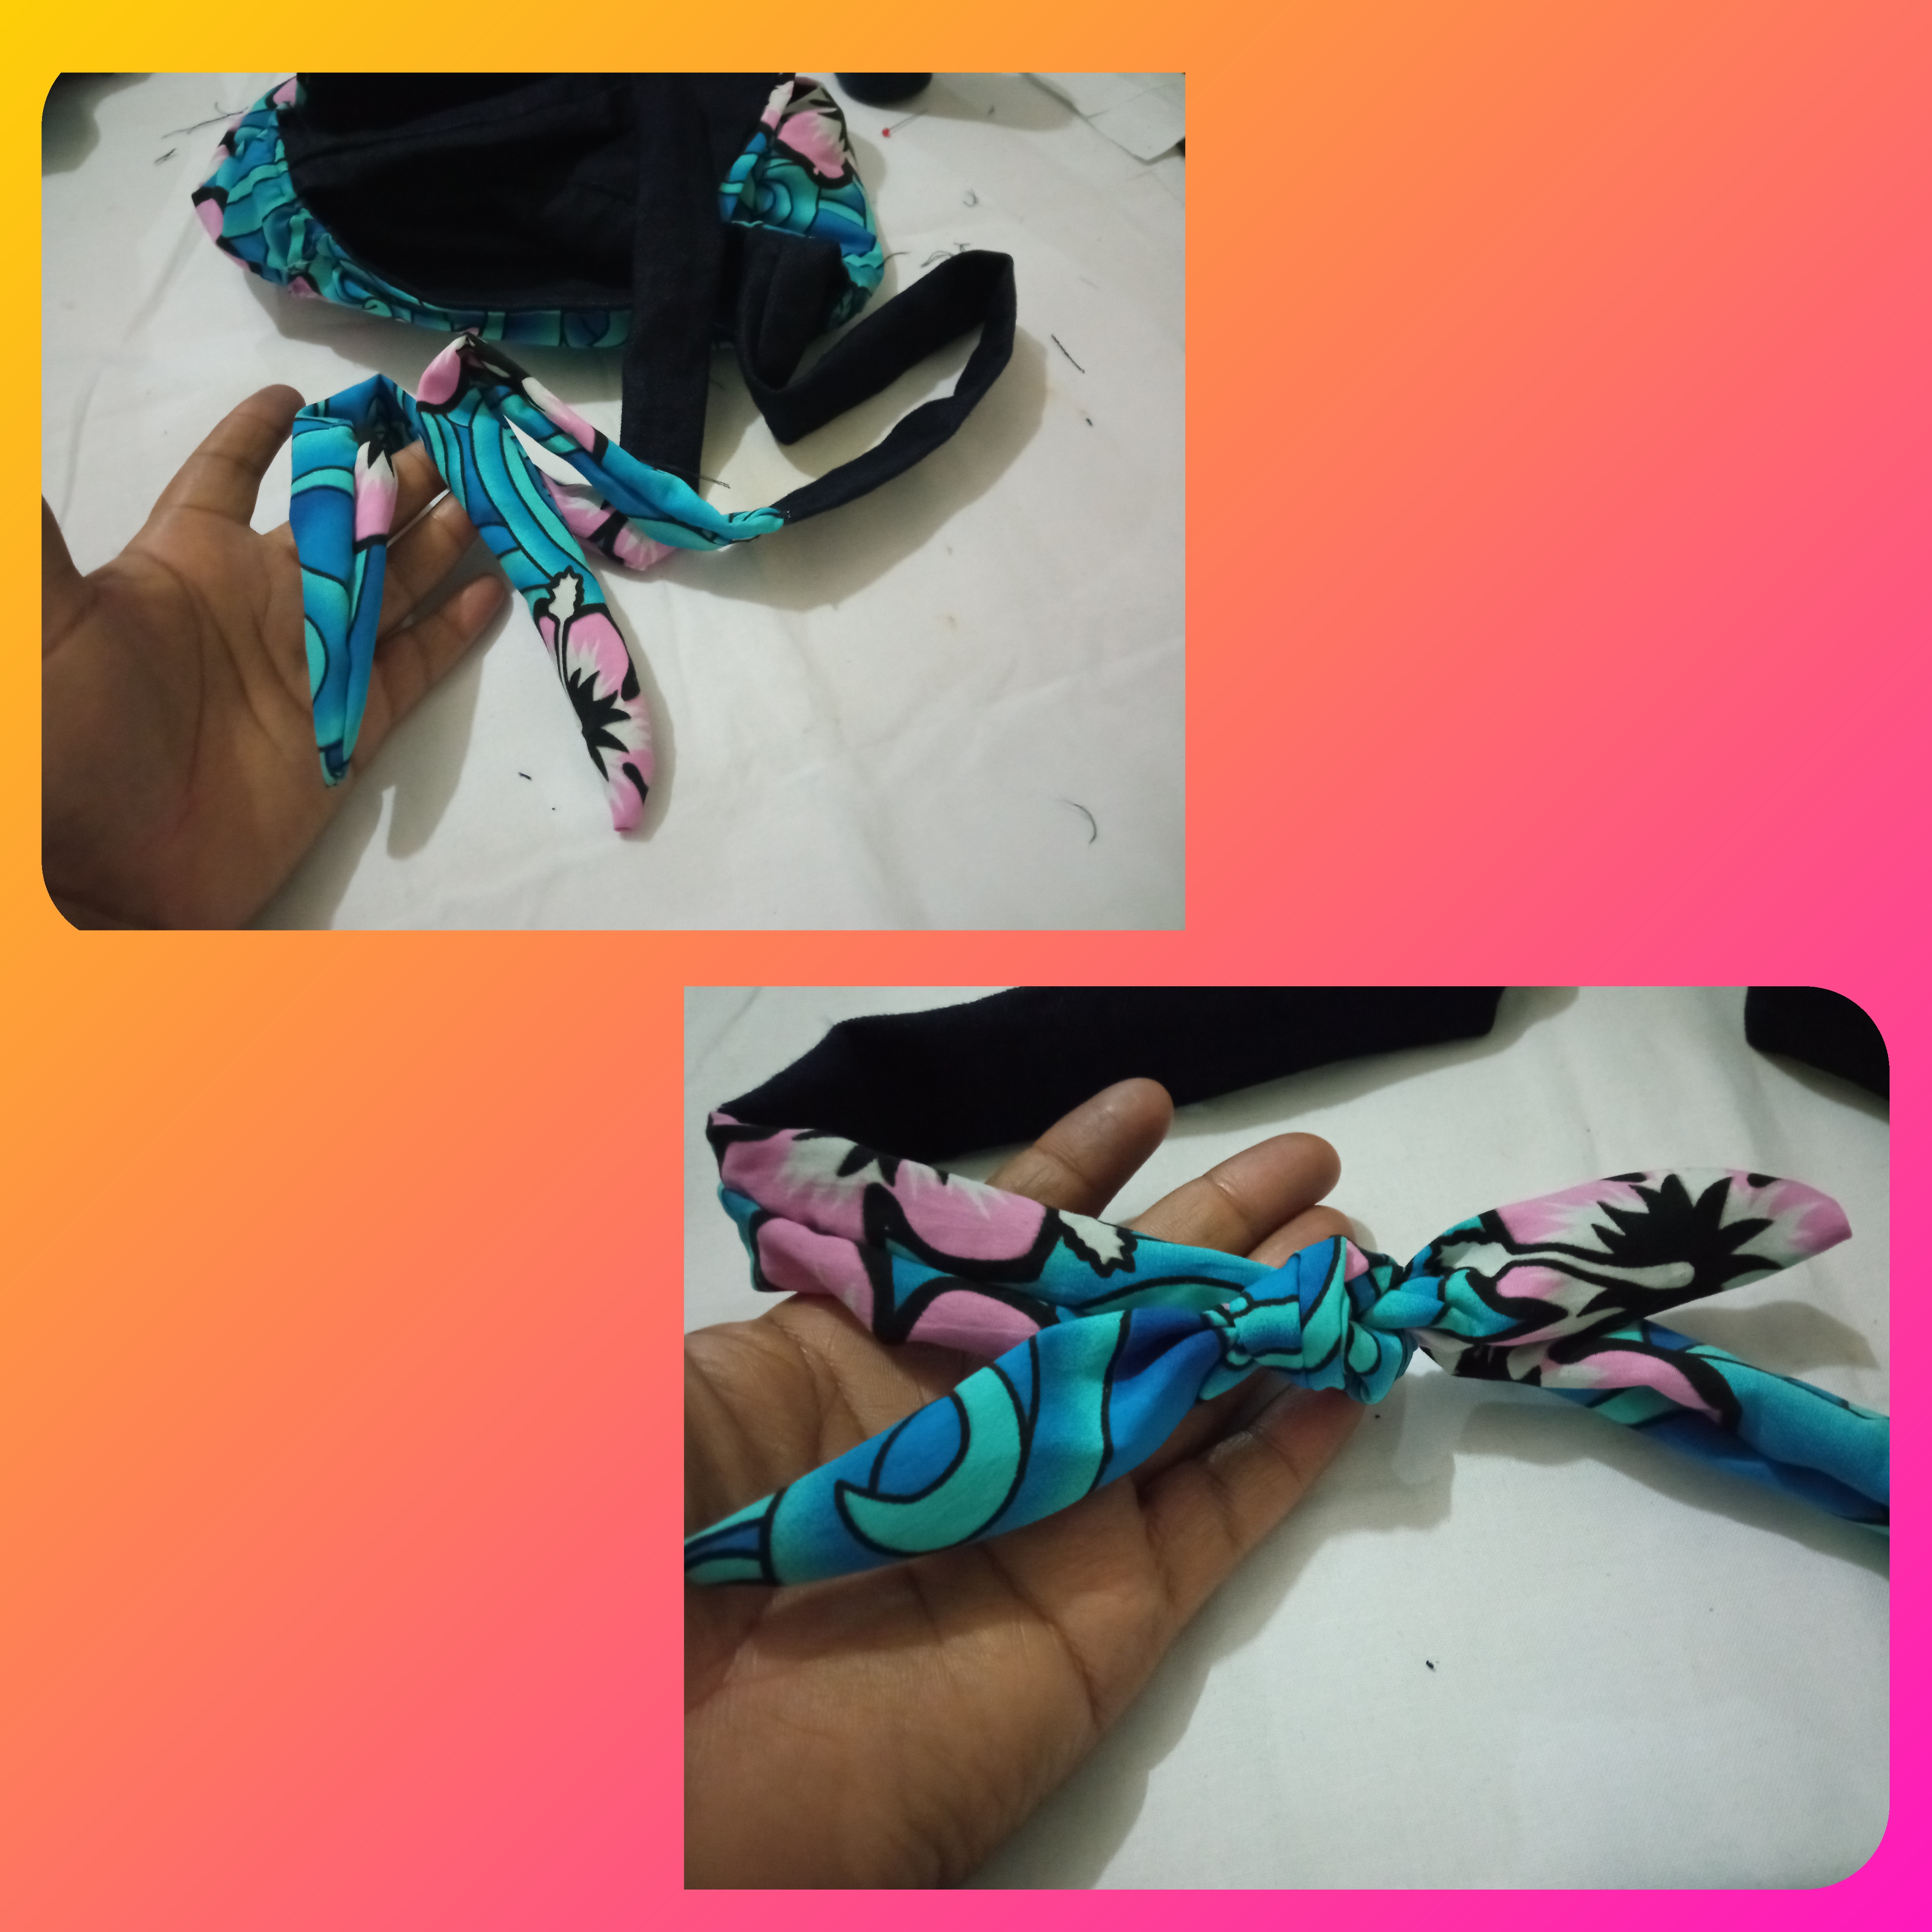
Para finalizar tome las tiras y las uni luego la amarre a mi medida haciendo un nudo muy bonito.
Step 13:
To finish, I took the strips and joined them together and then tied them to my size, making a beautiful knot.
¡Ya mi Hermoso 😍 Bolso 👜 Reversible está Terminando! // Already my beautiful 😍 Reversible 👜 Bag 👜 is finishing!
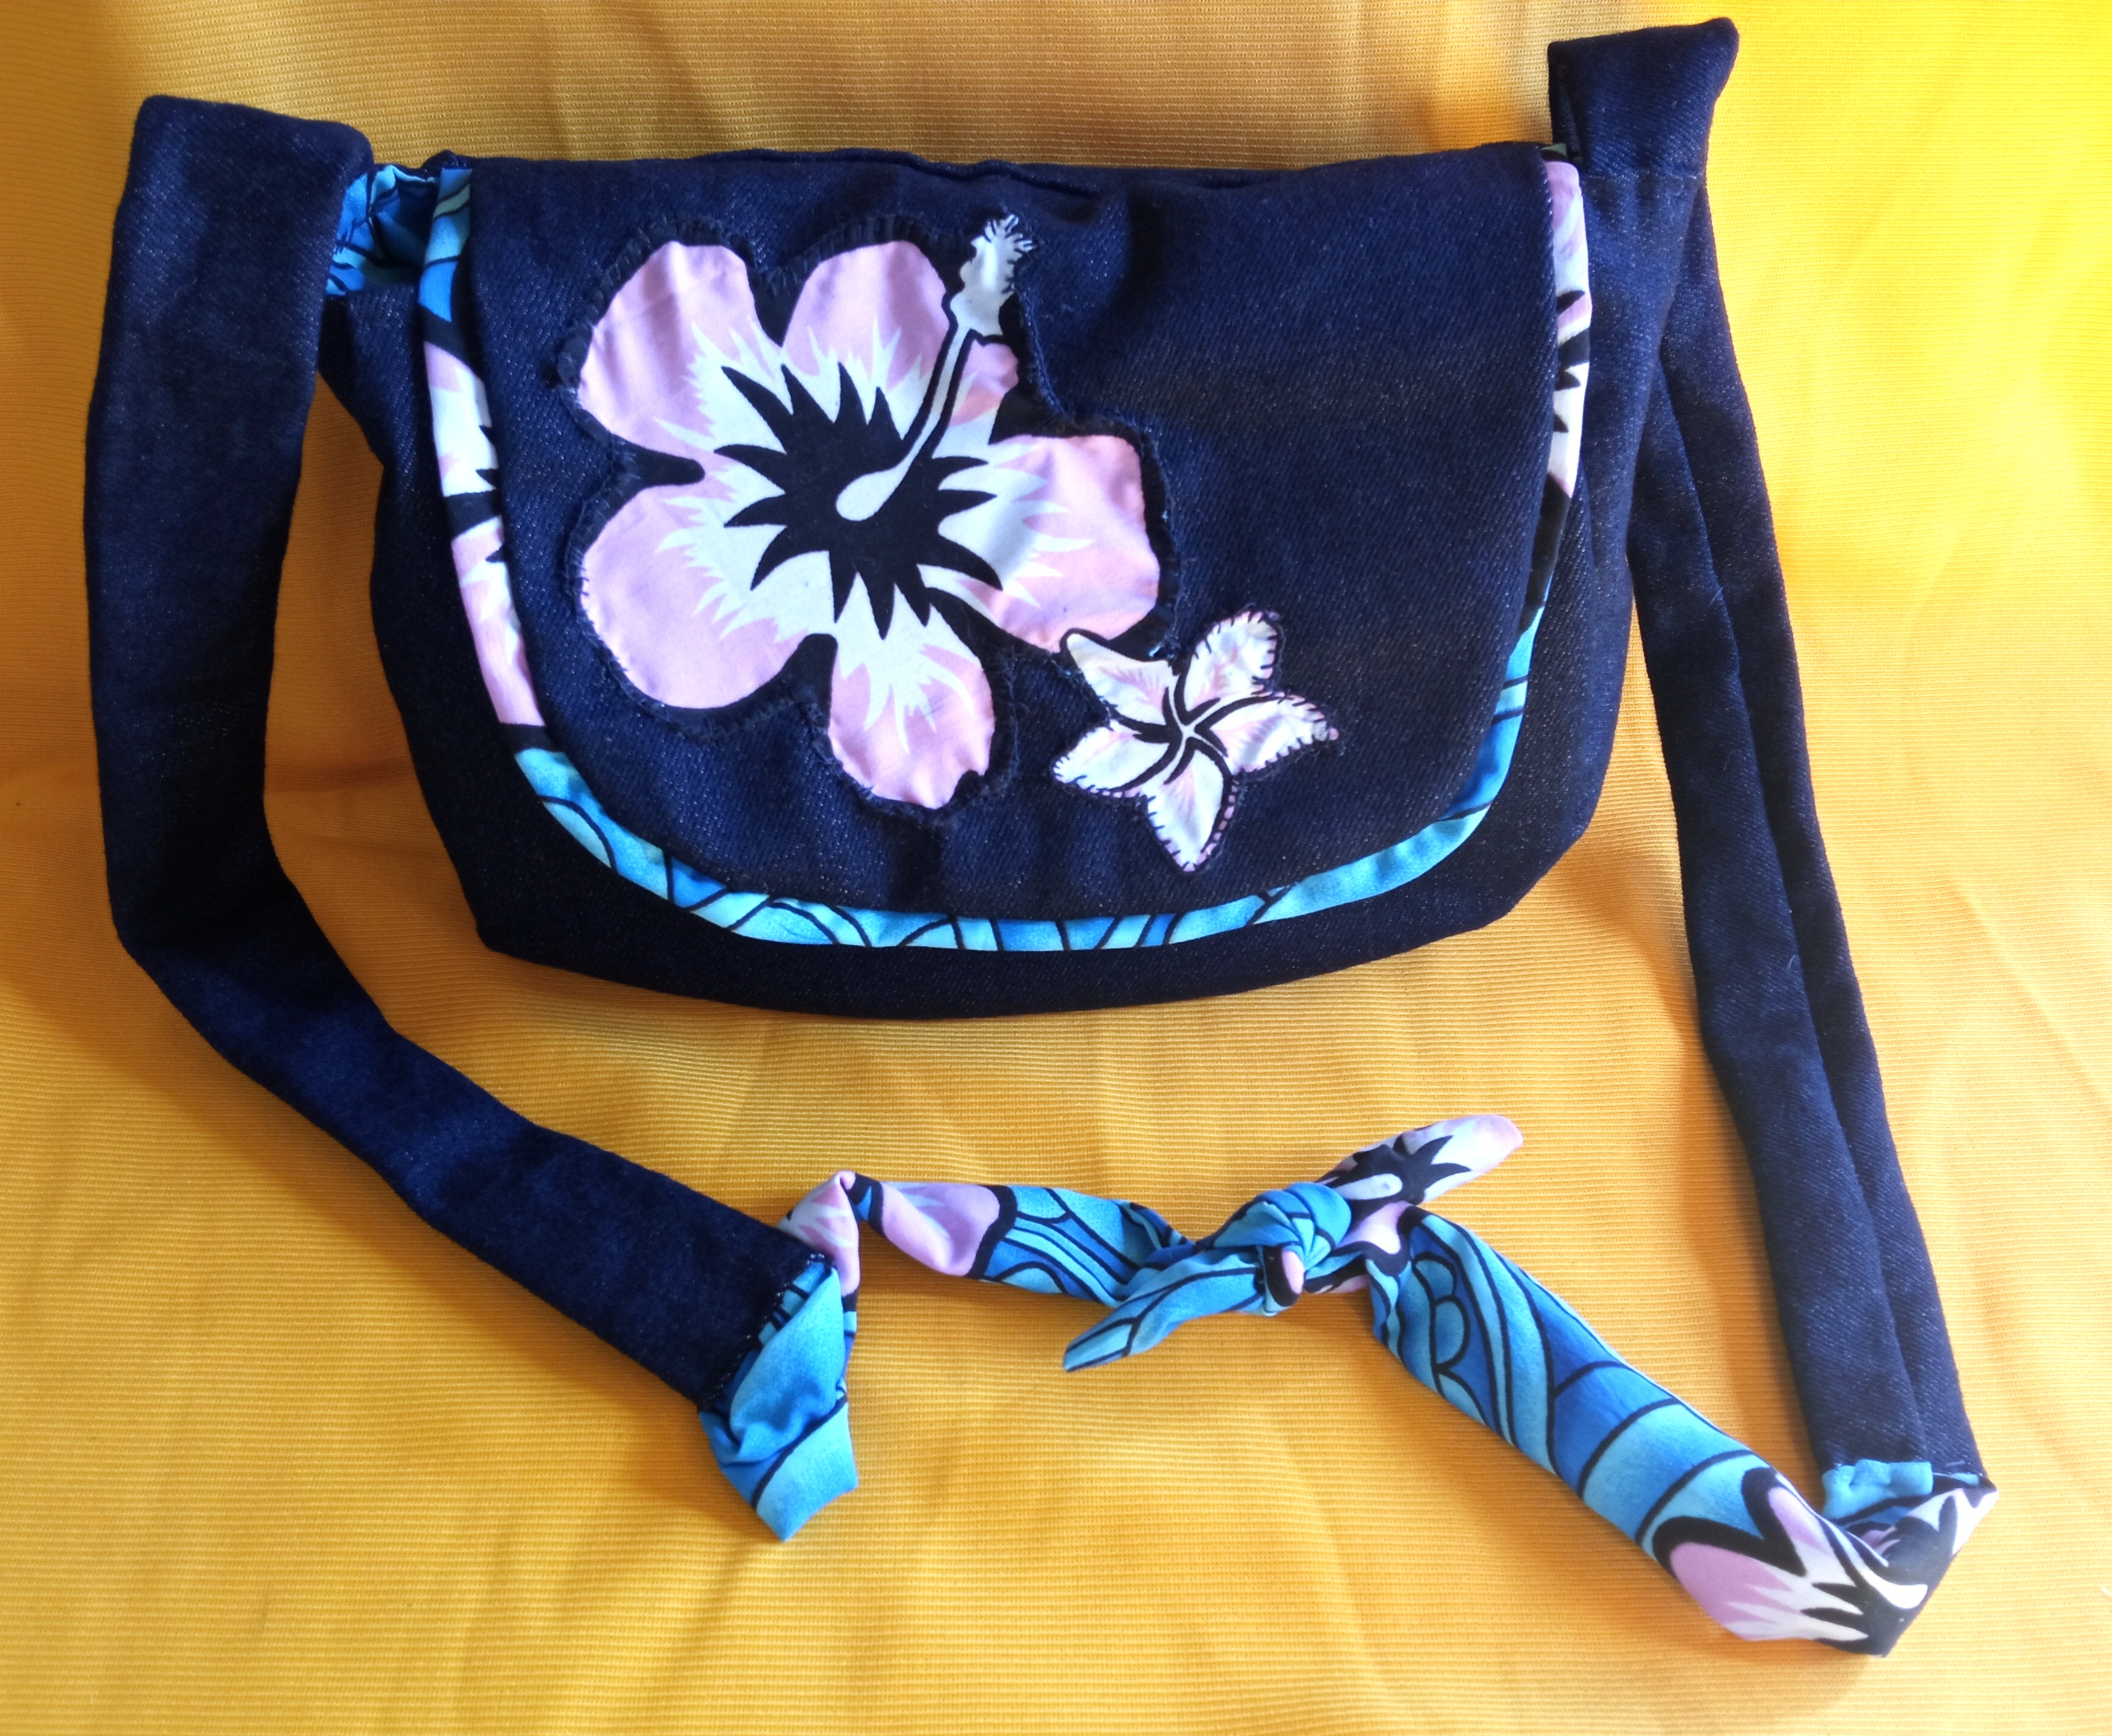
Hasta aquí llego este maravilloso 💓 tutorial 😃 me despierto de ustedes con un inmenso abrazo, espero que esté paso a paso les sirva para que creen su propio bolso.
So much for this wonderful 💓 tutorial 😃 I wake up from you with a huge hug, I hope this step by step will help you to create your own bag.
Como siempre estoy muy agradecida con esta maravillosa 😍 comunidad y la familia #hive por brindarme su apoyo en cada tutorial que preparo para ustedes.
As always I am so grateful to this wonderful 😍 community and #hive family for giving me your support in every tutorial I prepare for you.
Hermoso trabajo @yurimar 🥰
Gracias amiga me contenta que te gustará 😘
Quedó muy bonito amiga. Buen trabajo👏🤗☺
Muchas gracias! Se lleva un poco de trabajo pero el resultado es genial 😃.
Congratulations @yurimar! You have completed the following achievement on the Hive blockchain and have been rewarded with new badge(s):
Your next target is to reach 4250 upvotes.
You can view your badges on your board and compare yourself to others in the Ranking
If you no longer want to receive notifications, reply to this comment with the word
STOPCheck out the last post from @hivebuzz:
Support the HiveBuzz project. Vote for our proposal!
Hermosa técnica, yo si he querido hacer uno de estos accesorios reversibles. Muy lindo éste accesorio, me gustó. Genial 🌹
Amiga es fácil de hacer, solo sigue los pasos y verás un lindo resultado.
Besos 😘!
Waooo un hermoso accesorio me encanta como coces amiga, te quedo hermoso como siempre
Hola amiguita, gracias por tus palabras, siempre trato de hacer cosas que sea de gran utilidad.
Besos y abrazos!!