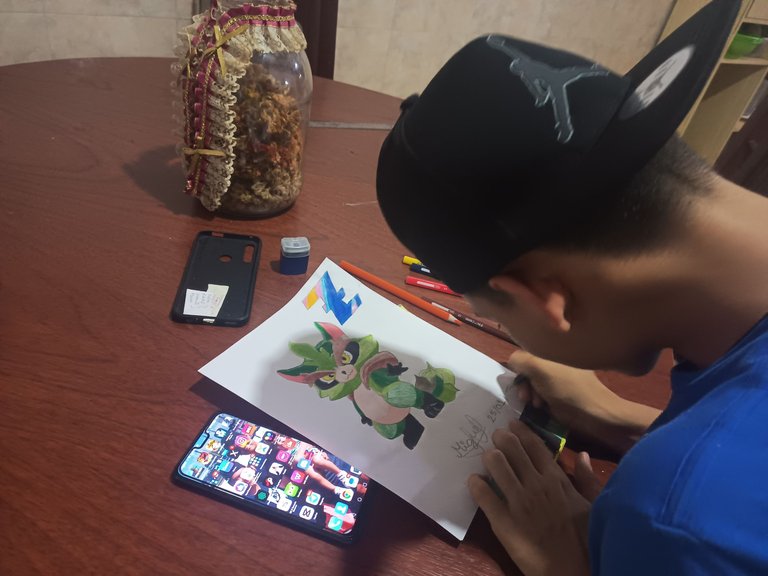
Hey, my dear holozing community, I'm here to bring you a step by step drawing of the grass raccoon, one of the creatures that integrates this magnificent game, but first, what is holozing? Well, holozing, for those who have participated in pokemon style games and have been activated in the fights, trainings and powers of those creatures, you will have a step ahead; because in @holozing you will be able to relive battles of this type. This game is being created under the hand of our friend @acidyo together with other great creators.
Hey! Que tal mi querida comunidad de holozing. Me encuentro por aquí para traer un dibujo paso a paso del mapache de hierba una de las criaturas que integra este magnífico juego, pero primero ¿que es el juego holozing? Bien, holozing, para quienes han participado en juegos del estilo pokemon y se han activado en las luchas, entrenamientos y poderes de esas criaturas, tendrán un paso adelante; porque en @holozing podrás revivir batallas de este tipo. Dicho juego esta siendo creado bajo la mano de nuestro amigo @acidyo en conjunto con otros grandes creadores.
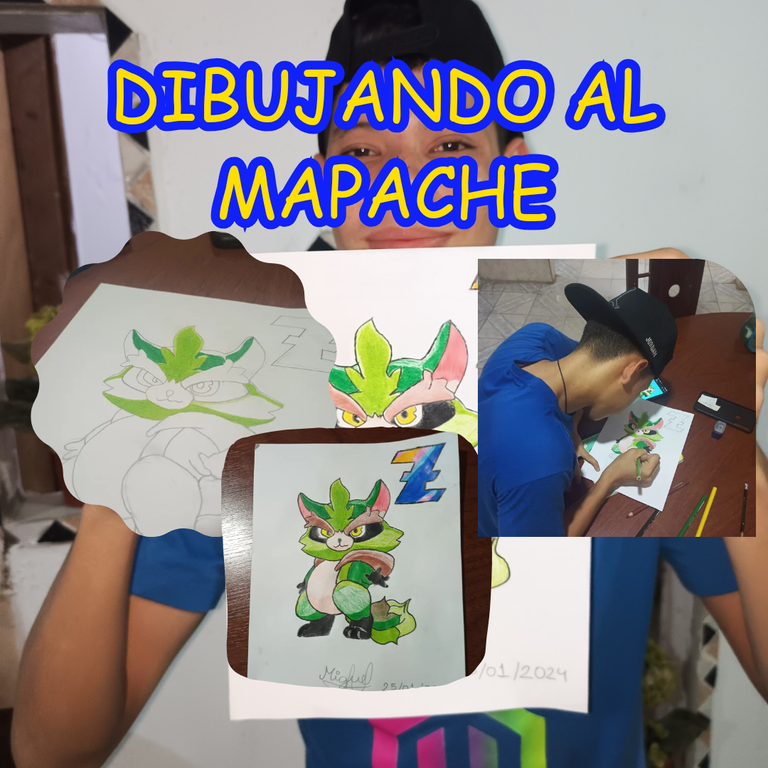
This game contains 4 creatures and each one of them constitutes and represents an element, among them are: the rabbit of electricity, the raccoon of grass that I said I would draw, the whale of water, the wolf of fire and a fifth creature which is called chirpily, it is a kind of parrot whose element is unknown, it could be air. As you can see, each one of these creatures has in its name the element they represent. But well my friends, without further ado, let's start with the drawing.
Before we start, it is worth noting that I had the power to delegate a certain amount of my HP to the @zingtoken account and thus get my zing tokens. Now yes, this time we are serious, let's start with this step by step and see the final result.
Este juego contiene 4 criaturas y cada una de ellas constituye y representa un elemento, entre ellas se encuentra: el conejo de electricidad, el mapache de hierba que dije dibujaría, la ballena de agua, el lobo de fuego y una quinta criatura la cual se llama chirpily, es una especie de loro al cual se le desconoce su elemento, podría ser aire. Como pueden darse cuenta cada una de estas criaturas lleva en su nombre aquel elemento que representan. Pero bueno mis amigos sin más que hablar iniciemos con el dibujo.
Antes de empezar, cabe destacar que tuve la potestad de delegar una cierta cantidad de mis HP a la cuenta de @zingtoken y así obtener mis token zing. Ahora si, esta vez si vamos enserio, iniciemos con este paso a paso y veamos el resultado final.


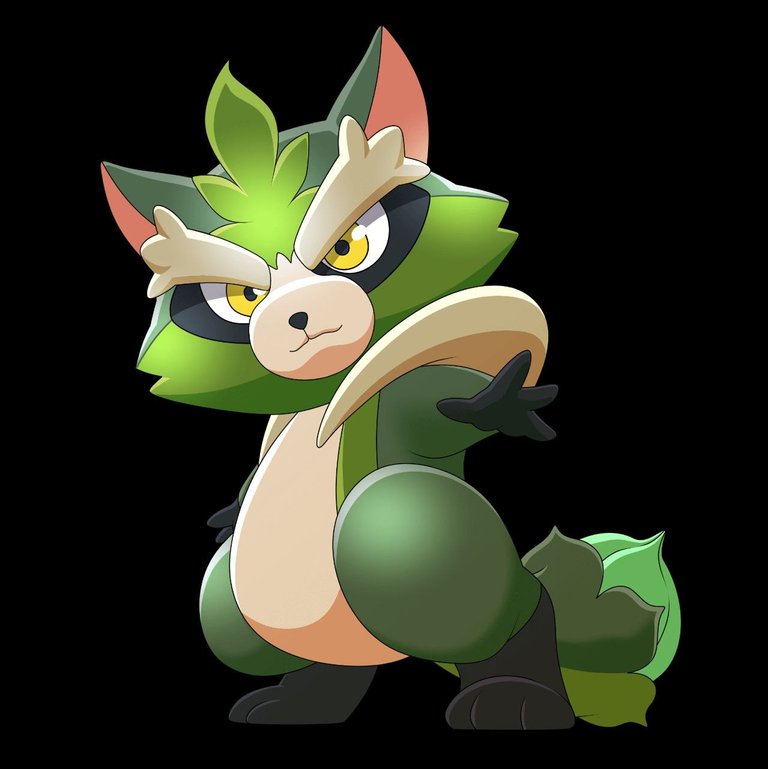
**WHAT CREATURE WILL WE DRAW? **
**¿QUE CRIATURA DIBUJAREMOS? **
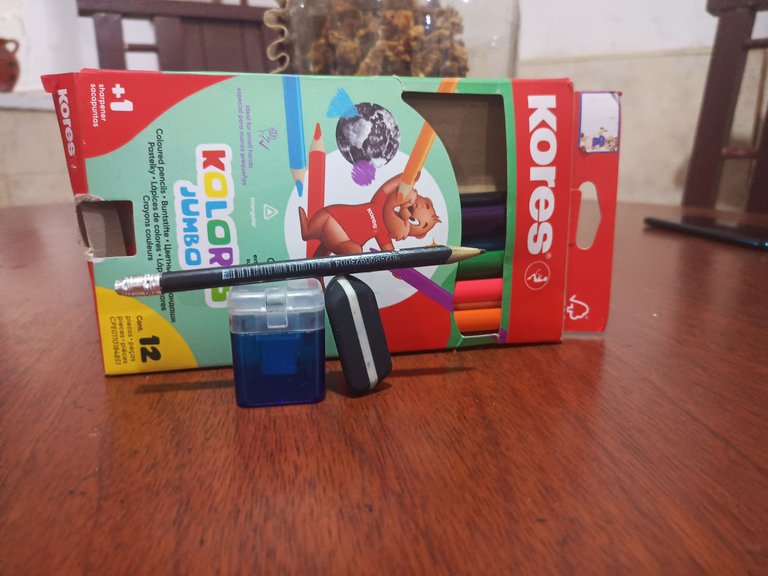
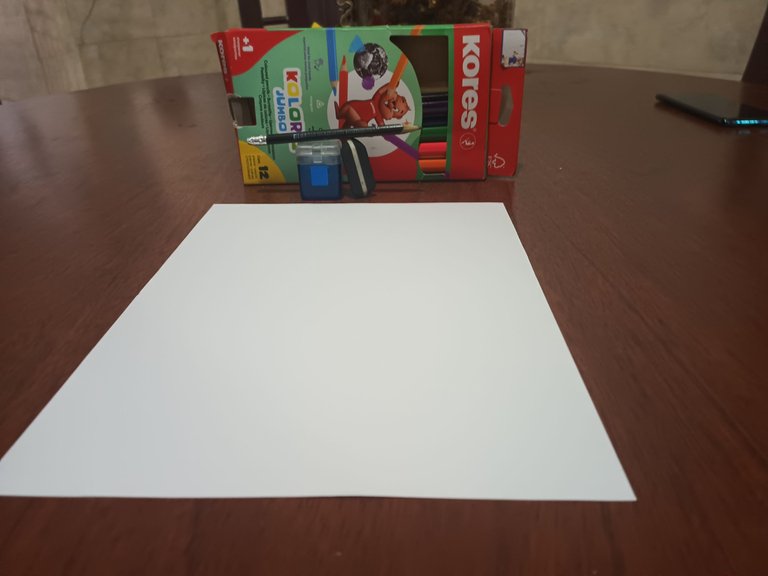
MATERIALS
The materials we need are very simple and easy to obtain, such materials are:
a pencil
A rubber
A pencil sharpener
A colors
One sheet
MATERIALES
Los materiales que necesitamos son muy simples y fáciles de obtener, tales materiales son:
un lapiz
una goma
un sacapuntas
colores
una hoja
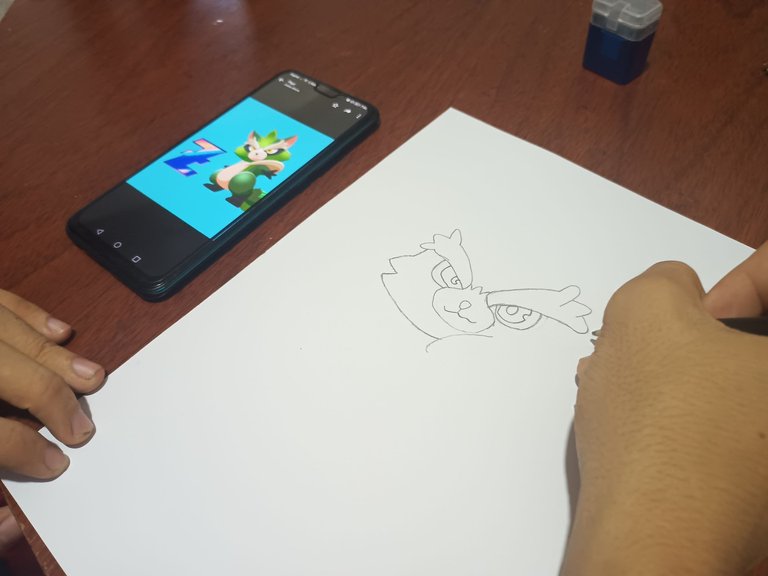
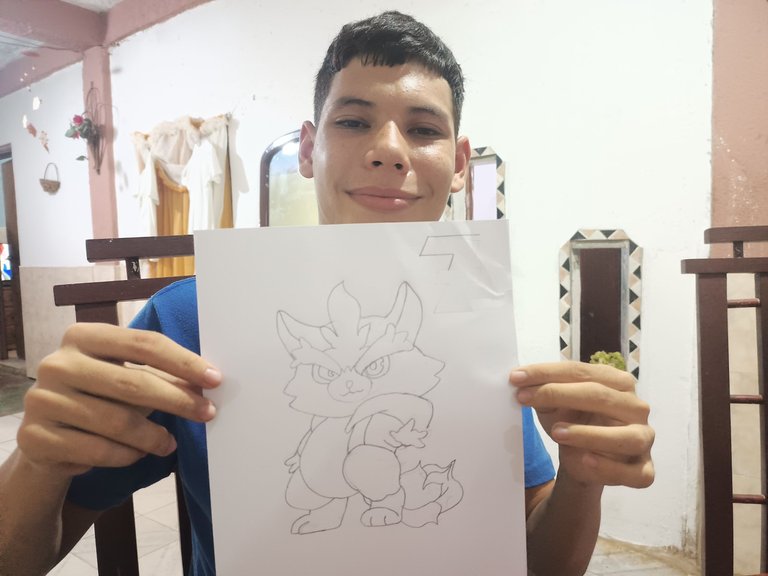
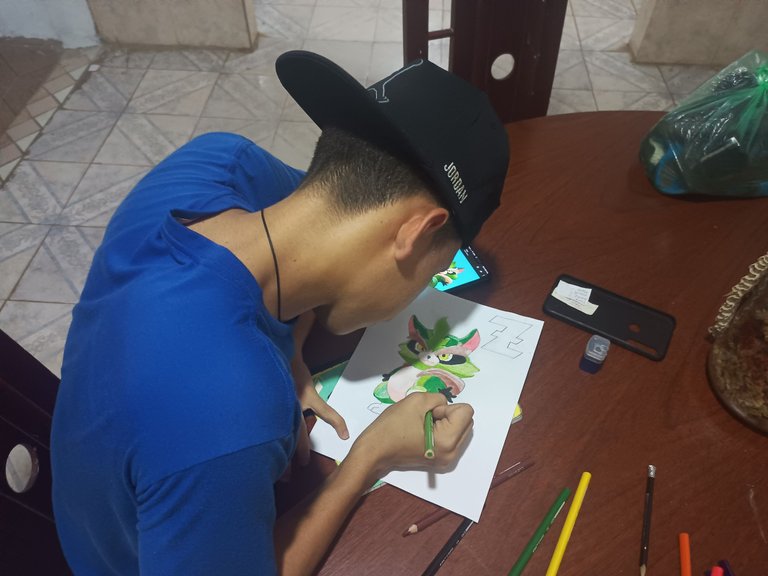
STEP 1
To begin with I have as a technique to start with the center of the drawing of the upper part, that is to say, to start with the face and as we talk about the center we would start to draw the snout of the creature. Finished the snout, we would begin to draw the eyebrows, as you can see in the image above, it has a small effect of depth and how we can do this in our drawing, it is easy, the tactic is to follow the scheme of the image making the right eyebrow bigger and longer than the left one, which should be smaller and shorter. Then we make the eyes of the raccoon following the outline of the drawing as best as possible to make it look very good, then we make the head of our character starting from the sides and that's it, our first step would be ready friends.
PASO 1
Para empezar tengo como técnica iniciar por el centro del dibujo de la parte superior, es decir, iniciar con la cara y como hablamos del centro iniciaríamos a dibujar el hocico de la criatura. Terminado el hocico, empezaríamos a dibujar las cejas, como podrán darse cuenta en la imagen de arriba, tiene un pequeño efecto de profundidad y como logramos hacer esto en nuestro dibujo, es fácil la táctica es seguir el esquema de la imagen haciendo la ceja derecha más grande y larga que la izquierda, la cual debe resultar más pequeña y corta. Seguídamente hacemos los ojos del mapache siguiendo el esquema del dibujo lo mejor posible para que quede muy bien, para luego hacer la cabeza de nuestro personaje iniciando por los costados y listo, estaría listo nuestro primer paso amigos.
STEP 2
Having finished the face and the sides of our character's head, we would do at this point his eye circles and start with the lower part of our drawing. The first thing we will do is to see our image and see carefully where each beginning of the ear comes from and as we see the left ear of the raccoon, part of the lower surface of the eyebrow, but wait a moment my friends we can't go crazy; if we want the ears to be perfect we should first make that grass hair that is the intermediary between ear to ear, if you notice the drawing you will see that it is something very simple to do.
At the end we can start with the left ear so we will place our pencil at the bottom of the eyebrow and follow the stroke upwards, depending on the shape of this in the image whether it is square, curved or straight is very important to look at every detail so that our drawing is the best way. After finishing with the ear completely which would end with a curvature towards the raccoon's hair, which would represent the top of the head, we will continue that curvature on the other side and we will make the right ear to finish with the head of the creature in its entirety and start with the body.
To start with the lower part of the raccoon. The first thing to do is to make that kind of armor on its shoulders on its right side following perfectly the curvature it presents; when we finish it we draw the body and as we can see it will be very easy since simply the beginning of its body is its chest and stomach and to complete them the only thing we will do is to start from its head downwards following a ball stroke, that is to say, to start with a straight stroke and then to make a round shape, then we draw its left foot and its left hand something that should not be very complicated, here we would pass to its right side starting with the beginning of its right leg and its right hand.
PASO 2
Teniendo terminada la cara y los costados de la cabeza de nuestro personaje, haríamos en este momento sus ojeras e iniciaríamos con la parte inferior de nuestro dibujo. Lo primero que haremos es ver nuestra imagen y ver detenidamente de donde sale cada inicio de la oreja y como vemos la oreja izquierda del mapache, parte de la superficie más baja de la ceja, pero esperen un momento mis amigos no podemos irnos a lo loco; si queremos que las orejas queden perfectas deberíamos realizar primero ese cabello de hierba que esta de intermediario entre oreja a oreja, si notan el dibujo podrán ver que es algo muy sencillo de hacer.
Al acabar podemos iniciar con la oreja izquierda por lo que colocaremos nuestro lapiz en la parte inferior de la ceja y seguiremos el trazo hacia arriba, dependiendo de la forma de esta en la imagen ya sea cuadrada, curva o recta es muy importante mirar cada detalle para que nuestro dibujo quede de la mejor manera. Luego de acabar con la oreja completamente la cual acabaría con una curvatura hacia el cabello del mapache, lo que representaría la parte superior de la cabeza, continuariamos esa curvatura del otro lado y realizaremos la oreja derecha para así acabar con la cabeza de la criatura a su totalidad e iniciar con el cuerpo.
Para iniciar con la parte inferior del mapache. Lo primero es hacer esa especie de armadura en sus hombros a su lado derecho siguiendo perfectamente la curvatura qué presenta; al acabarla dibujamos el cuerpo y como podemos ver resultará muy fácil ya que simplemente el inicio de su cuerpo es su pecho y estómago y para completarlos lo único que aremos es iniciar desde su cabeza hacia abajo siguiendo un trazo de bolita, es decir, iniciar con un trazo recto y luego hacer una forma redonda, seguidamente dibujamos su pie izquierdo y su mano izquierda algo que no se les debería complicar mucho, aquí pasaríamos a su lado derecho iniciando con un principio de su pierna derecha y de su mano derecha.
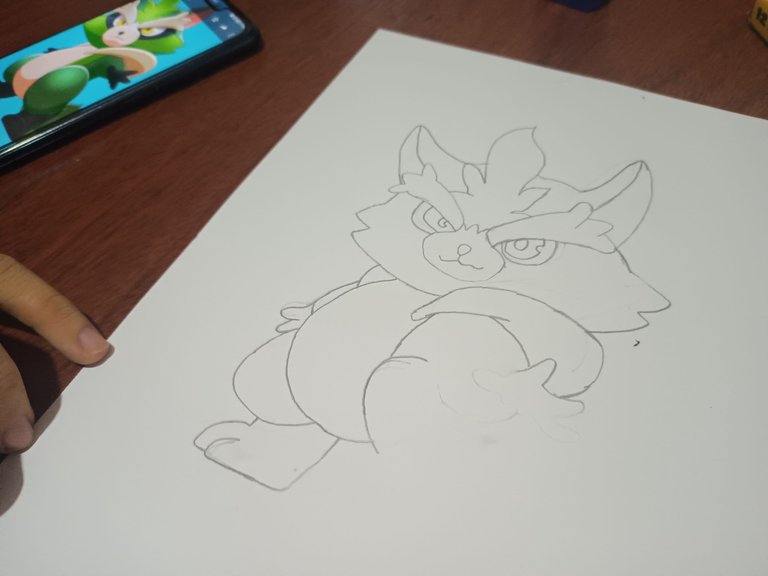
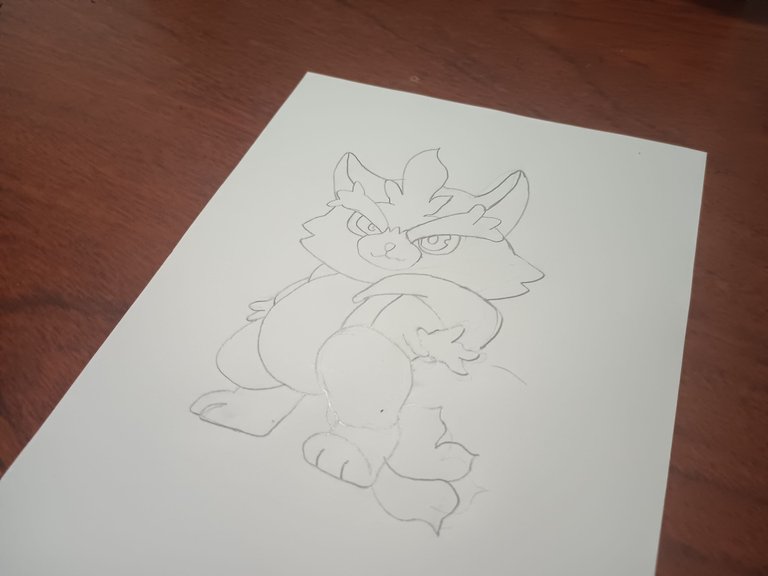
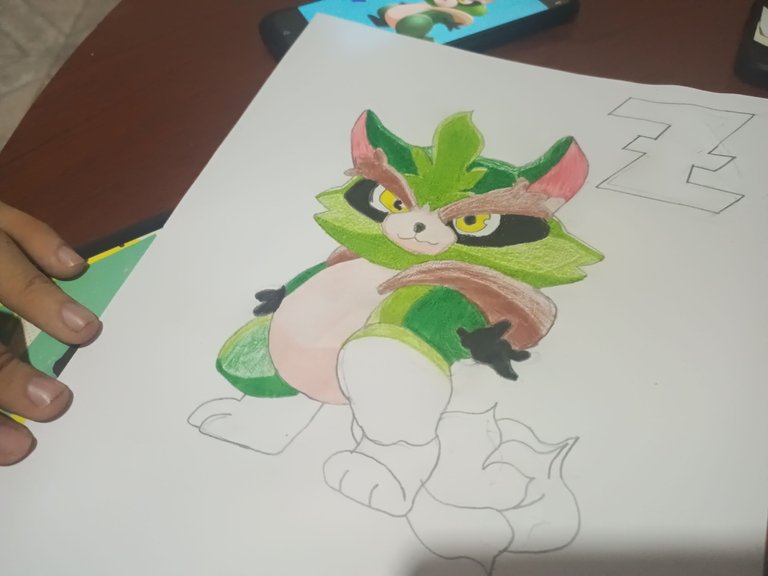
STEP 3
This would be the last step to conclude the drawing and move on to coloring it. What we should do here is the hand first which should be neither too big nor too small and as I say always following the correct shape of the image. My friends, when we finish it we make the lower line which would form the complete arm and under that line we draw another line a little curved that would give the shape of the body to its totality. Ready, once the hand and the line are finished, we trace and draw the biggest leg of the raccoon, this leg consists of a round line, to guide me and make this leg well I made the line of the body first.
Well, we trace the upper part of the leg which is round so as to make its part thinner and culminate with it, we proceed to draw the foot. We can notice that its outline makes it look a little slanted and by following the image perfectly we can achieve this. It should be said that if you are new to drawing it will be a little more difficult to make these drawings that involve 3D shapes and depth, and with this our drawing would be ready my friends.
PASO 3
Este sería el último paso para concluir el dibujo y pasar a colorearlo. Lo que debemos hacer aquí es la mano primeramente la cual debe ir ni muy grande ni muy pequeña y como digo siempre siguiendo la forma correcta de la imagen. Mis amigos, al terminarla le hacemos la línea inferior qué formaría el brazo completo y debajo de esa línea trazamos otra línea un poco curviada que le daría la forma del cuerpo a su totalidad. Listo terminada la mano y dicha línea, trazamos y dibujamos la pierna más grande del mapache, esta pierna consiste en un trazo redondo, para guiarme y hacer bien esta pierna realicé primero la línea del cuerpo.
Bien, trazamos la parte superior de la pierna la cual es redonda para así hacer su parte más delgada y culminar con ella, proseguimos a dibujar el pie. Podemos notar que su esquema lo hace ver un poco inclinado y al seguir perfectamente la imagen podemos lograr esto. Cabe decir que si eres nuevo en el dibujo se te hará un poco más difícil realizar estos dibujos que implican formas 3D y profundidad, y con esto nuestro dibujo estaría listo mis amigos.
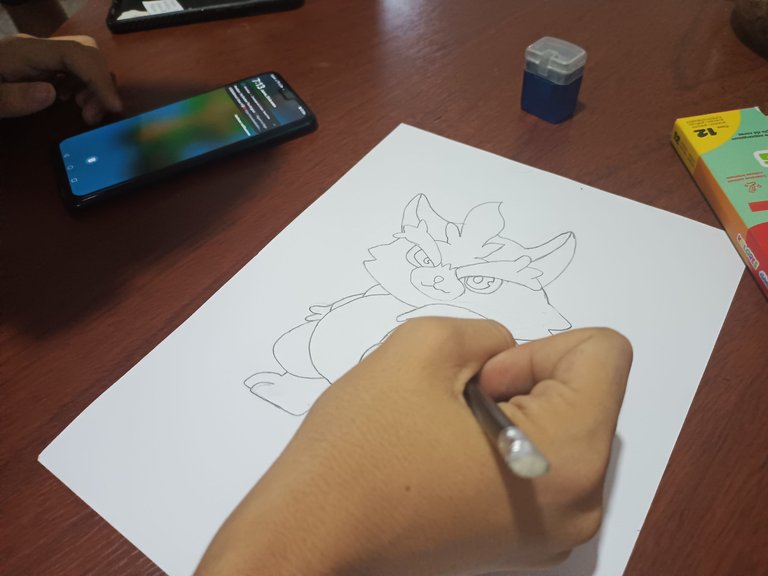
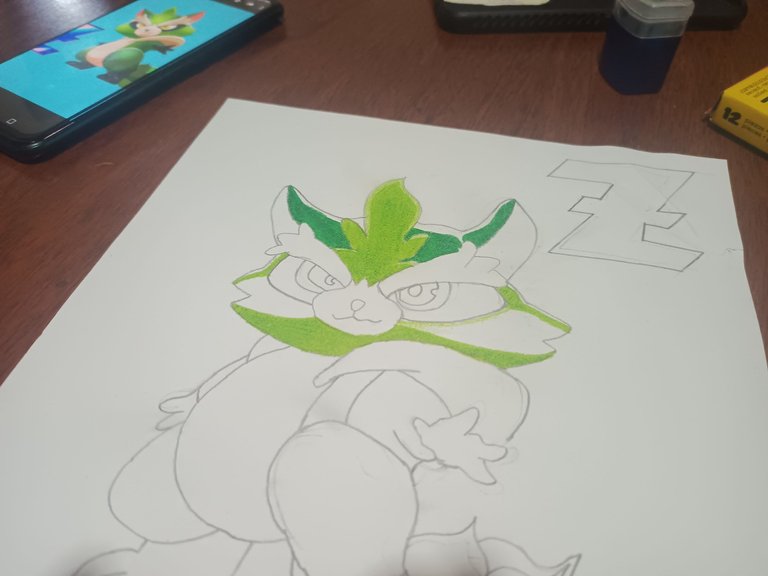
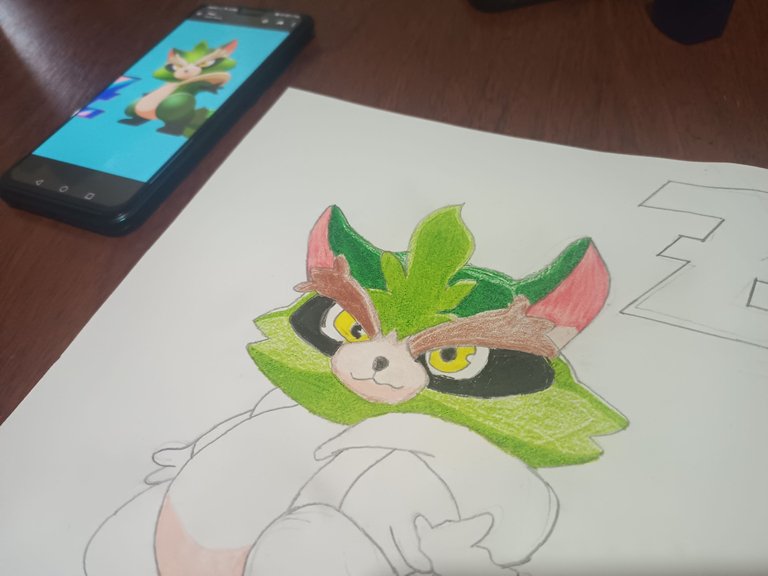
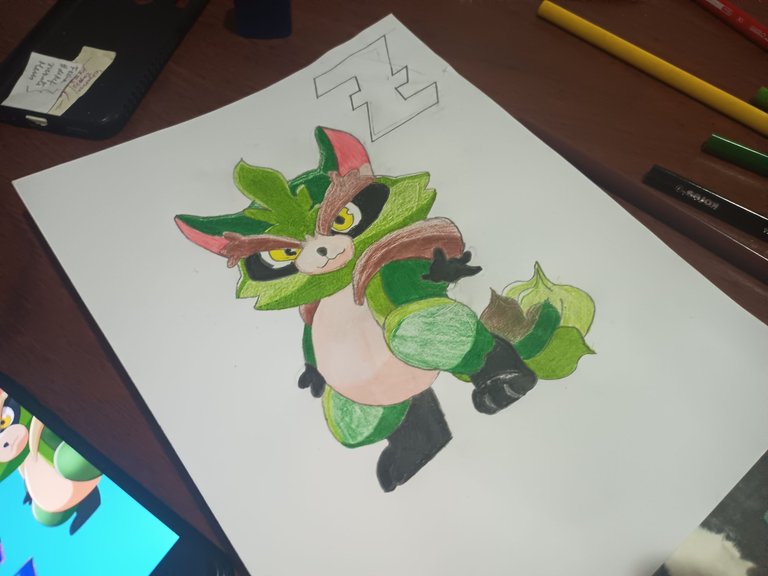
To finish with everything we start coloring our raccoon. Starting with the head, it is important to say that, if you don't know how to apply the shadows correctly as it is my case, use the same tone of colors to make the lightness and the shadow. Coloring a little darker for those parts that involve a shadow and with a lighter tone for the lightness obviously. Well starting with the coloring we would begin with the head applying what I said before, we color stronger those parts that carry a little shadow effect and for the clarity we color a little softer friends.
After finishing the head we start with the body using the flesh color for the stomach and the chest. Applying the shadow in the lower part of it and finishing it, then we start with the shoulder using the brown color making use of a dark, light and intermediate coloring to start with the green parts of the creature which would be the body and legs, we color and color using the technique I talked about before until we finally finish the drawing.
Para terminar con todo empezamos a colorear nuestro mapache. Iniciando por la cabeza, es importante decir que, si no sabes aplicar correctamente las sombras como es mi caso, utilices el mismo tono de colores para hacer la claridad y la sombra. Coloreando un poco más oscuro para aquellas partes que conlleven una sombra y con un tono más claro para la claridad obviamente. Bien iniciando con el coloreo iniciaríamos por la cabeza aplicando lo que dije anteriormente, coloreamos más fuerte esas partes que llevan un pequeño efecto de sombra y para la claridad coloreamos un poco más suave amigos.
Al terminar la cabeza iniciamos con el cuerpo utilizando el color carne para el estómago y el pecho. Aplicando la sombra en la parte inferior de este y terminandolo, seguídamente iniciamos con el hombro utilizando el color marrón haciendo uso de un coloreado oscuro, claro e intermedio para así iniciar con las partes verdes de la criatura la cual sería el cuerpo y las piernas, coloreamos y coloreamos utilizando la técnica de la que les hablé anteriormente hasta por fin terminar el dibujo.
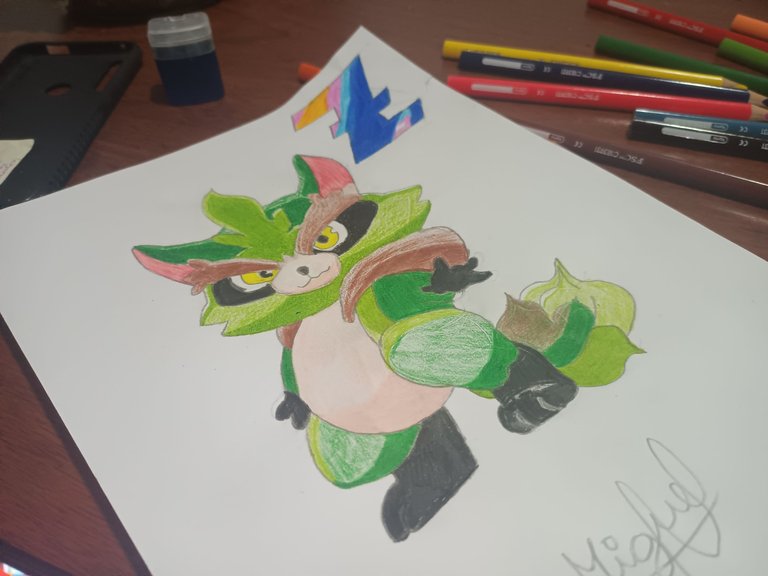
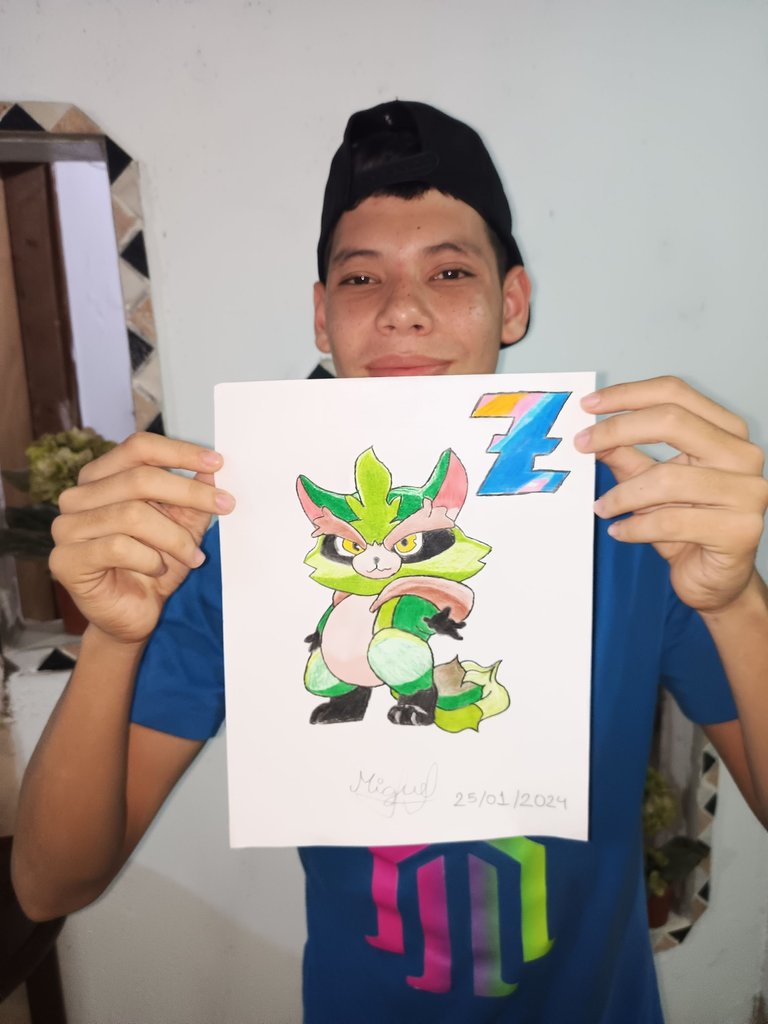
Well my friends, when you finish your drawing I recommend you to draw it completely with a marker or black color to give it a better look and if you want to put your signature so they know who made that drawing. Well my bloggers this was all for today I hope you liked this content and have been to your liking, see you soon and take it minimi!
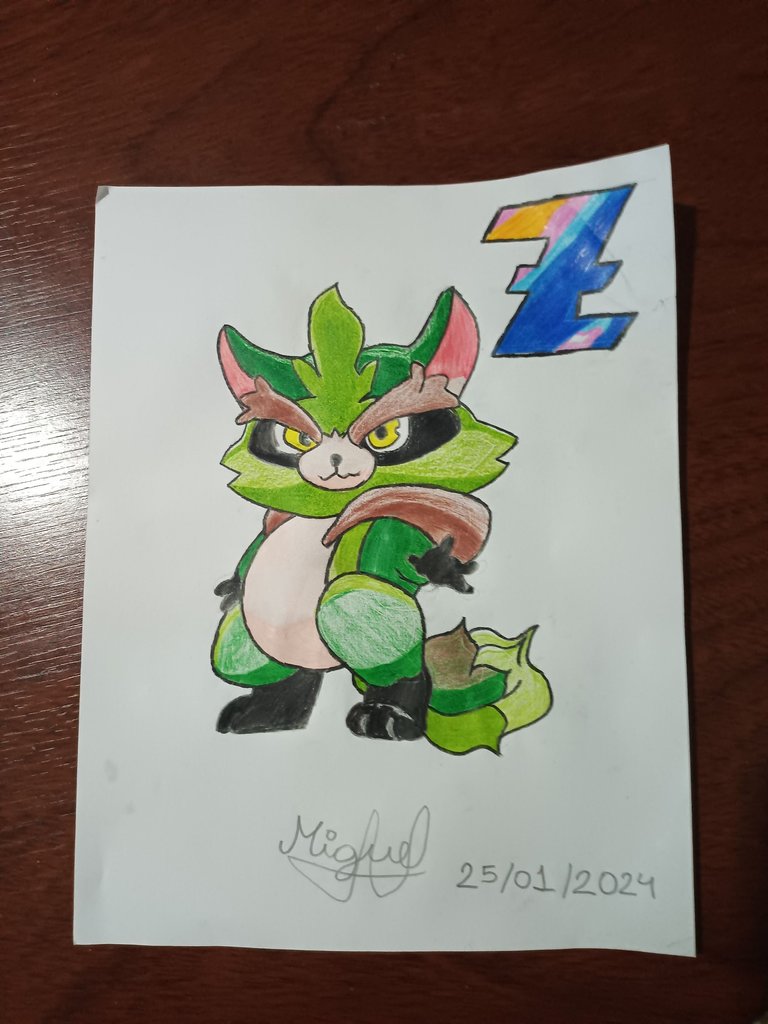
READY FOR THE FINAL RESULT OF OUR GRASS RACCOON
Bueno mis amigos, al terminar su dibujo les recomiendo trazarlo completamente con algún marcador o color negro para darle un mejor aspecto y si quieren pongan su firma para que sepan quien hizo ese dibujo. Bueno mis blogueros esto fue todo por hoy espero este contenido les haya gustado y haya sido de su agrado, nos vemos pronto y ¡llévatelo minimi!
LISTOS PARA EL RESULTADO FINAL DE NUESTRO MAPACHE DE HIERBA
Imágenes tomadas por mi papá de su Tecno camon 18P.
images taken by my dad of his Tecno camon 18P.
Todos los derechos reservados de @elmiguelacho. No autorizo el uso de ningún material de mi propiedad
All rights reserved by @elmiguelacho. I do not authorize the use of any material of my property.
...Gracias... Dando Lo Mejor Para Tí...
...Thank You... Giving The Best For You...
Portada editada en Canva
Cover edited in Canva
Traducción realizada en/Translation made in Deepl
Congratulations @elmiguelacho! You have completed the following achievement on the Hive blockchain And have been rewarded with New badge(s)
Your next target is to reach 600 replies.
You can view your badges on your board and compare yourself to others in the Ranking
If you no longer want to receive notifications, reply to this comment with the word
STOPCheck out our last posts:
Thanks so much for your support
You're on a quest for greatness @elmiguelacho, and we have no doubt that you'll reach your new target soon!