.jpeg)

Español
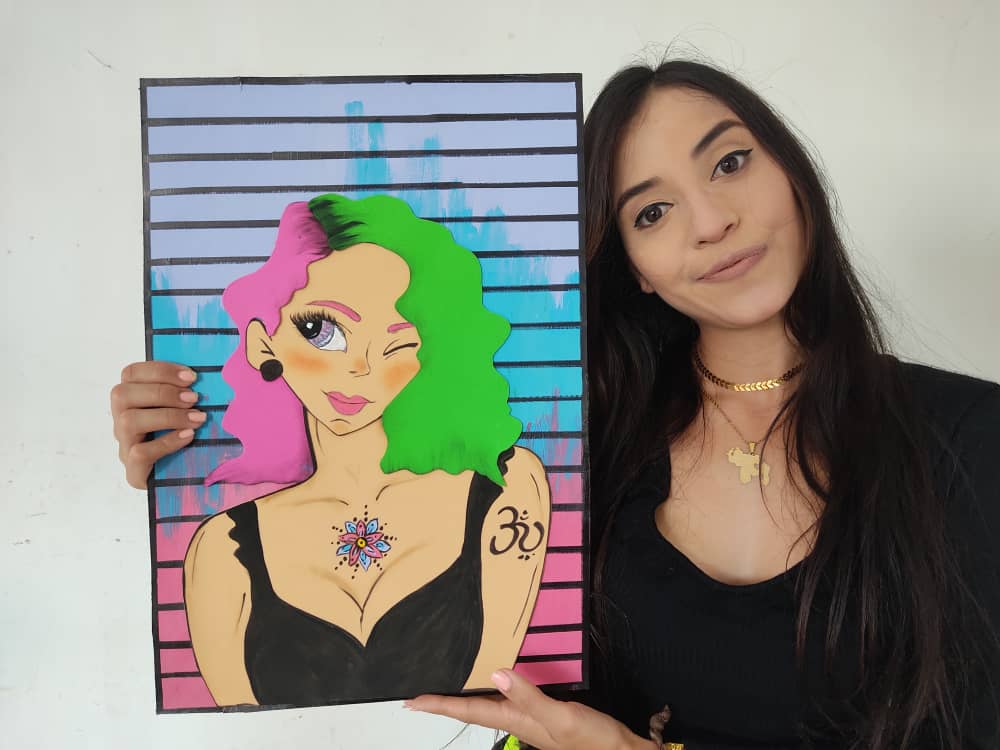
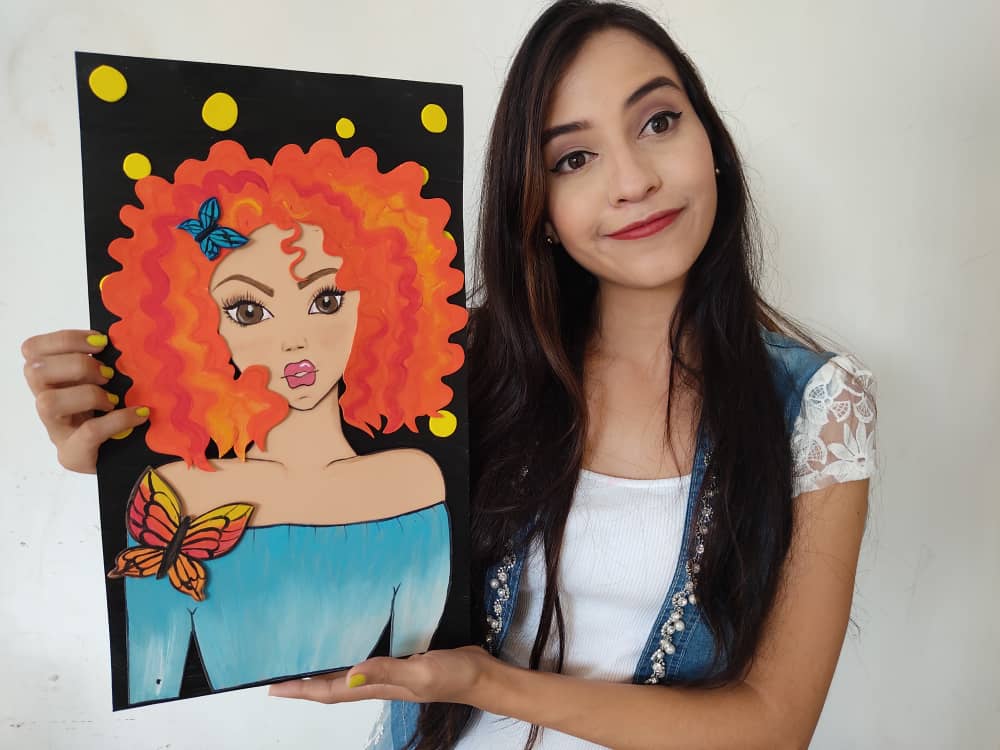
Hola hermosa familia de Hive ❤️ Este lindo día les traigo un divertido paso a paso dónde les mostrare como elaborar un hermoso cuadro de chica punk, amante de los tatuajes y de los colores, sin duda esta hermosa chica alegrara nuestros espacios favoritos de la manera más original, y hermosa, llamando la atención de todos los que la miren.
English
Hello beautiful hive family ❤️ This beautiful day I bring you a fun step by step where I will show you how to make a beautiful painting of a punk girl, a lover of tattoos and colors, without a doubt this beautiful girl will brighten up our favorite spaces in the most original way, and beautiful, drawing the attention of all who look at it.
¿Qué están esperando?
Gracias a esta técnica podemos crear nuestro propio cuadro de chica punk, además, una hermosa obra hecha en casa es una manera creativa y muy económica de darle un toque de alegría a nuestro entorno. Antes de comenzar no olvidemos lavarnos nuestras manos.
What are they waiting for?
Thanks to this technique we can create our own painting of a punk girl, in addition, beautiful homemade work is a creative and very inexpensive way to give a touch of joy to our surroundings. Before we start, let's not forget to wash our hands.
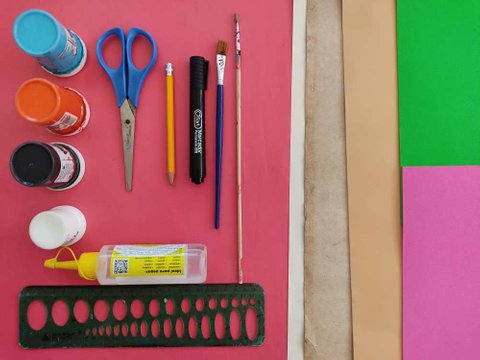
[Materiales | Materials]
Para realizar esta hermosa chica necesitaremos:
- Moldes.
- Foami o goma eva.
- Papel vegetal o calco.
- Lamina de cartón.
- Regla.
- Lápiz.
- Marcador.
- Tijera.
- Cúter.
- Pincel o brocha.
- Pinturas.
- Silicón liquido o pegamento.
To make this beautiful girl we will need:
- Molds.
- Foamy or EVA Foam.
- Vegetable paper or tracing.
- Cardboard sheet.
- Rule.
- Pencil.
- Bookmark.
- Scissors.
- Cutter.
- Brush or brush.
- Paintings.
- Liquid silicone or glue.
Procedimiento (paso a paso)
Process (step by step)
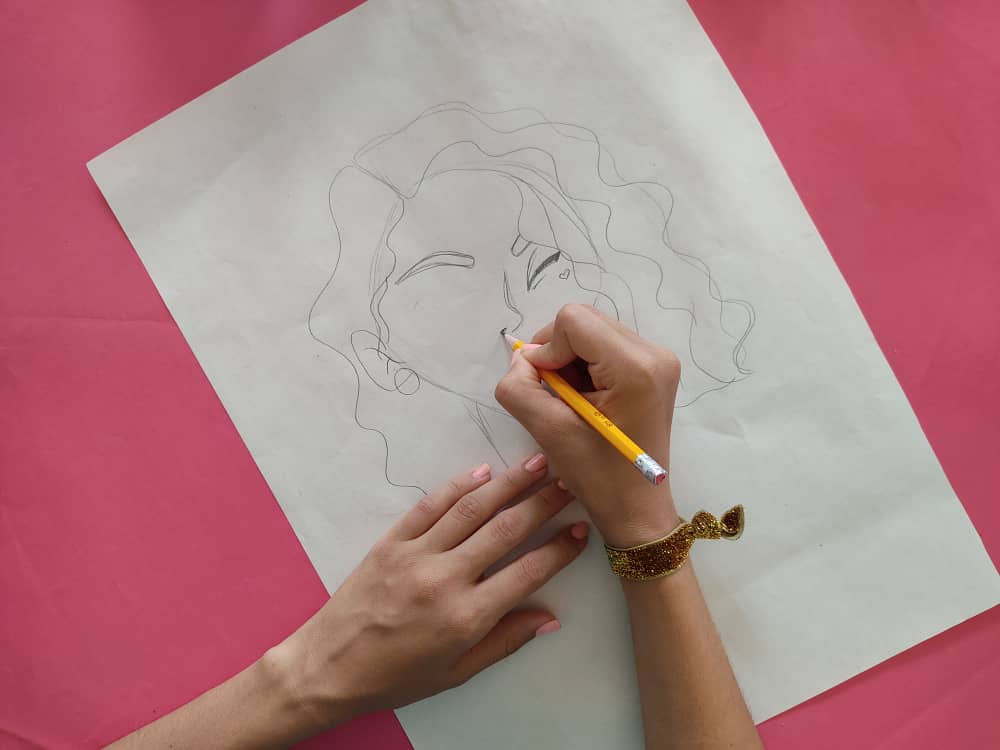
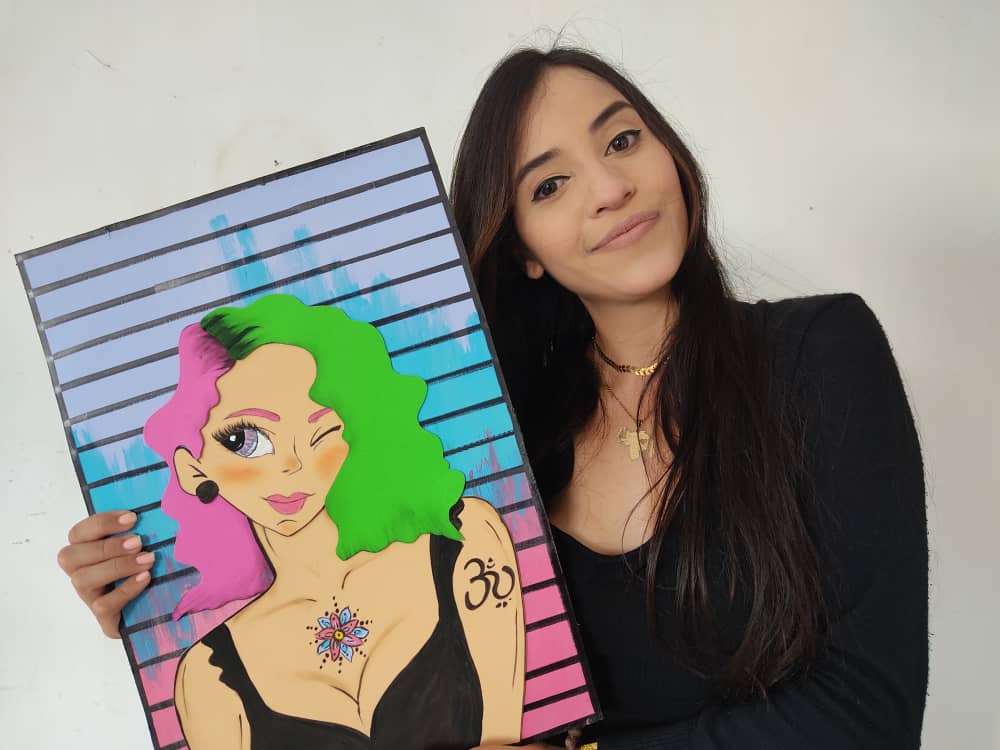
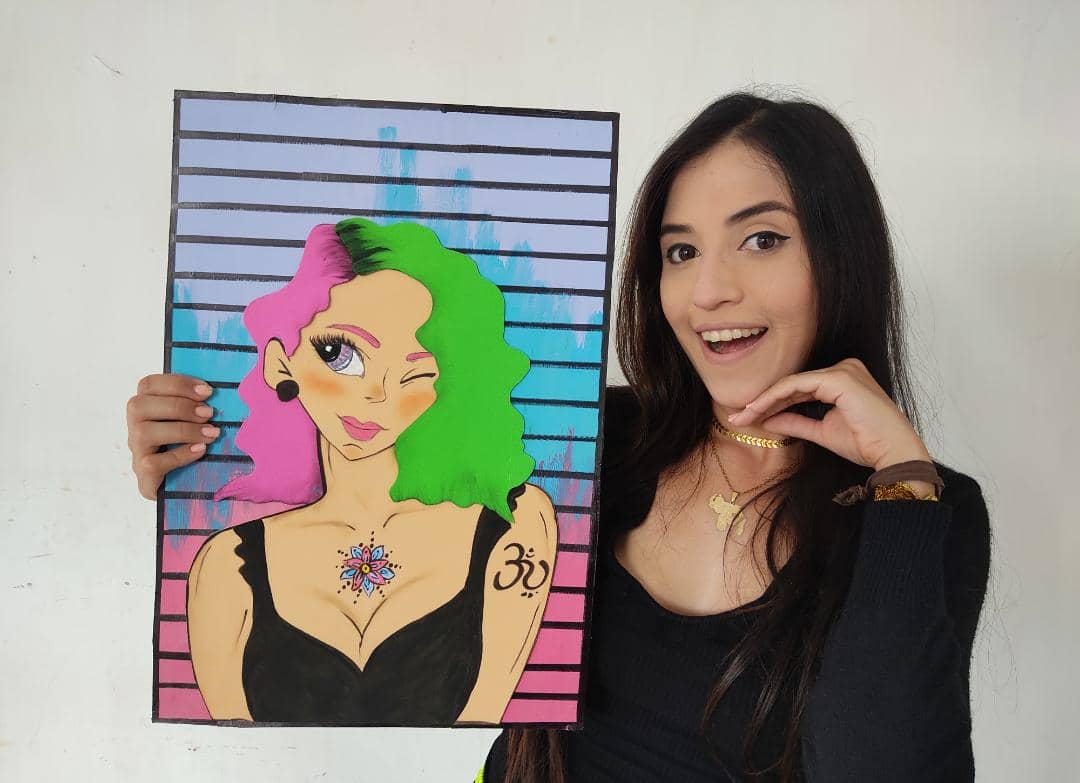
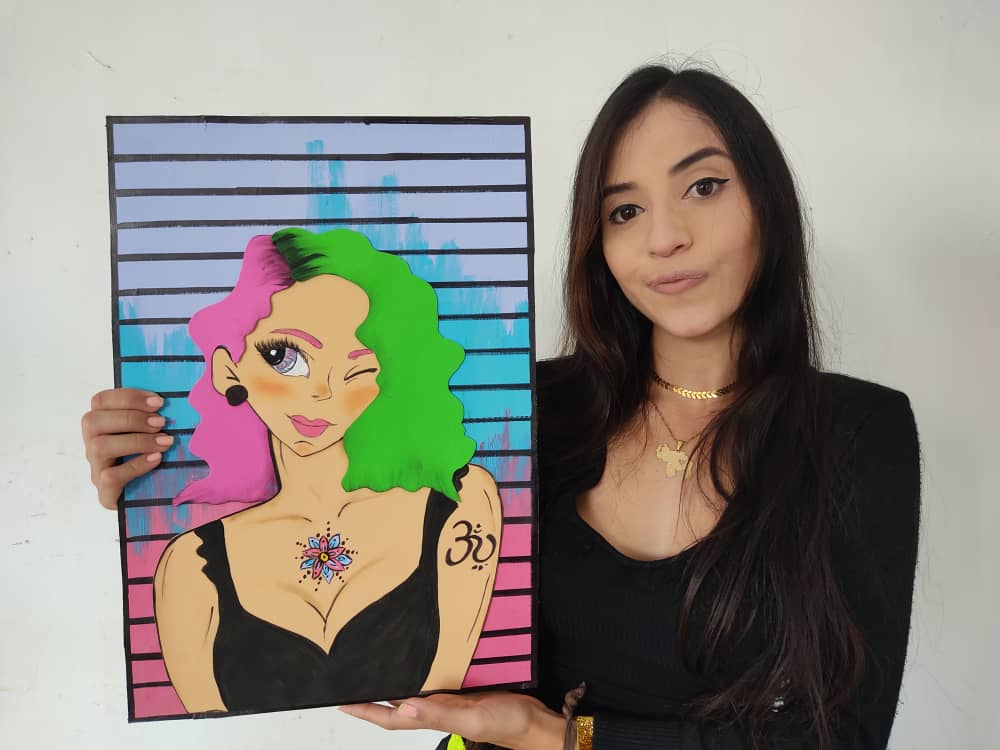
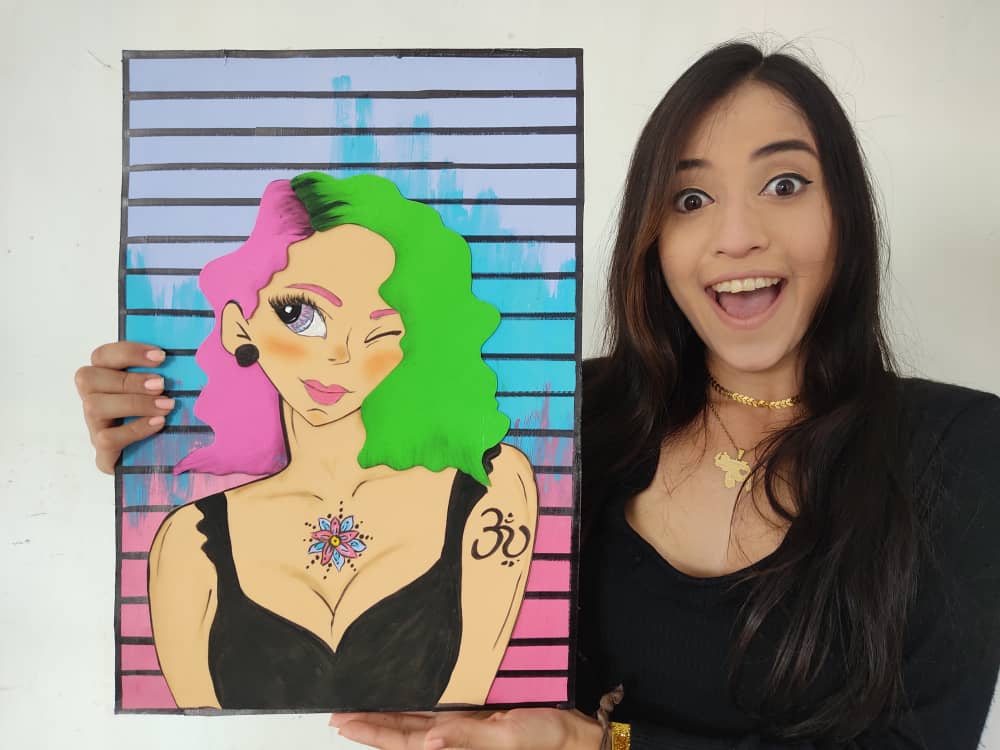
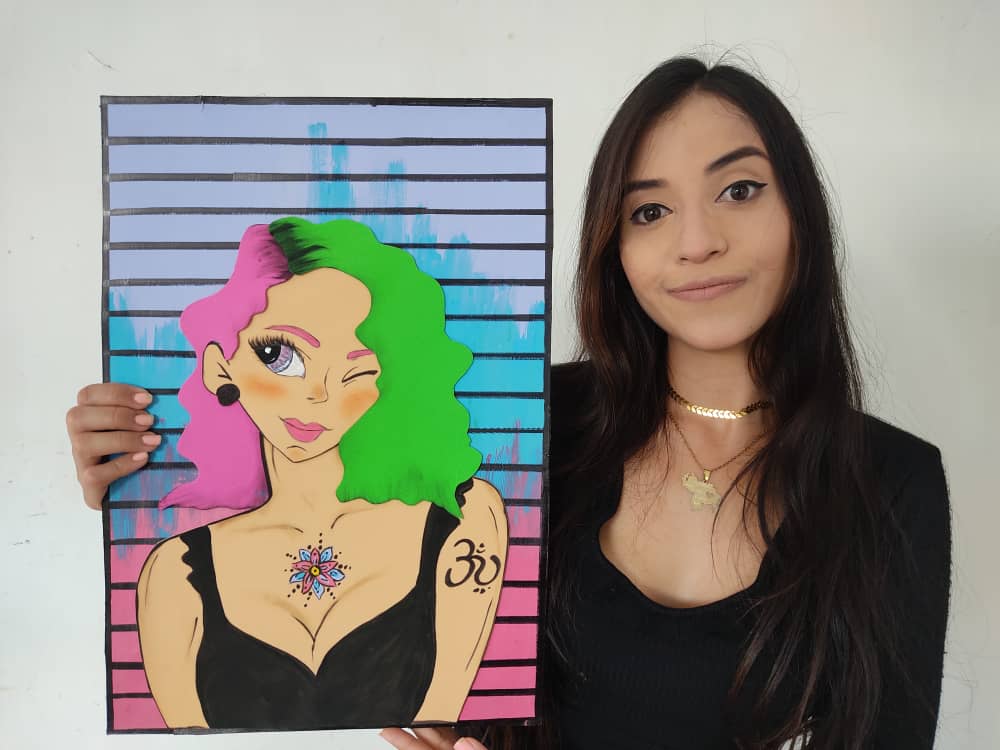
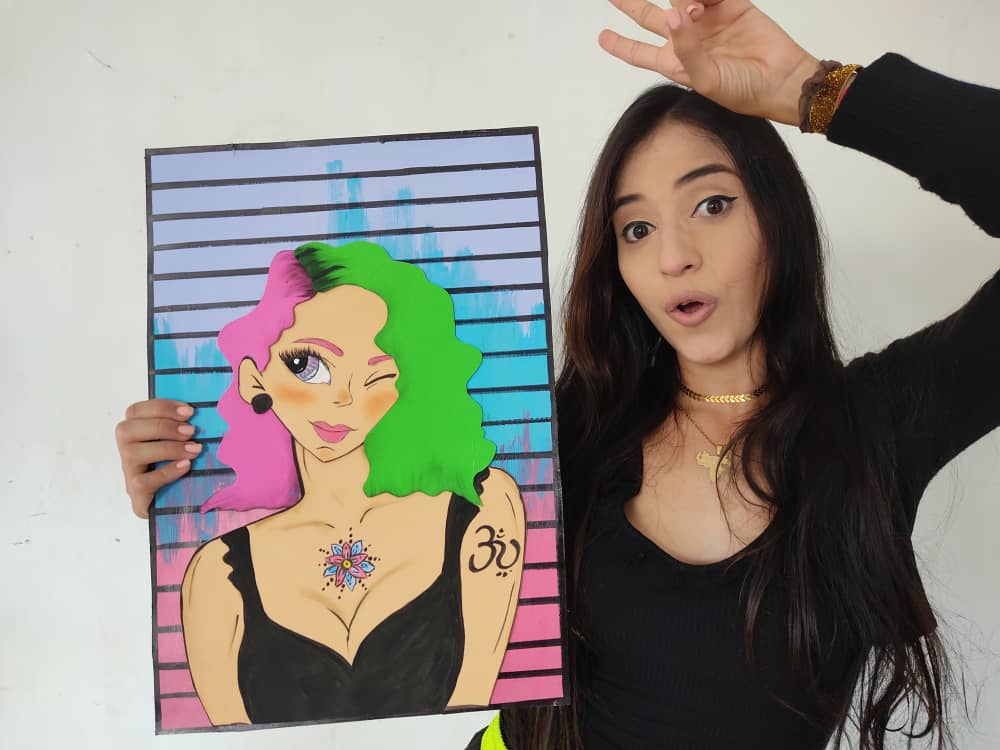
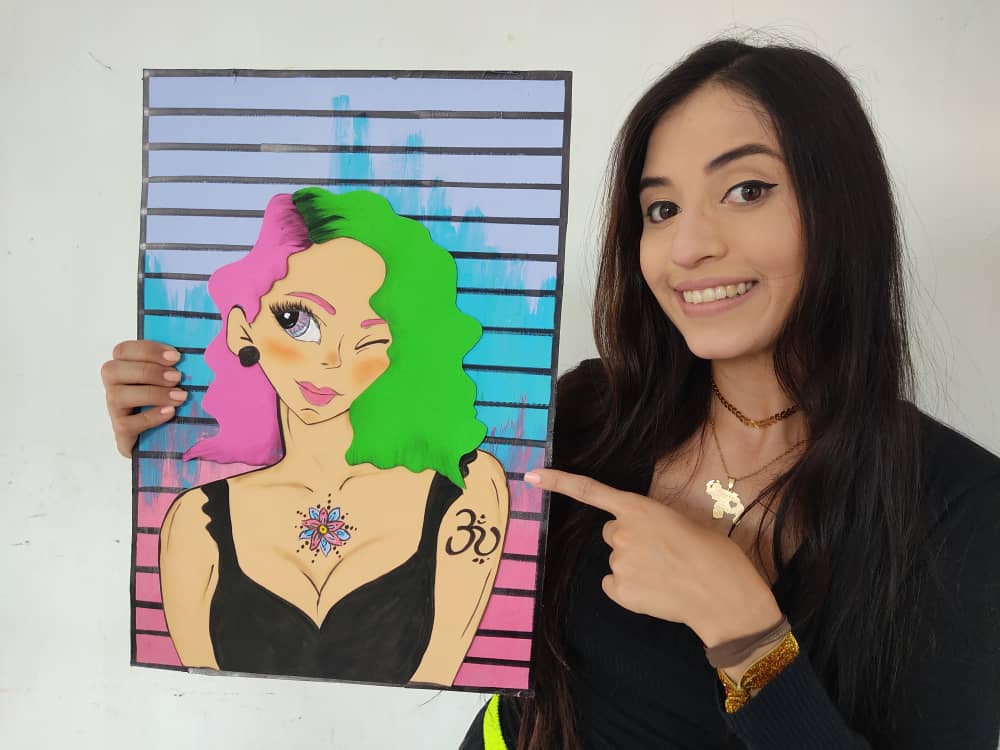
Primero, dibujamos a una hermosa chica de cabello corto, que guiñe el ojo y sonría de una hermosa manera, esta hermosa chica, tiene dos tatuajes muy lindos, uno en su pecho, y otro en su brazo.
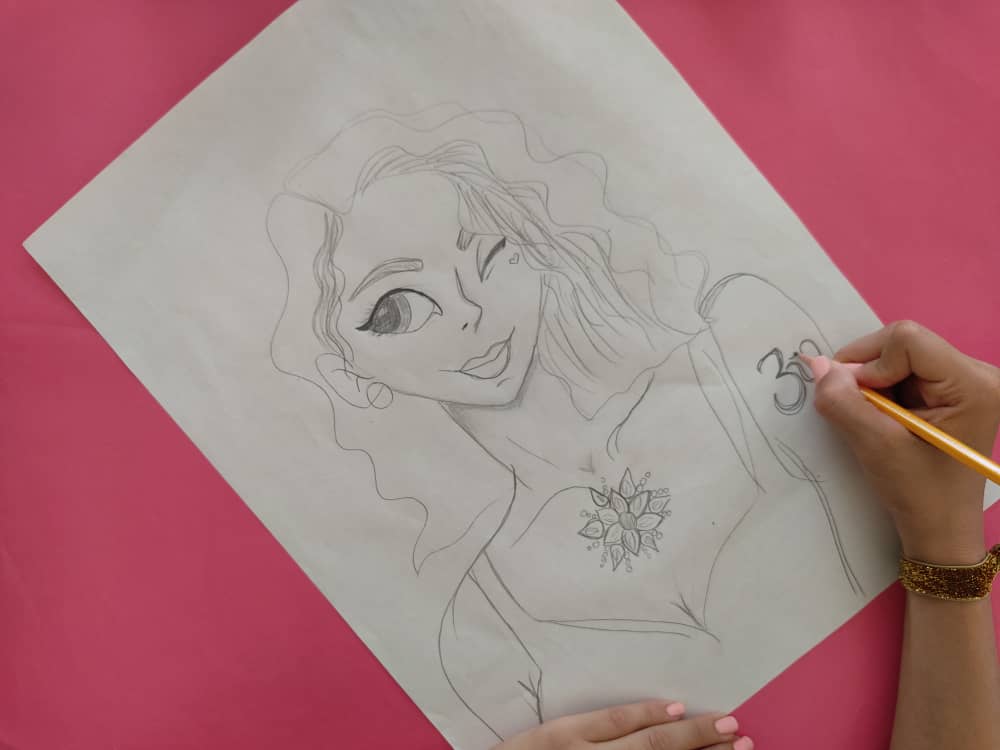
First, we draw a beautiful girl with short hair, who winks and smiles in a beautiful way, this beautiful girl has two very cute tattoos, one on her chest, and one on her arm.
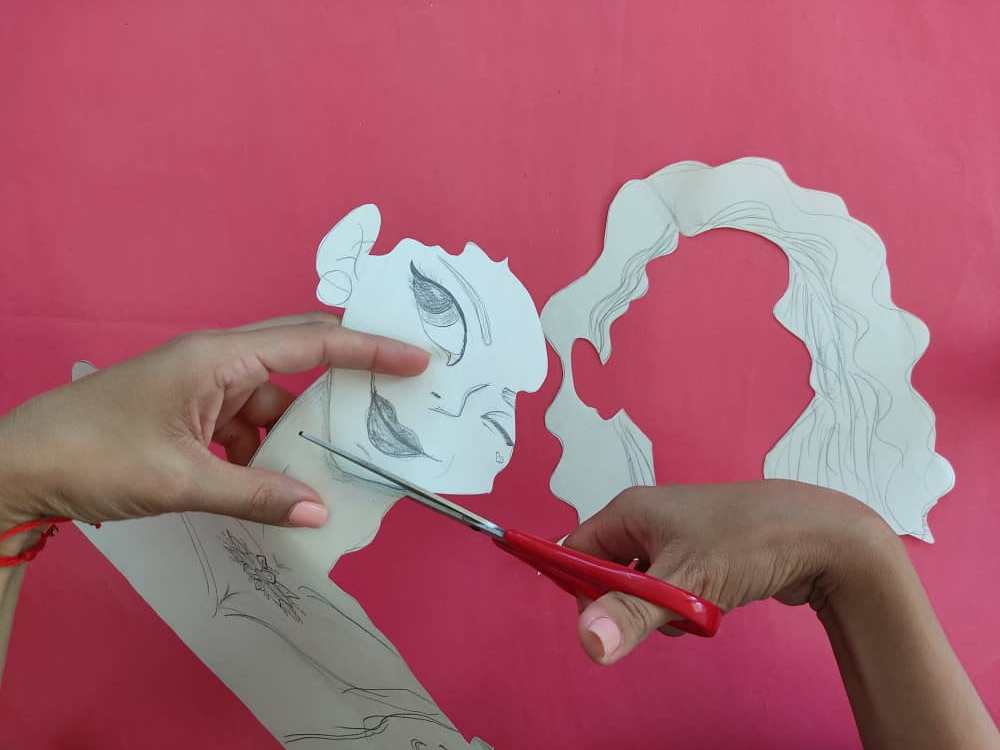
Ahora, recortamos las partes de la chica separando el pecho, cuello, cabello y cara, haciéndolo con mucho cuidado para que todas las figuras de está modelo punk encajen perfectamente.
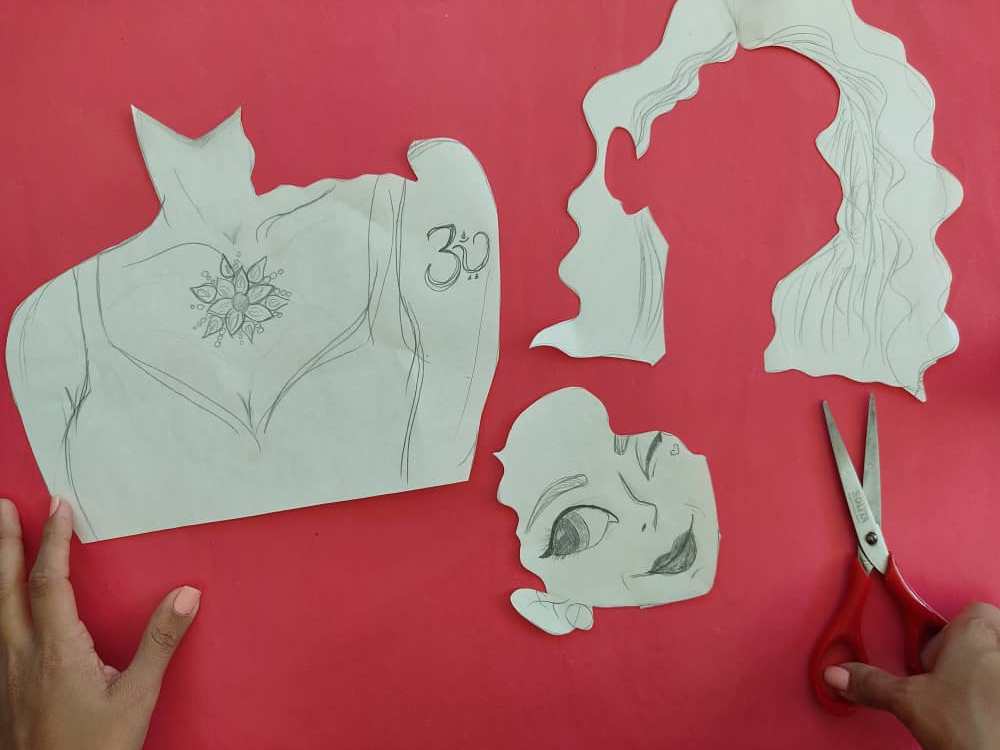
Now, we cut out the parts of the girl separating the chest, neck, hair, and face, doing it very carefully so that all the figures of this punk model fit perfectly.
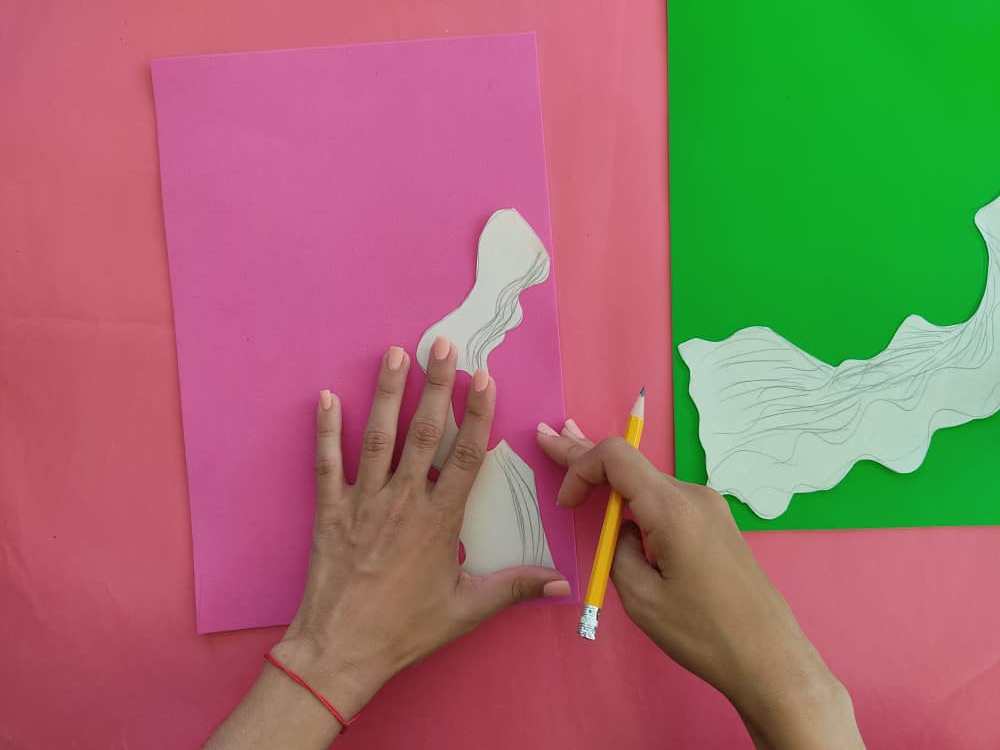
Seguidamente, transferimos el cabello, cabeza y el pecho al foami de color que más nos guste, respetando las medidas para que nuestra linda muñeca no pierda su forma.
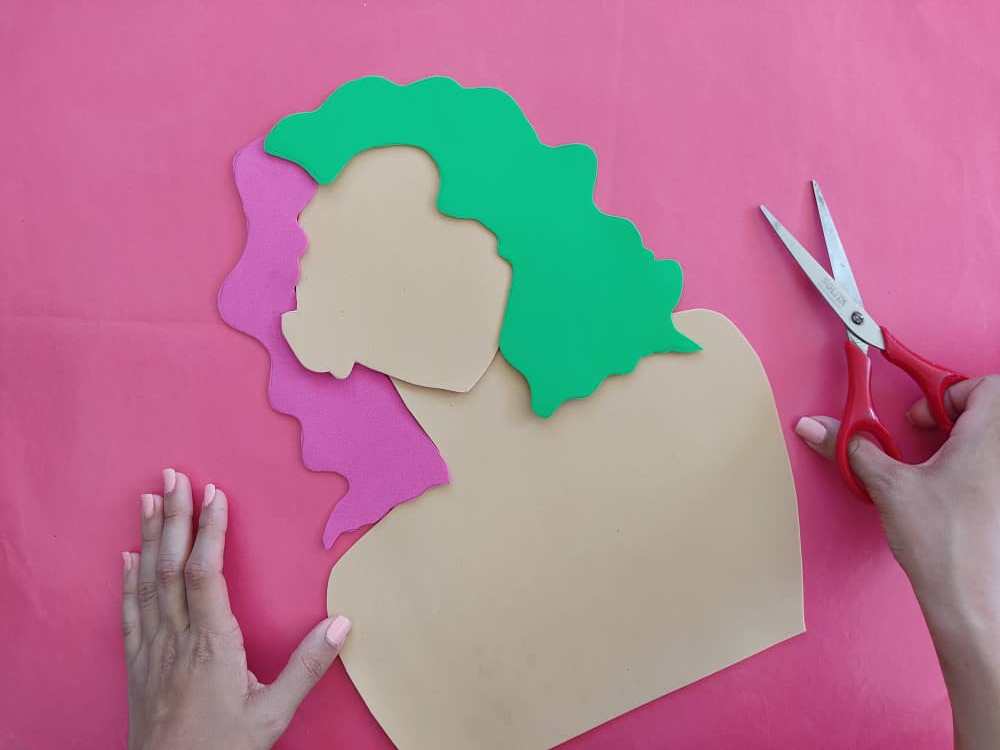
Next, we transfer the hair, head, and chest to the foamy of color that we like the most, respecting the measurements so that our cute doll does not lose its shape.
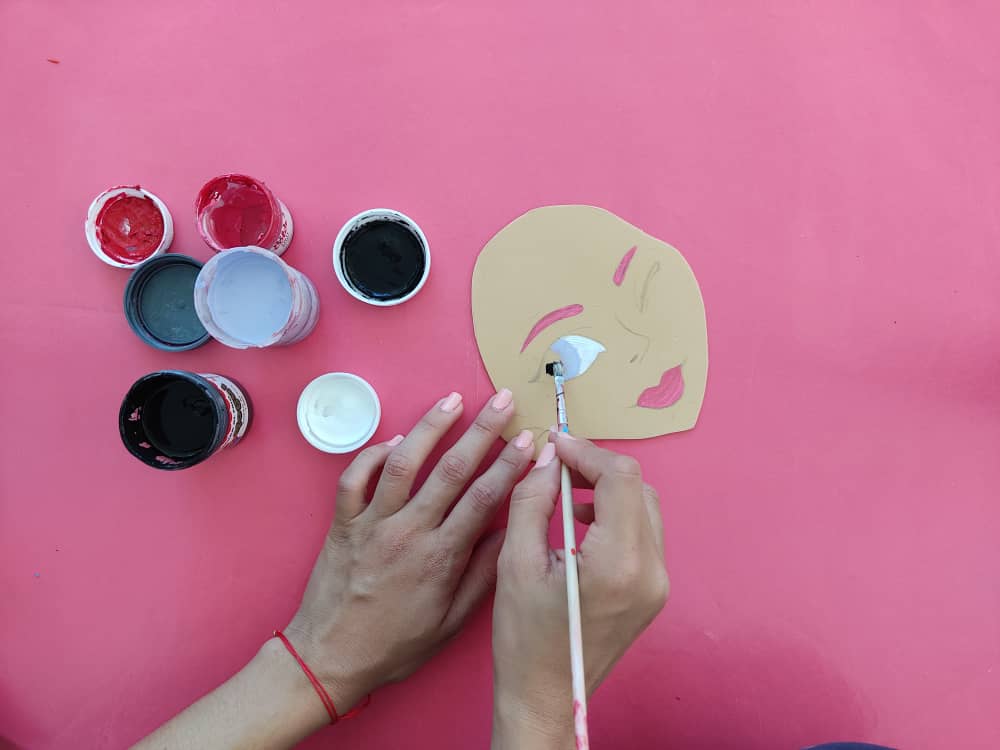
Una vez obtenidas las figuras deseadas en foami, damos comenzamos a darle vida y color a cada parte, comenzamos a definir y colorear el rostro de nuestra bella chica, marcando sus cejas, ojos, y demás rasgos.
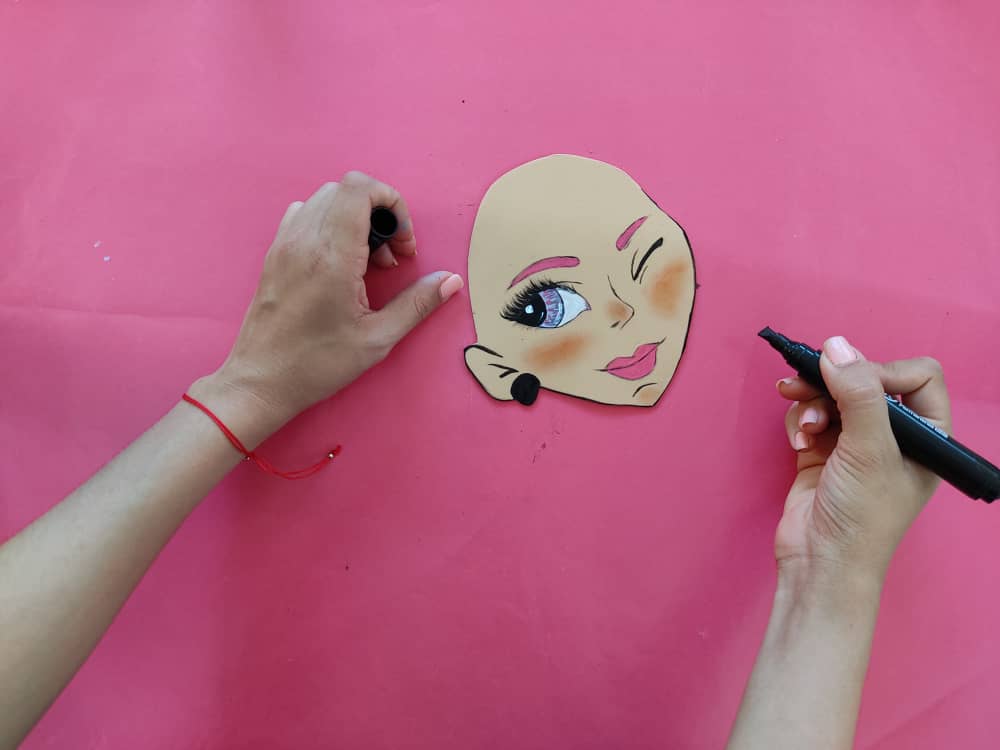
Once the desired figures are obtained in foamy, we begin to give life and color to each part, we begin to define and color the face of our beautiful girl, marking her eyebrows, eyes, and other features.

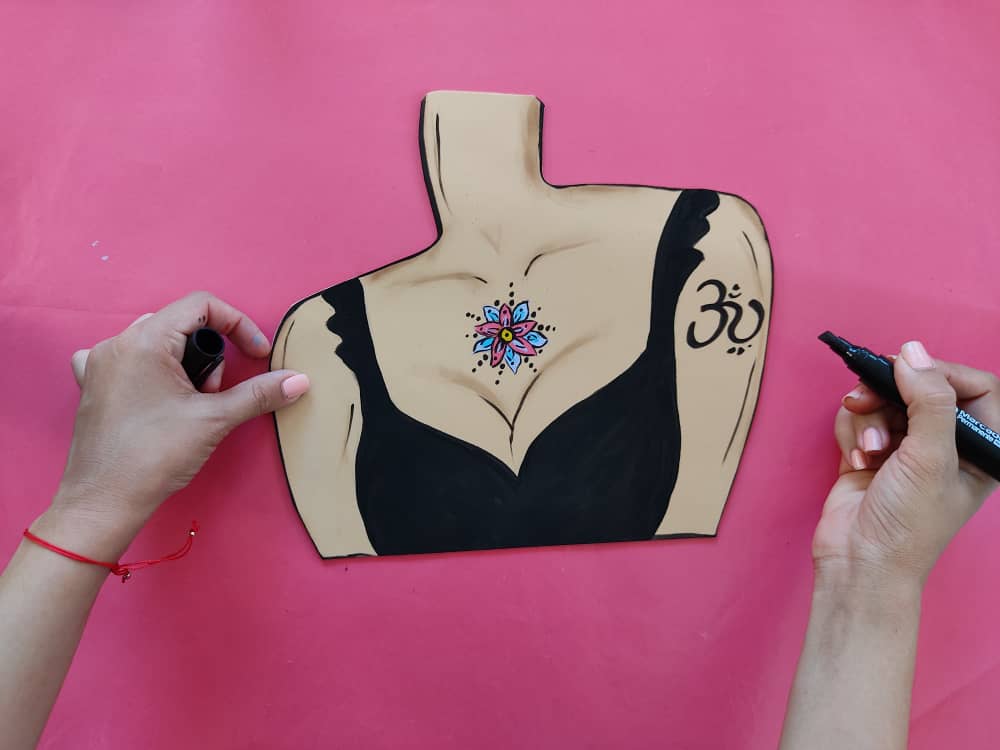
Ahora, marcamos los detalles de su cuerpo, como lo son la blusa, los tatuajes entre otras marcas, y comenzamos a pintar con los colores que más nos gusten, está vez opte por pintar la blusa de color negro, y la flor de varios colores, recuerden sombrear un poco los bordes del cuerpo de la chica con un tono marrón un poco oscuro, para que le dé el toque ideal de profundidad.
Now, we mark the details of her body, such as the blouse, the tattoos among other brands, and we begin to paint with the colors that we like the most, this time I chose to paint the blouse in black, and the flower in various colors Remember to shade the edges of the girl's body a bit with a slightly dark brown tone, to give it the ideal touch of depth.
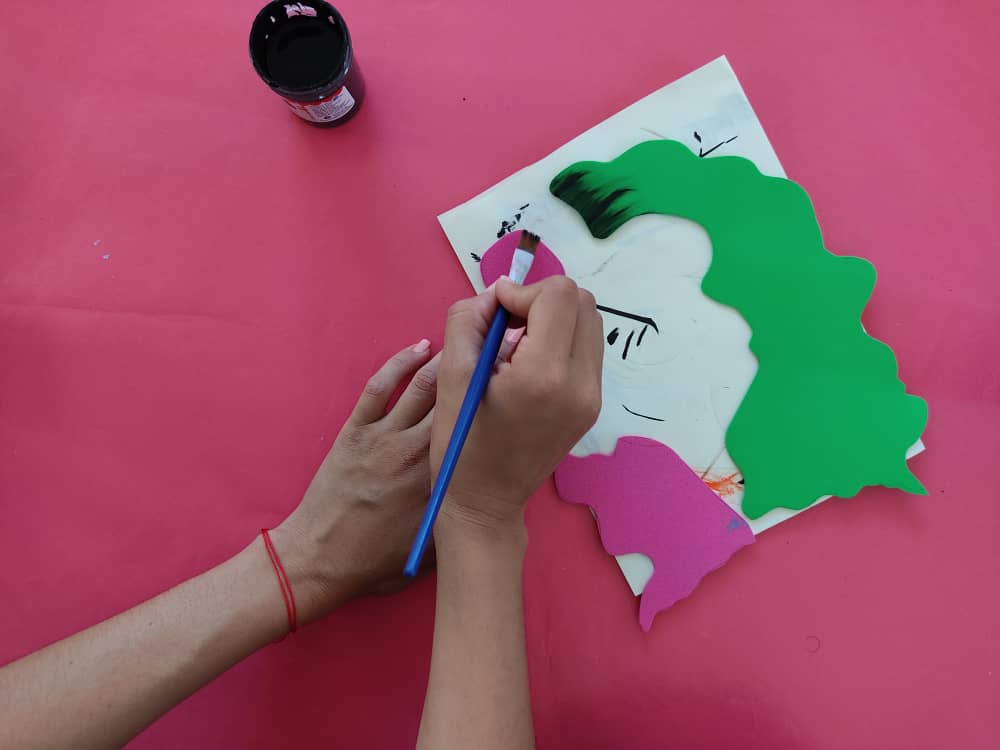
Seguidamente, pintamos un poco el cabello alocado de esta preciosa chica, será muy sencillo, pues únicamente aplicaremos pintura negra, una especie de raíz de color negro, de manera que luzca algo más real.
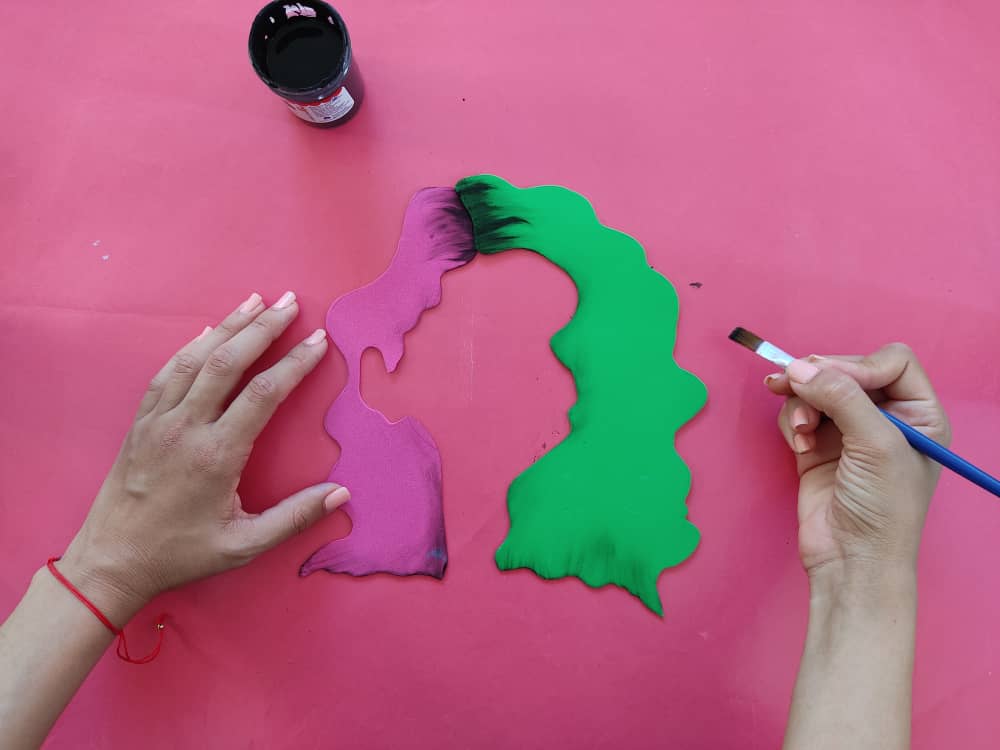
Next, we paint a little the crazy hair of this beautiful girl, it will be very simple because we will only apply black paint, a kind of black root so that it looks something more real.
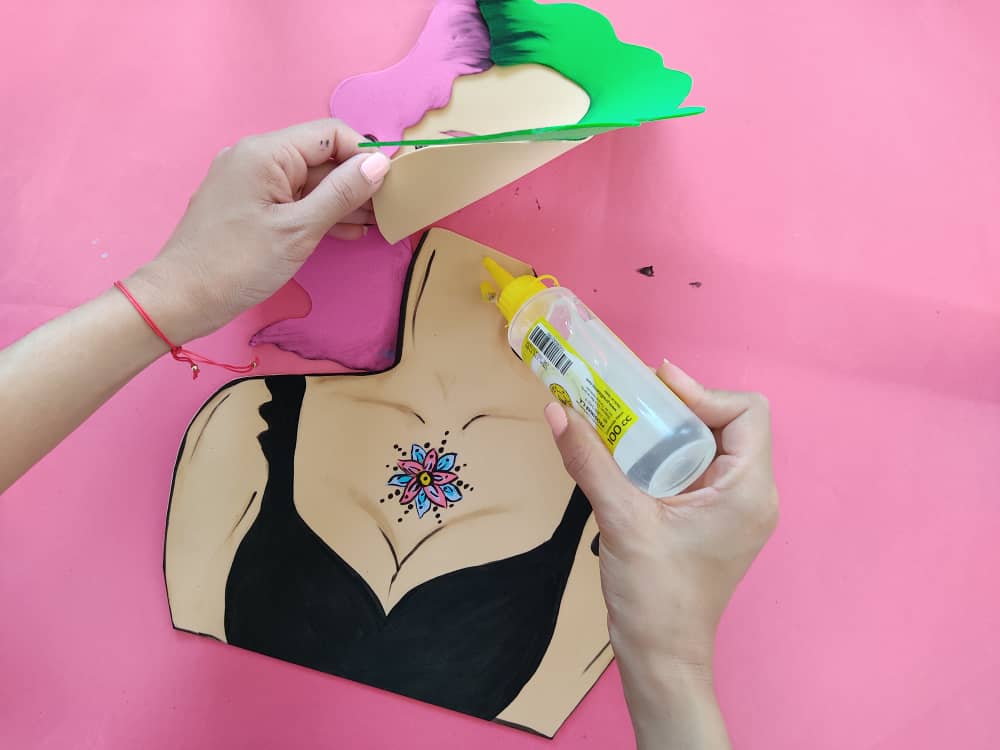
Una vez listas todas estas fabulosas piezas, comenzamos a unir las figuras, utilizando pegamento o silicón líquido y haciendo presión por unos segundos en cada unión para asegurar que todo quede bien pegado y que nuestra hermosa chica se robe todas las miradas de sus visitantes, genial no?
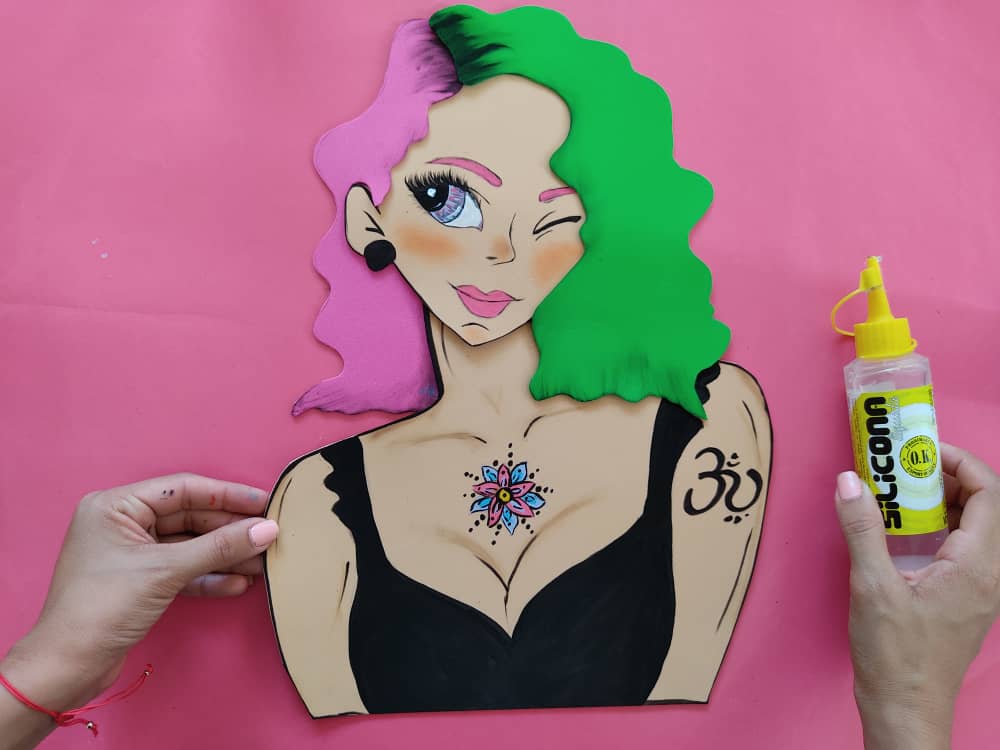
Once all these fabulous pieces are ready, we begin to join the figures, using glue or liquid silicone and pressing for a few seconds on each joint to ensure that everything sticks well and that our beautiful girl steals all the eyes of her visitors, great not?
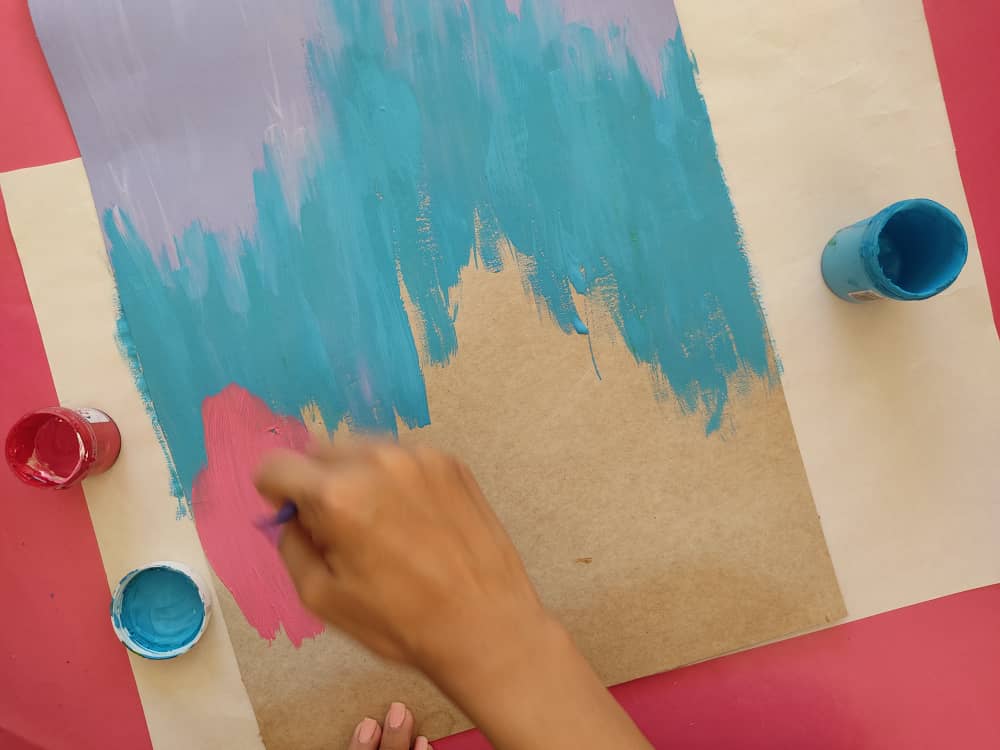
Ahora, fabricamos una linda base de cartón de aproximadamente 50cm de largo y 40cm de ancho, está vez decidí usar tres lindos colores para esta base, como lo son lila, azul y rosa, y realmente es un hermoso contraste, solo debemos dejar secar la pintura por unos segundos.
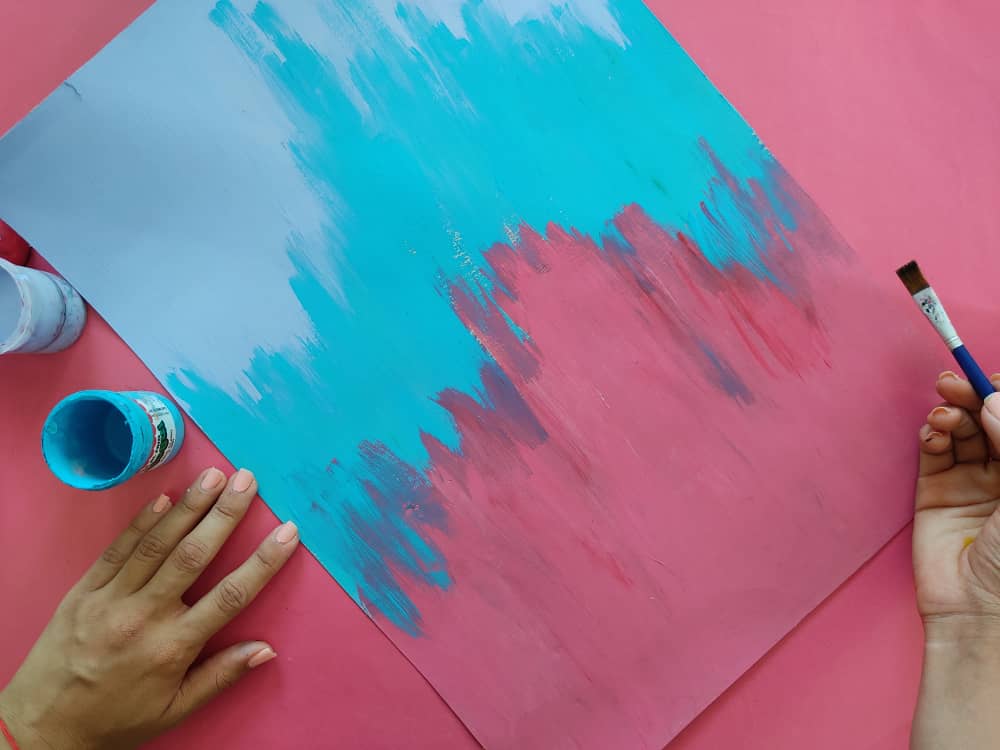
Now, we make a nice cardboard base of approximately 50cm long and 40cm wide, this time I decided to use three beautiful colors for this base, such as lilac, blue and pink, and it really is a beautiful contrast, we just have to let it dry painting for a few seconds.

Luego, con la ayuda de una regla y un marcador negro hacemos líneas horizontales, dejando un espacio entre ellas de aproximadamente 3cm, el resultado realmente me encantó, espero igual a ustedes.
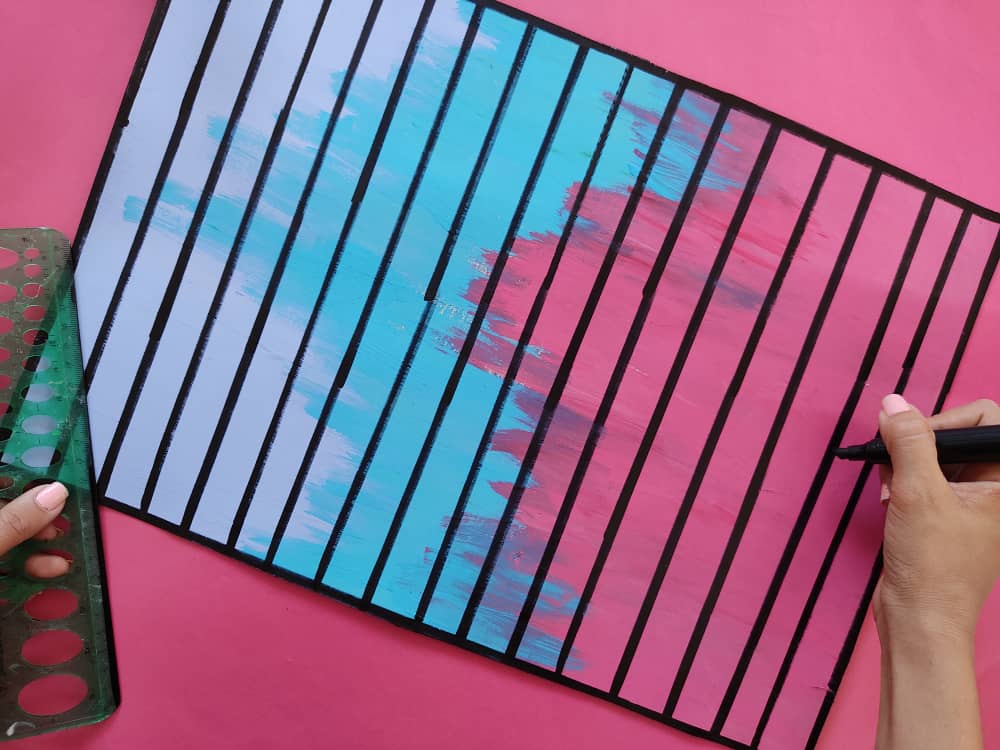
Then, with the help of a ruler and a black marker, we make horizontal lines, leaving a space between them of approximately 3cm, I really loved the result, I hope the same as you.
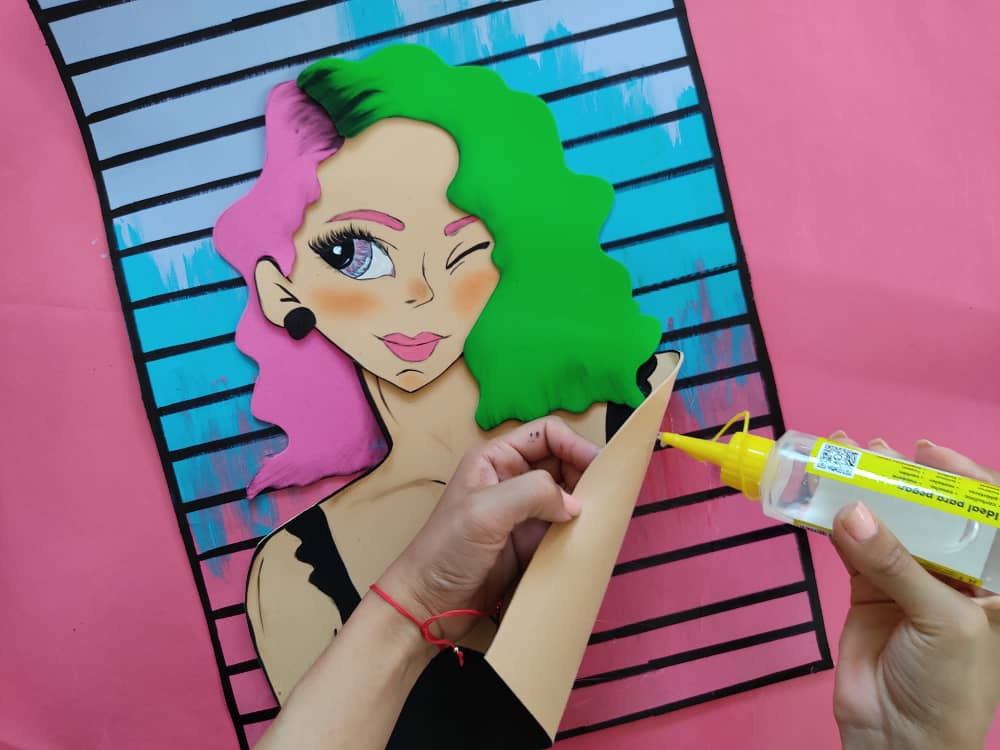
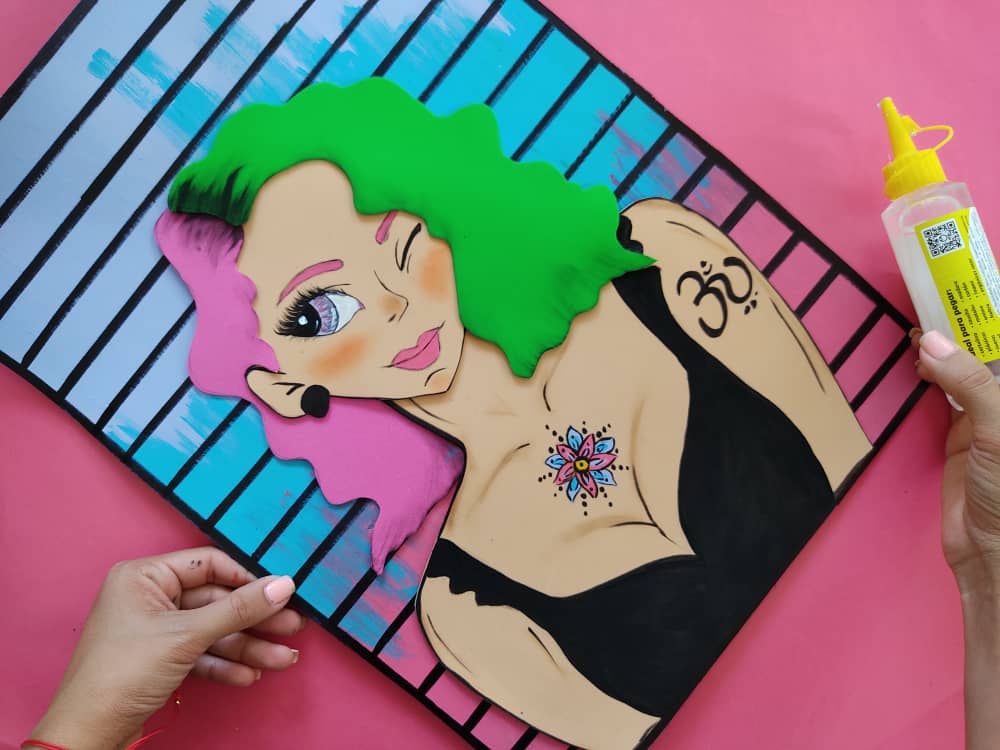
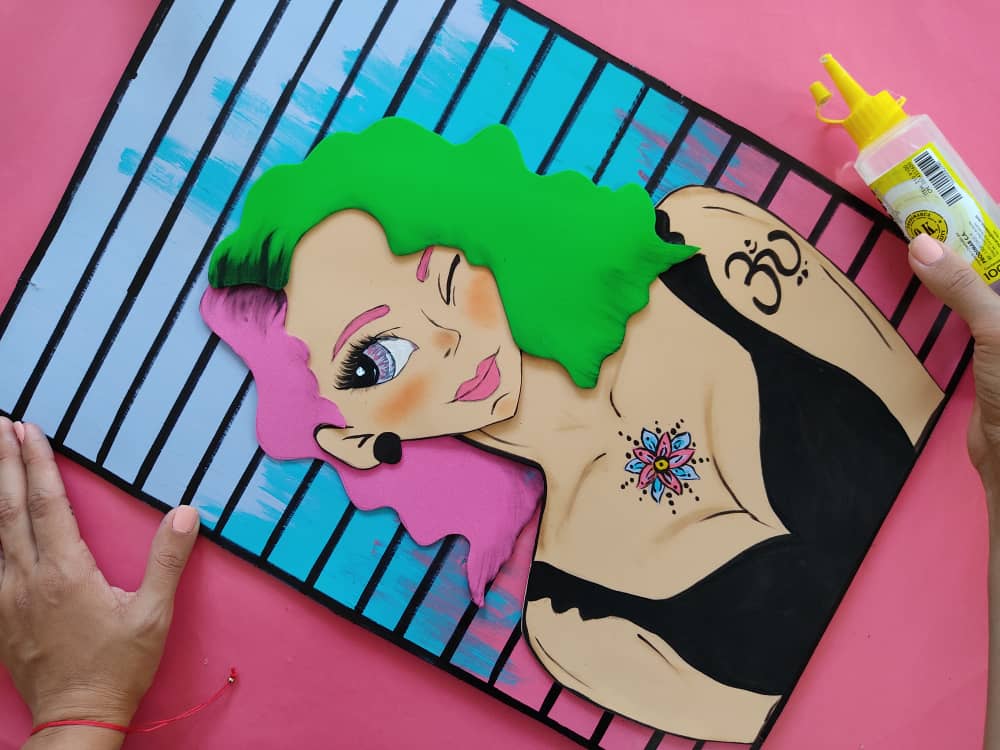
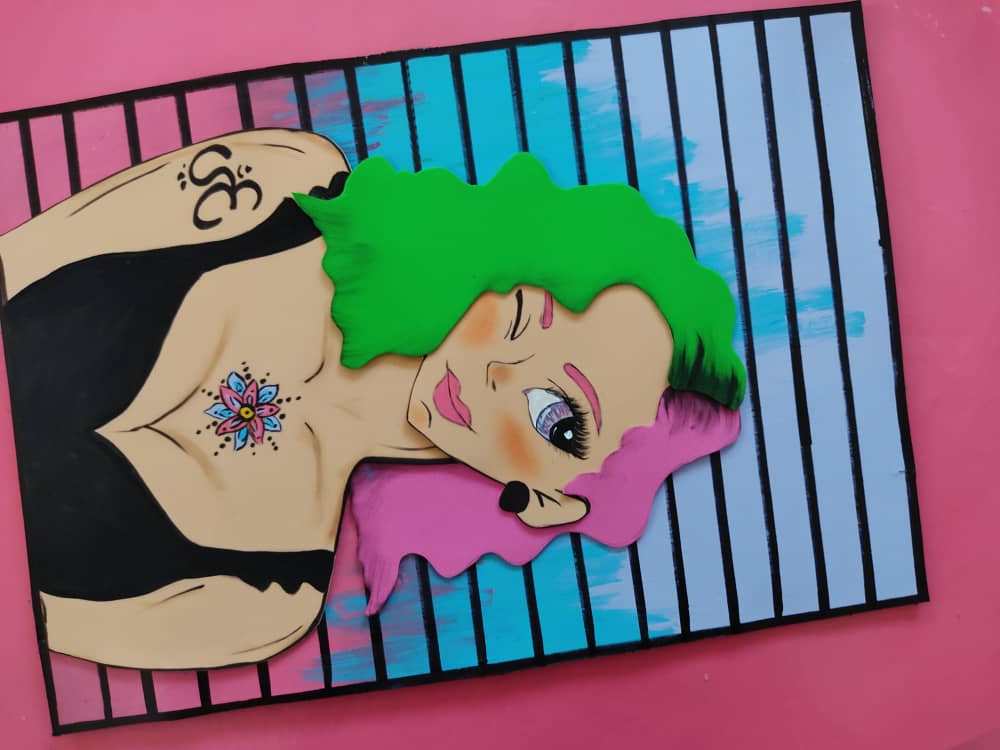
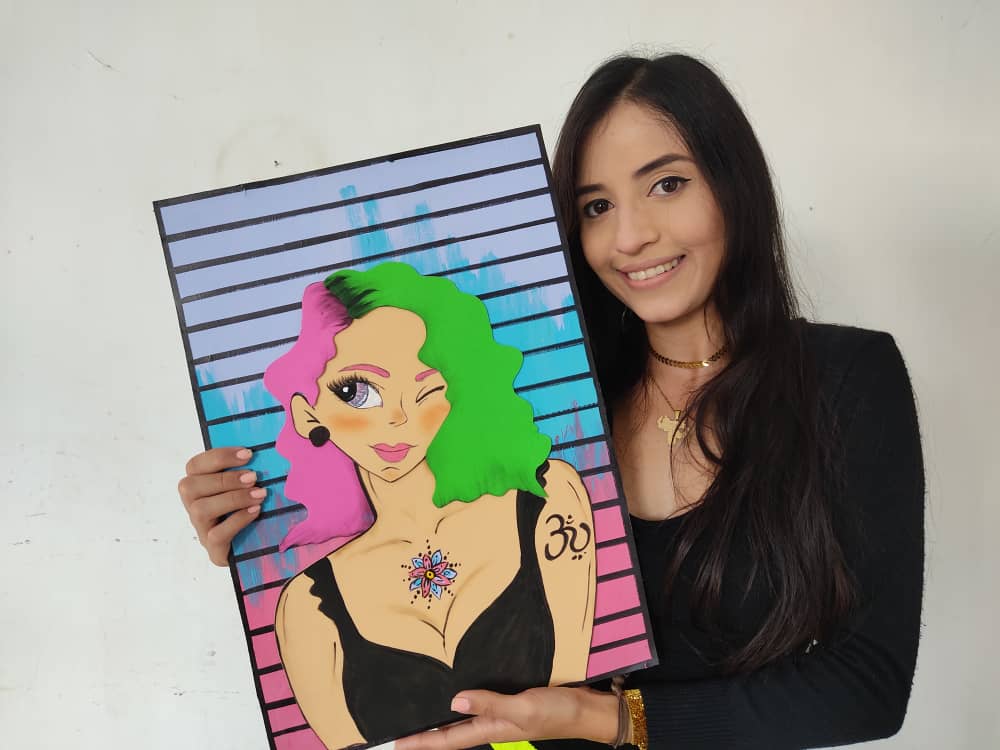
Ahora, pegamos nuestra chica punk sobre nuestra original base, con mucho amor para que todo luzca más elegante, y así, obtener el resultado deseado.
Now, we glue our punk girl on our original base, with a lot of love so that everything looks more elegant, and thus, obtain the desired result.
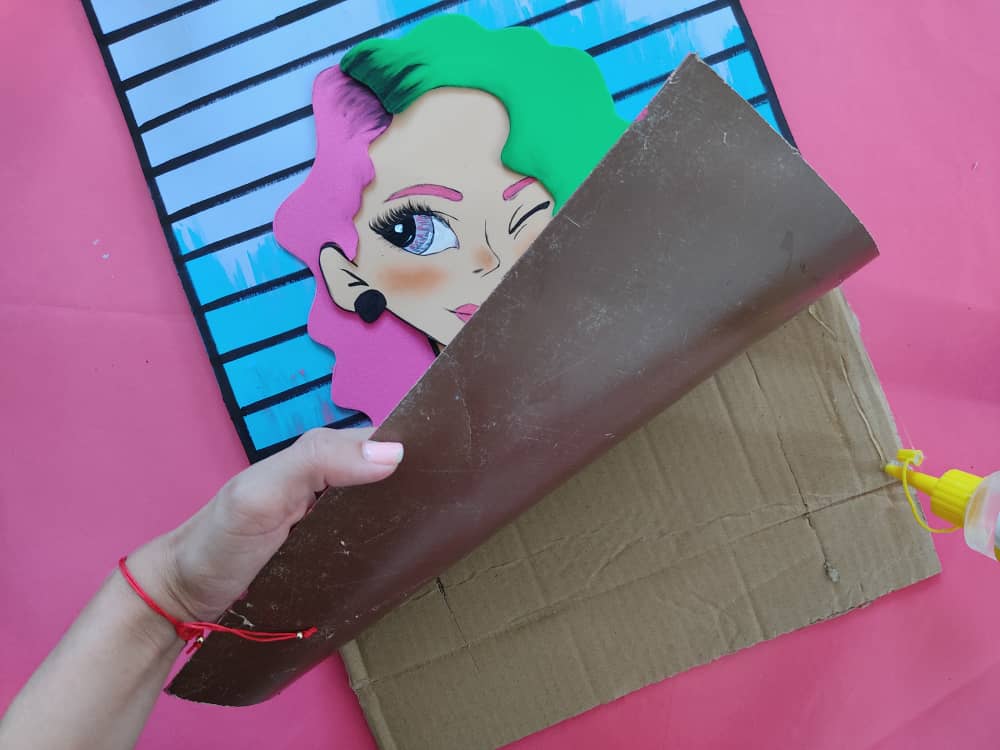
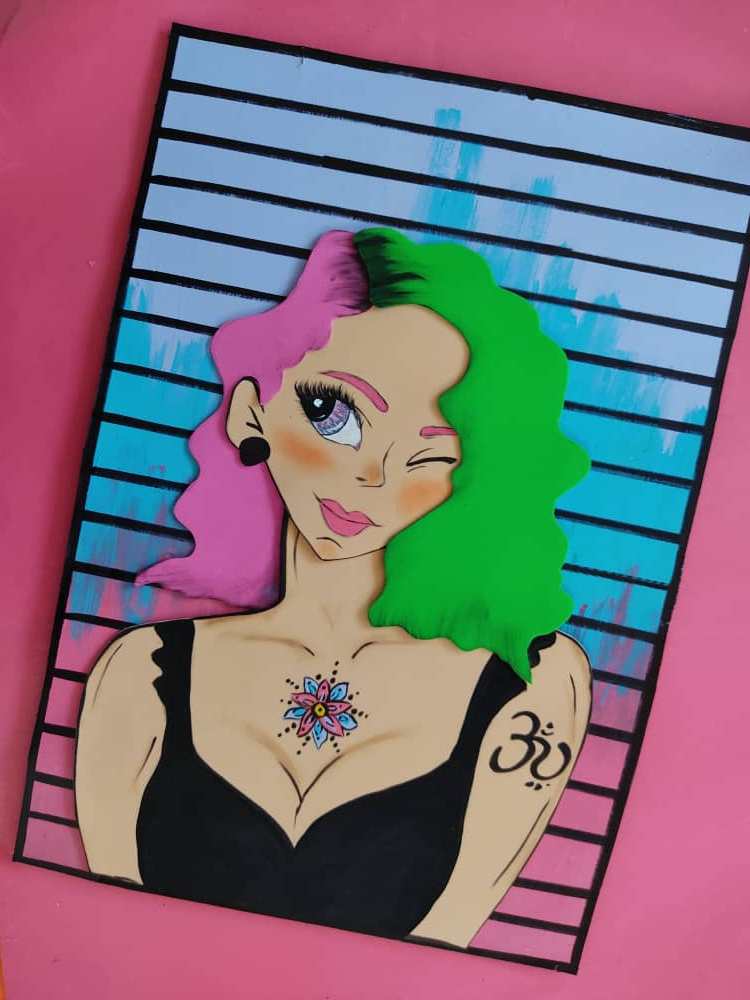
Finalmente, pegamos nuestra preciosa obra de arte sobre un cartón más grueso y de la misma medida de la base, para que esté le dé un poco mas de firmeza, y así, nuestro cuadro quedará perfecto para decorar las paredes de nuestros sitios más apreciados.
Finally, we glue our precious work of art on thicker cardboard and of the same measure of the base, so that it gives it a little more firmness, and thus, our painting will be perfect to decorate the walls of our most appreciated places.
.jpeg)
.jpeg)
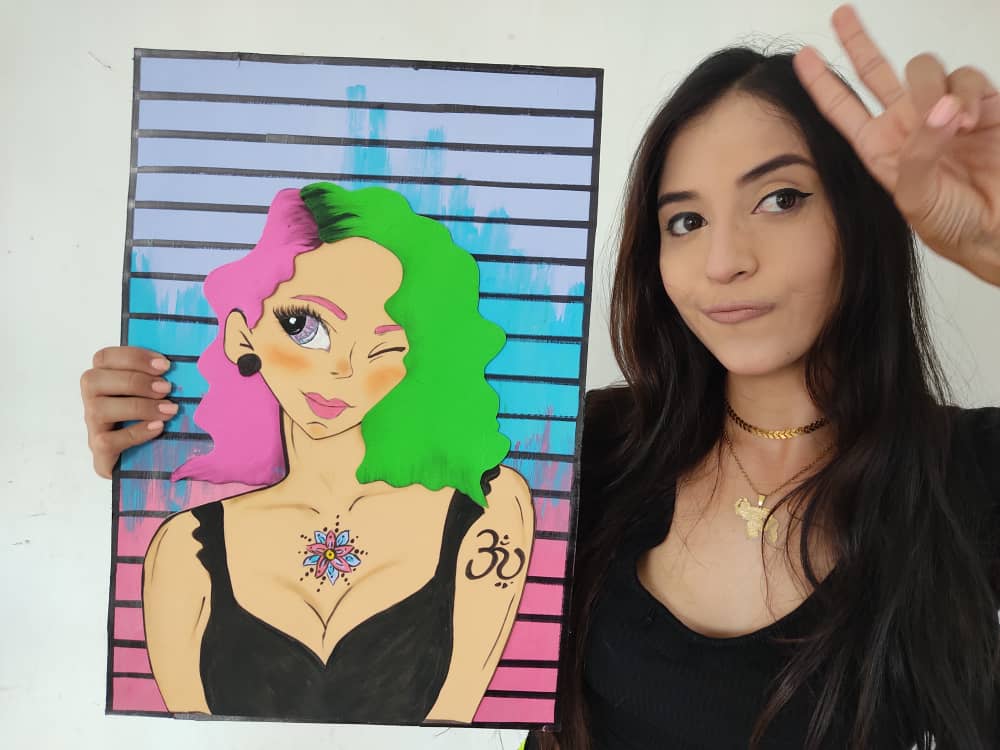
Gracias por acompañarme y espero que lo hayan disfrutado. ❤️
Thanks for joining and I hope you enjoyed it.❤️
.jpeg)
.jpeg)
.jpeg)
.jpeg)
.jpeg)
.jpeg)
.jpeg)
.jpeg)
.jpeg)
.jpeg)
.jpeg)
.jpeg)
.jpeg)
.jpeg)
.jpeg)
.jpeg)
.jpeg)
.jpeg)
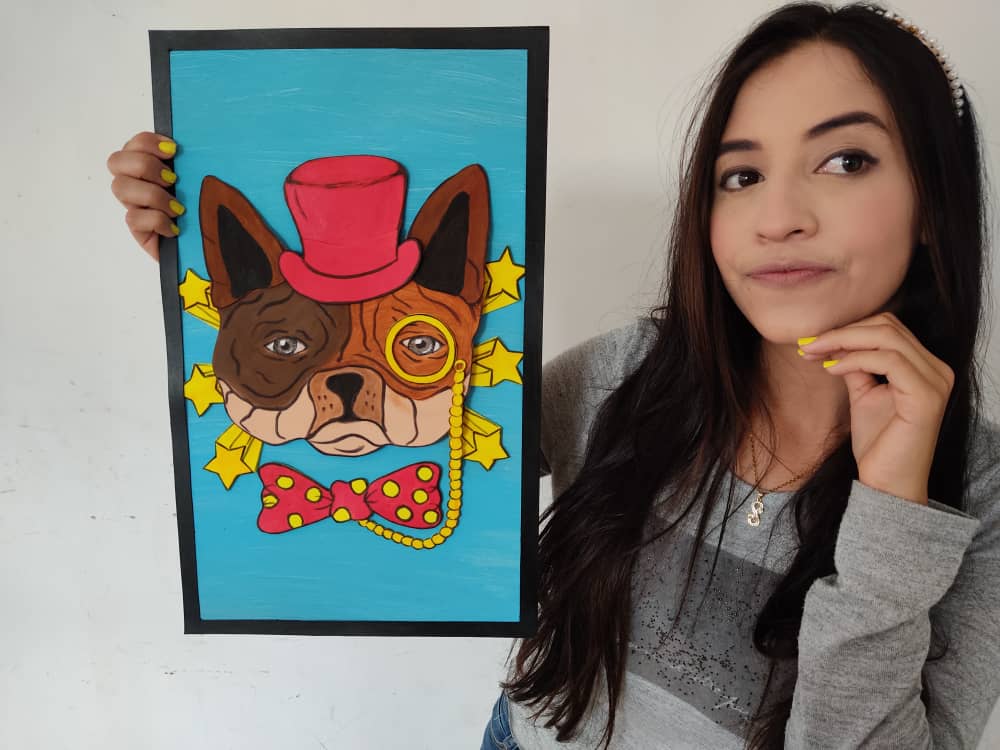
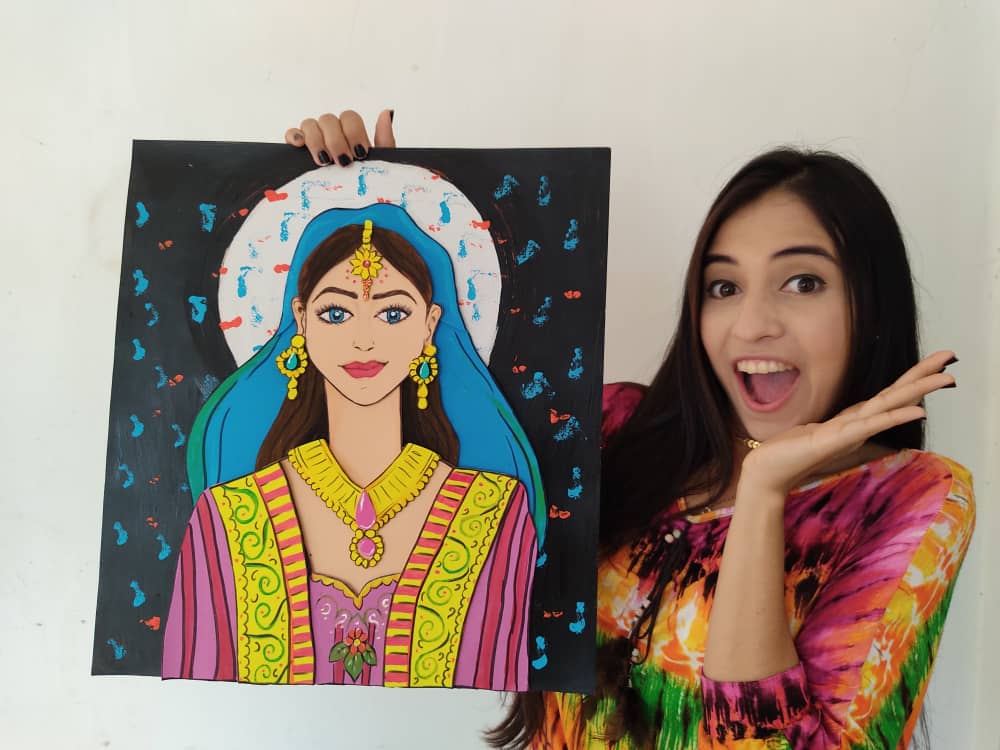
Clic para ver trabajos anteriores | Click to see previous works


My twt #posh
Congratulations @saracampero! You have completed the following achievement on the Hive blockchain and have been rewarded with new badge(s) :
You can view your badges on your board and compare yourself to others in the Ranking
If you no longer want to receive notifications, reply to this comment with the word
STOPDo not miss the last post from @hivebuzz:
solo tengo dos palabras para ti.... "Talento Puro", felicidades amiga.
Congratulations, your post has been upvoted by @dsc-r2cornell, which is the curating account for @R2cornell's Discord Community.
Thank you for sharing this amazing post on HIVE!
Your content got selected by our fellow curator @priyanarc & you just received a little thank you via an upvote from our non-profit curation initiative!
You will be featured in one of our recurring curation compilations and on our pinterest boards! Both are aiming to offer you a stage to widen your audience within and outside of the DIY scene of hive.
Join the official DIYHub community on HIVE and show us more of your amazing work and feel free to connect with us and other DIYers via our discord server: https://discord.io/diyhub!
If you want to support our goal to motivate other DIY/art/music/homesteading/... creators just delegate to us and earn 100% of your curation rewards!
Stay creative & hive on!