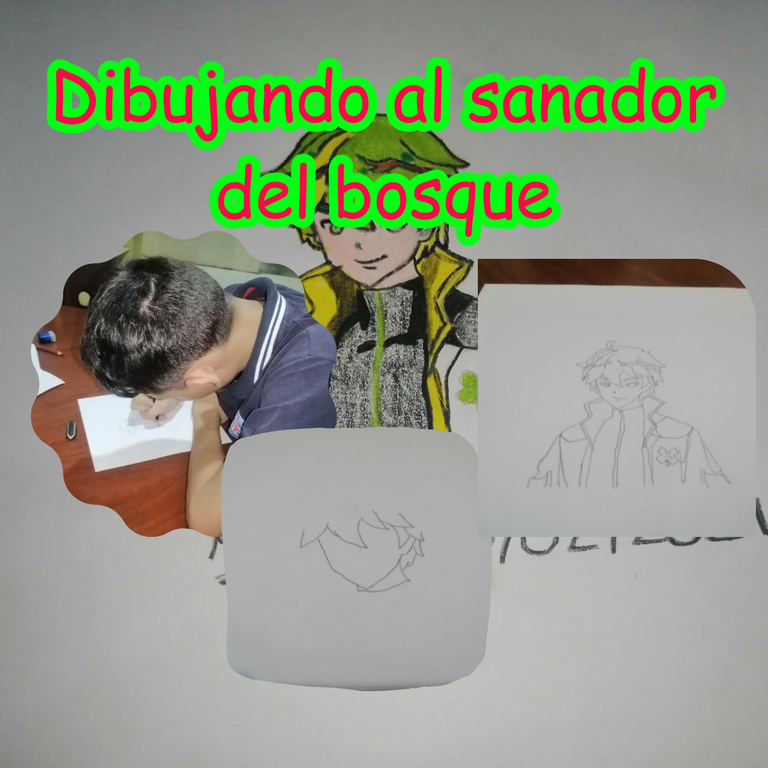
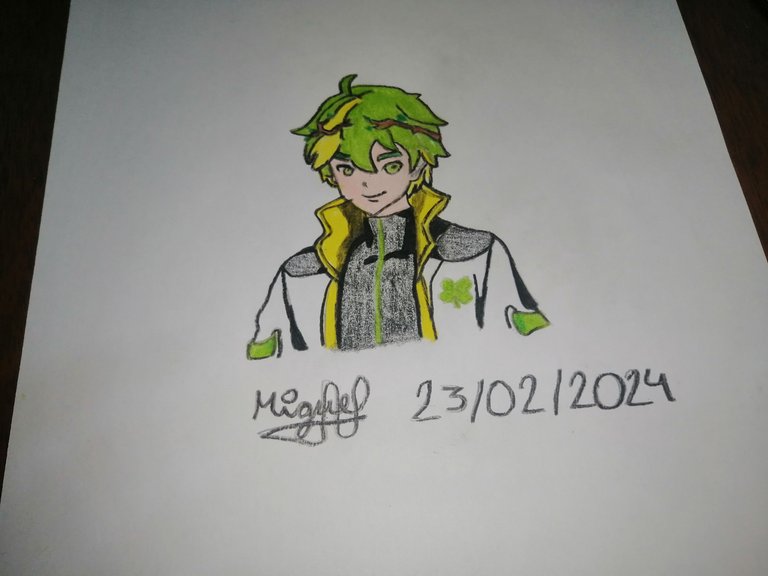
Hey, my dear friends. We are back here with one more drawing for this great community as it is @holozing, this time we will change the subject a little bit so, we will go from drawing one of our magnificent creatures, to draw one of the curators, in this case we will do it with the healing man of the forest. Let's see how we do in this and join me in this artistic adventure until the end.
Hey! Que tal mis queridos amigos. Volvemos por aquí con un dibujo más para esta gran comunidad como lo es @holozing, en esta ocasión cambiaremos un poco de tema así que, pasaremos de dibujar a una de nuestras magníficas criaturas, para dibujar uno de los curadores, en este caso lo haremos con el hombre sanador del bosque. Veamos como nos va en esto y acompañenme en esta aventura artística hasta el final.
**WHICH HEALER WE WILL DRAW? **
**¿QUE SANADOR DIBUJAREMOS? **

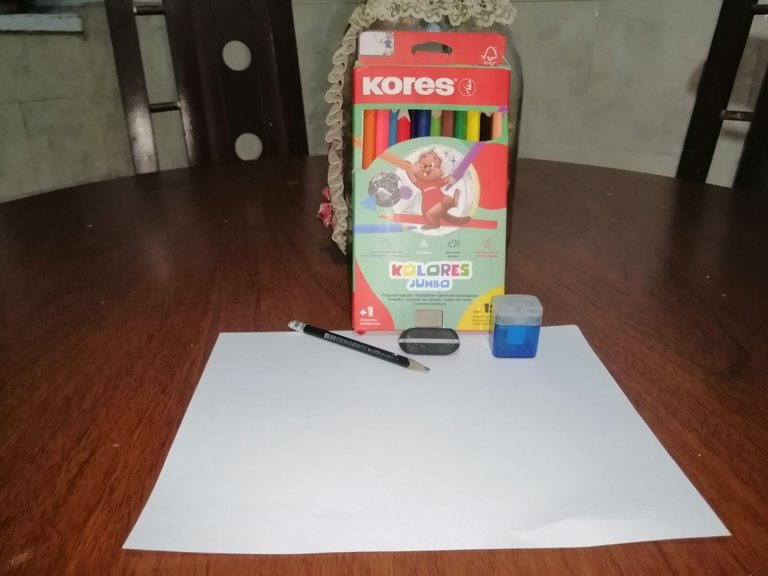
MATERIALS
The materials we need are very simple and easy to obtain, such materials are:
a pencil
A rubber
A pencil sharpener
A colors
one sheet
MATERIALES
Los materiales que necesitamos son muy simples y fáciles de obtener, tales materiales son:
un lapiz
una goma
un sacapuntas
colores
una hoja
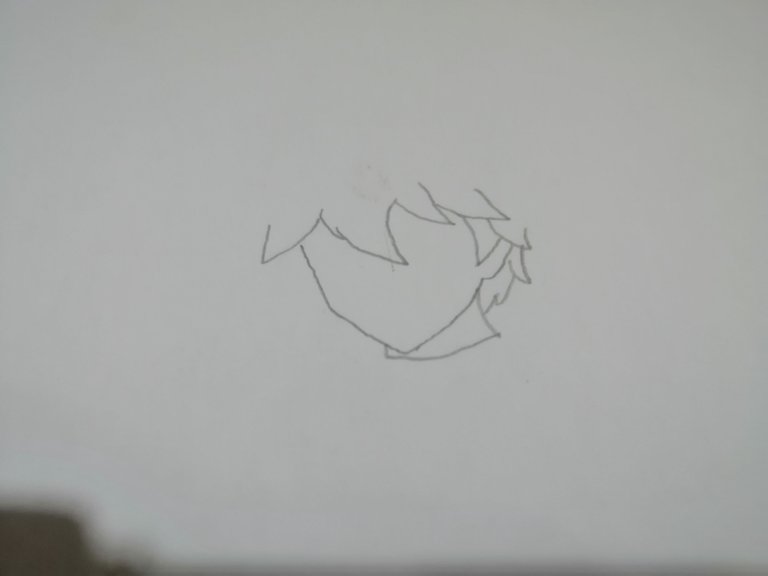
DRAWING OF THE FOREST HEALER
STEP 1
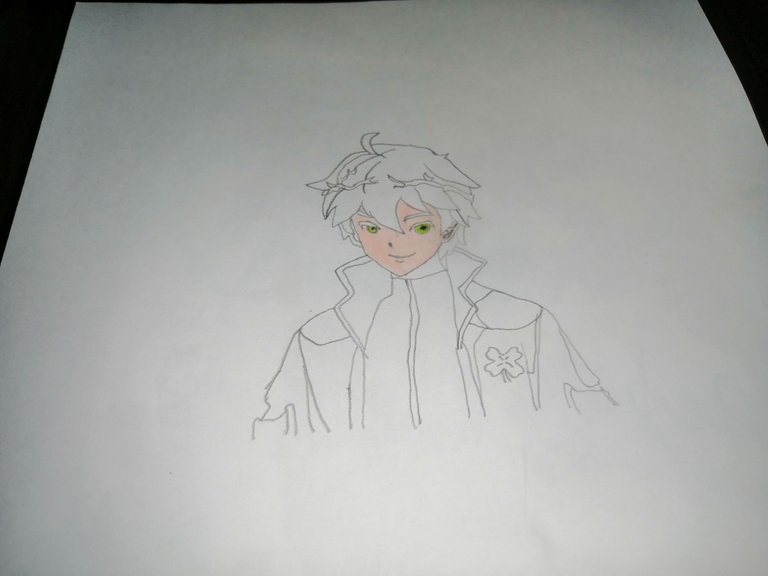
Starting our drawing, first we will look a little bit at the reference image to know very well where to begin the drawing of our curator; in my case I will start with the face and the strands of hair that rest on his forehead, for this we will start with a thin line where the first line that will start our work will be curvilinear and a little short, then we will turn downwards going to the right side without finishing with this line until we reach the chin. Then we will take a turn upwards with a straight line arriving at the point of making the ear of our curator. Then we will draw the small strands of hair that rest on his ear to continue with the rest of the hair that rests on the forehead of this; in a continuous way to culminate with the first part of the hair, we will draw with straight lines the neck of the character giving an end to this first step.
DIBUJO DEL SANADOR DEL BOSQUE
PASO 1
Haciendo inicio a nuestro dibujo, primero miraremos un poco la imagen de referencia para saber muy bien por donde empezar el dibujo de nuestro curador; en mi caso daré inicio por la cara y los mechones del cabello que se posan en su frente, para esto iniciaremos con un trazo delgado donde la primera línea que dará comienzo a nuestra obra será curvilínea y un poco corta, luego giraremos hacia abajo dirigiendonos al lado derecho sin acabar con este trazo hasta llegar al mentón. Entonces tomaremos un giro hacia arriba con una linea recta llegando al punto de realizar la oreja de nuestro curador. Acto seguido dibujaremos los pequeños mechones de cabello que se postran en su oreja para así seguir con el resto del cabello que se posa en la frente de este; de una manera continua al culminar con la primera parte del cabello, dibujaremos con líneas rectas el cuello del personaje dándole fin a este primer paso.
STEP 2
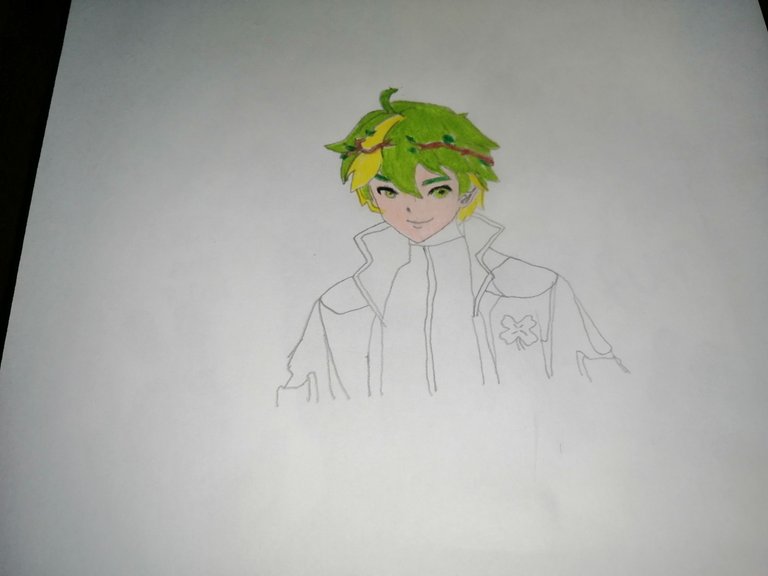
To start our second step we will be guided by our reference image to make the rest of the hair, therefore we will take care of every detail of this to make it as similar as possible and so consecutively to finish it, when the hair is ready we will make the two twigs that it has, giving meaning to the name of healer of the forest. To continue with this, we will make the details of the face to be more specific his eyes, nose and mouth.
For this we will first make her left eyebrow with two parallel lines between tuft and tuft ending it easily, then a little below we will make two straight strokes that converge at the same point coming to have the shape of a small peak and clear, all this following the reference image and do the same on the next side, to finish with the eyes we will make two circles that start from the previous stroke to finish on the other side. Continuing with the nose we will make a small curve and it's that easy. Finishing this step with the mouth the only thing we will do will be a curve forming a small smile on his face and ready the second step would be completed.
PASO 2
Para iniciar nuestro segundo paso nos guiaremos de nuestra imagen de referencia para realizar el resto del cabello, por lo tanto cuidaremos cada detalle de este para hacerlo lo más parecido posible y así consecutivamente hasta acabarlo, al tener listo el cabello haremos las dos ramitas que este posee, dándole significado al nombre de sanador del bosque. Para seguir con esto, realizaremos los detalles del rostro para ser más específico sus ojos, nariz y boca.
Para esto realizaremos primero su ceja izquierda con dos líneas paralelas entre mechón y mechón terminandola fácilmente, seguidamente un poco debajo realizaremos dos trazos rectos qué converjan en un mismo punto llegando a tener la forma de un pequeño pico y claro, todo esto siguiendo la imagen de referencia y haremos lo mismo del siguiente lado, para acabar con los ojos haremos dos círculos que den inicio desde el anterior trazo hasta finalizar del otro lado. Siguiendo con la nariz realizaremos una pequeña curva y listo así de fácil. Finalizando este paso con la boca lo único que haremos será una curva formando una pequeña sonrisa en su rostro y listo el segundo paso estaría culminado.
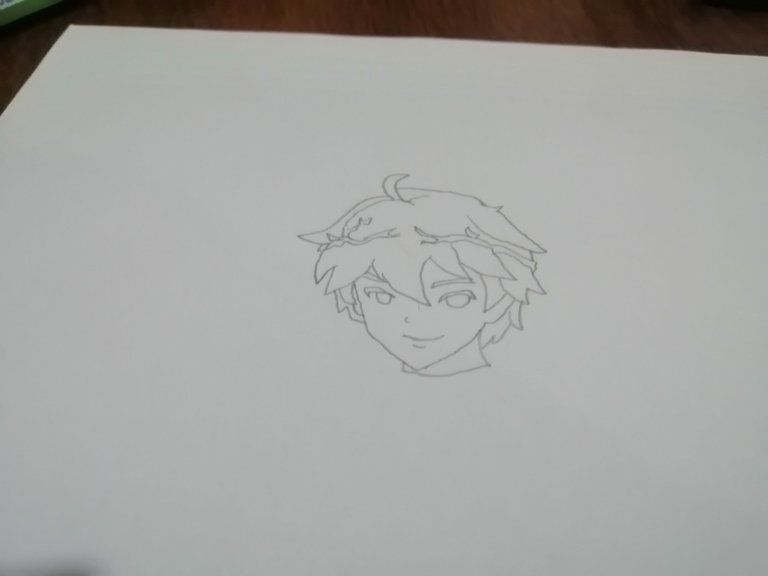
STEP 3
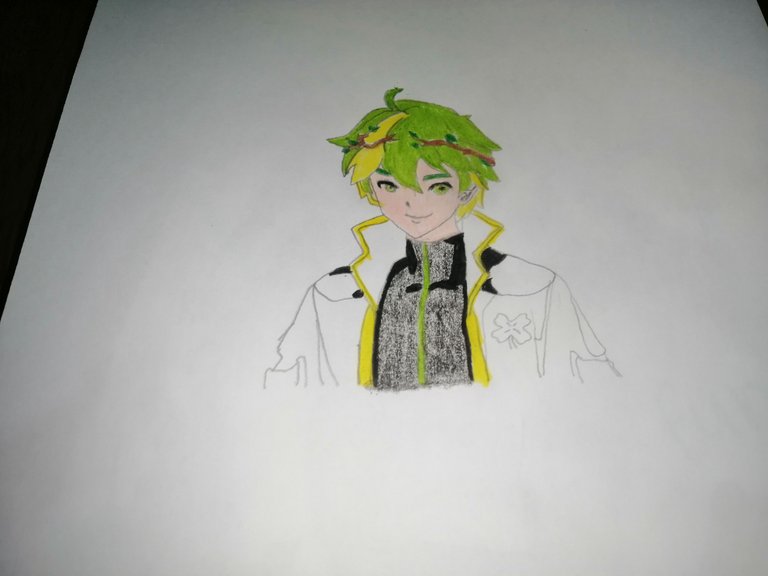
Continuing our drawing of the forest healer, we will make a curved line on the neck from end to end what would be understood as his shirt, then from there we will make two straight lines downwards what would be understood as a zipper. Now, we will make the doubles of her clothes; for this we will make two straight lines parallel to each other, each one will have a diagonal shape and we will do the same on both sides. Next we will make the shoulder following our reference image.
PASO 3
Continuando nuestro dibujo del sanador del bosque, realizaremos una línea curva en el cuello de punta a punta lo que se entendería como su camisa, entonces de allí partirán dos líneas rectas hacia abajo lo que se entendería como un cierre. Ahora, haremos los dobles de su ropa; para ello realizaremos dos líneas rectas de manera paralela una con respecto a la otra, cada una tendrá una forma diagonal y realizaremos lo mismo de ambos lados. Seguidamente haremos el hombro siguiendo nuestra imagen de referencia.

STEP 4
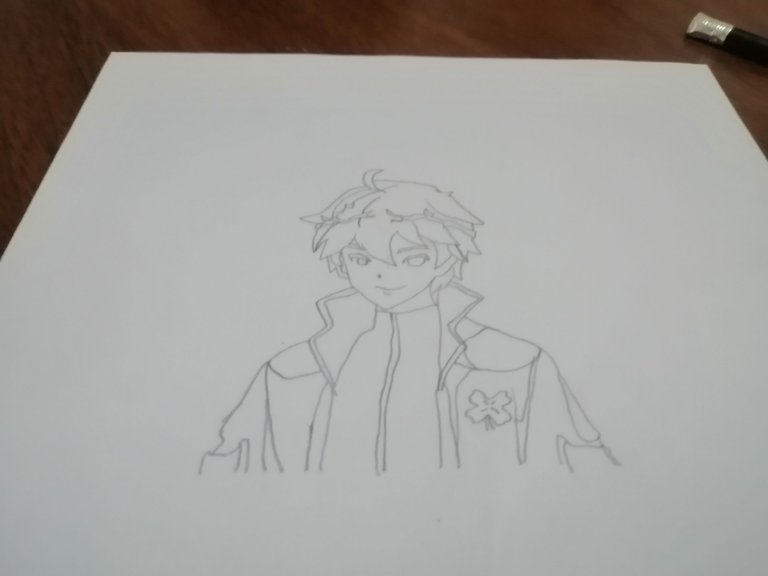
To finish with this last step what we will do is to go little by little looking at our reference image therefore we will make a small curve from the right shoulder and when we have it ready we will make a straight line down and to finish our right side we will make the clover leaf of our forest healer; when we finish it we will move to the left side to finally finish our drawing.
Now having our folds on the left side we will first make the shoulder of our healer, therefore, from the tip of the fold at the bottom we will make a slightly curved line below, which will then become a straight line down and following this line we will turn to the right until we reach our folds again. Well to continue we will create a semi-curved line downwards until we reach the bottom and from this line we will make another one a little bit open to the previous one also downwards. From the same beginning of the shoulder we will make a stroke to the left simulating the arm of our character and to finish we will make the last details that we can witness in our reference image and ready my friends our base drawing would be finished just missing the coloring.
PASO 4
Para finalizar con este último paso lo que haremos es ir poco a poco mirando nuestra imagen de referencia por lo tanto realizaremos una pequeña curva desde el hombro derecho y al tenerla lista realizaremos una línea recta hacia abajo y para acabar nuestro lado derecho realizaremos la hoja de trebol de nuestro sanador del bosque; al terminarla pasaremos al lado izquierdo para por fin acabar con nuestro dibujo.
Ahora al tener nuestros doblez del lado izquierdo primero realizaremos el hombro de nuestro sanador por lo tanto, desde la punta del doblez de la parte inferior realizaremos una línea curva un poco debajo, la que luego se convertirá en una recta hacia abajo y siguiendo este trazo girariamos hacia la derecha hasta llegar nuevamente a nuestro Dobles. Bien para continuar crearemos un trazo semi-curvo hacia abajo hasta llegar a la parte inferior y desde esta línea haremos otra un poco aperturada a la anterior también hacia abajo. Desde el mismo inicio del hombro haremos un trazo hacia la izquierda simulando el brazo de nuestro personaje y para finalizar haremos los últimos detalles que podemos presenciar en nuestra imagen de referencia y listo mis amigos nuestro dibujo base estaría acabo faltandonos solamente el coloreo.
Well my friends as I always tell you the coloring I leave it to your taste because each person has their own way of drawing and coloring, so my friends this has been all for today, I hope you liked this content, see you soon and take it minimi!
Bueno mis amigos como les digo siempre el coloreo los dejo a su gusto ya que cada persona tiene sus formas de dibujar y colorear, por lo tanto mis amigos esto ha sido todo por hoy, espero este contenido les haya gustado nos vemos pronto y ¡llévatelo minimi!
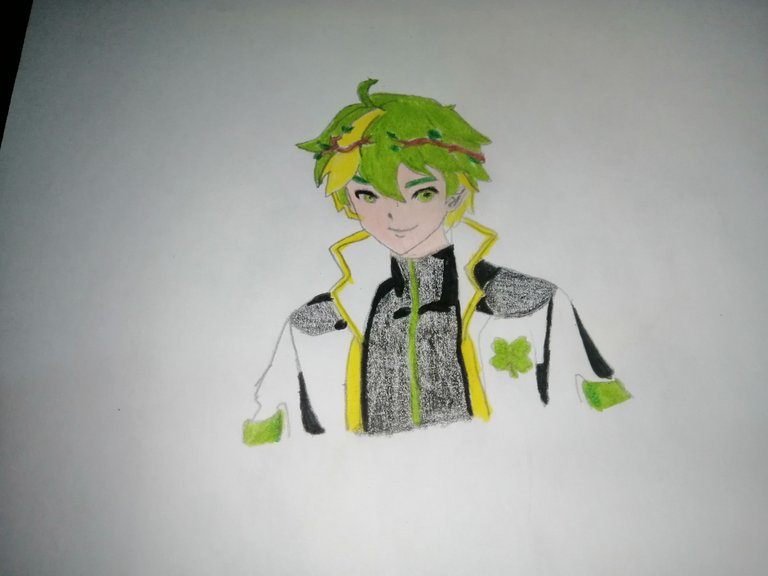
READY FOR THE FINAL RESULT OF OUR DRAW
LISTOS PARA EL RESULTADO FINAL DE NUESTRO DIBUJO
images taken with my phone.
Imágenes tomadas con mi teléfono.
All rights reserved by @elmiguelacho. I do not authorize the use of any material of my property.
Todos los derechos reservados de @elmiguelacho. No autorizo el uso de ningún material de mi propiedad
...Thank You... Giving The Best For You...
...Gracias... Dando Lo Mejor Para Tí...
Cover edited in Canva
Portada editada en Canva
Translation made in/ Traducción realizada enDeepl
Saludos amigo, muy bueno este dibujo que nos compartes, donde es increíble la manera como vas dibujando con mucha precisión y técnica ese gran personaje del juego, para lograr un gran resultado y una obra de arte.
Saludos amigo, así es en cada uno de mis dibujos los he realizado con técnica y precisión para que me puedan salir lo mejor y más parecido posible a la imagen de referencia, saludos y muchas gracias por comentar.