3D Floor Plan Design #5

Yesterday I said I tried to make a floor plan design every single day even if too hard and takes a lot of time to finished one design, but here we go I made a new 3D design of the studio type unit. I took more than 9 hrs to finished the design one of the reason why I took more time to finished the design is the rendering photo because it depends what size of the photo did you want to render I choosed a 1440px - 942px photo size. Get or start to make your floor plan design for you beautiful future house you can find all of my design down below. I hope you like it!
Angle View & Time
I provided different types of view and time of my floor plan design to see how is the look of the house at the different times.
Transparent Perspective Of the Interior
Time - 8:00 PM
I made a transparent view of the interior design of the studio to see how is the look of the interior at night-time.
![]()
Front View
Time - 9:00 PM - 8:00 PM
The front view of the studio type unit in day-time and night-time. The exterior design of the studio is very simple with a rectangular shape with one door and one window.


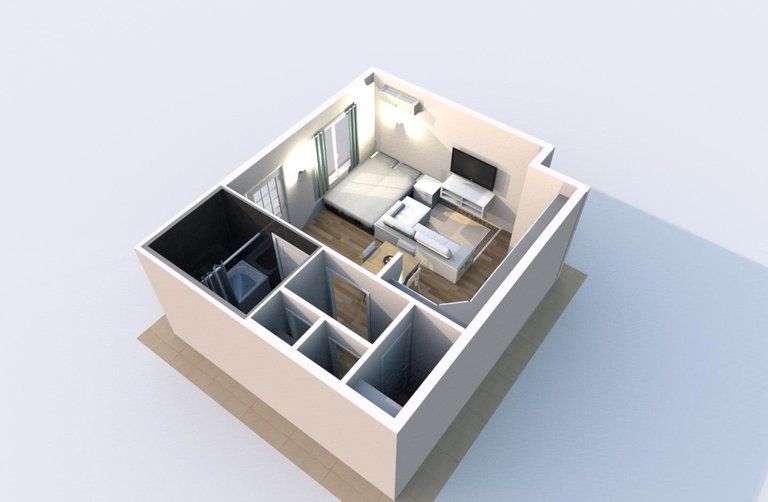
Top View (First Level) with Furniture
Time - 9:00 AM - 8:00 PM
I made a two types scenario of the top view of the studio one is in the day-time the other one is in the night-time.


Side Top View
Time - 9:00 AM - 8:00 PM
I added a new types of view of my design the side top view it's just like a top view to see the other corner of the interior of the studio.


Oblique View
Time - 9:00 AM
Here is the oblique view of the studio it's just like a top view but in this view you can see the back exterior design of the studio.
Axonometric View
Time - 8:00 PM
In the axonometric view you can see the front exterior design of the studio it's just like an oblique view. Last time I made the axonometric view in the day-time, but this time in the night-time.

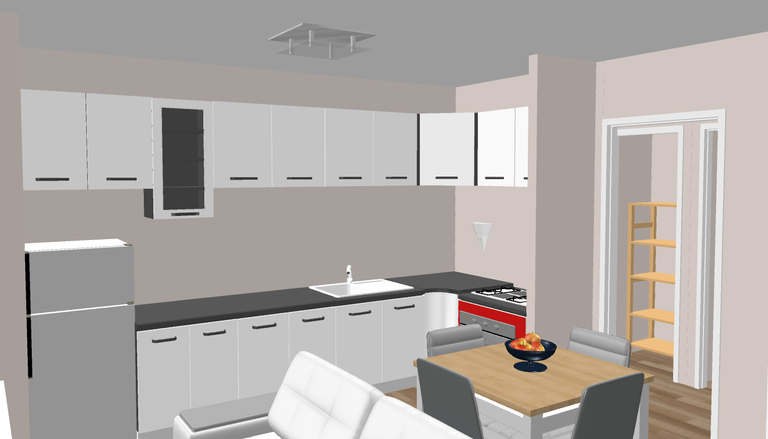
Interior Design
I captured the interior design of the studio using the visual point of view to see the realistic design of the Living Room, Kitchen, and the Bathroom.


Procedure
Here are the procedures of how I can make the floor plan design of the studio.
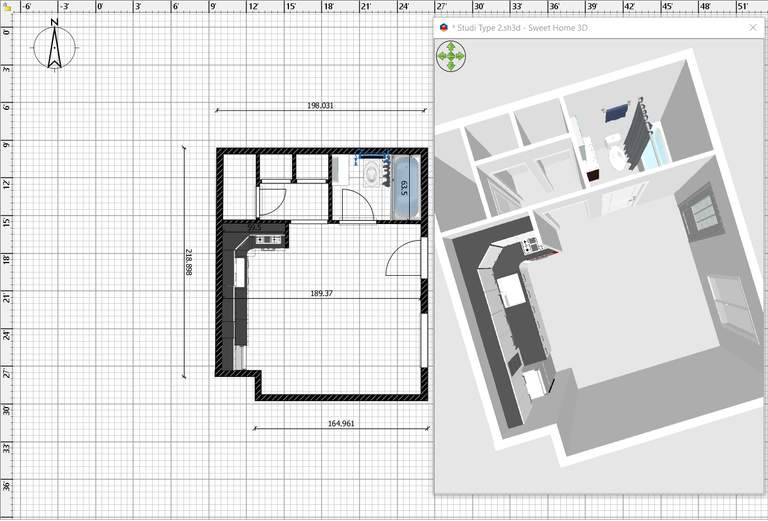
The Floor Plan
First I made a floor plan of the studio with 40 sqm size of the lot. The thickness size of the primary walls is 15 cm and the thickness size of the secondary walls is 8 cm.

Doors & Windows
After I built the walls I installed the doors and windows the width size of the main door is 35.75 inches and the height size if 82.65 inches. The width size of the front window is 51.96 inches and the height size is 60 inches.

Modifying The Kitchen
After I've been installing the doors and the windows I modified the kitchen I installed the following furnitures.
- Wood corner cabinet
- Sink
- Lower Cabinet
- Upper corner cabinet
- Upper cabinet
- Fridge
- Cooker
- Gray glass door cabinet

- Modifying The Bathroom
I modified the bathroom and I installed the following types of furniture.
- Toilet unit
- Shower curtain
- Washbasin with cabinet
- Cupboard mirror
- Towel rack
Modifying The Dining, Bedroom & Living Room
I pay most of my attention in this part of the studio in the dining and living room I took more time to modified those 3 parts of the studio because of the tiny space. Here's are the following types of furniture that I installed.
- Bed
- Curtains
- Chair
- Table
- TV shelf unit
- Wall flat TV
- Greek Carpet
- Corner Sofa
- Air conditioning - Internal unit
- Ceiling lamp
- Wall uplight

My System Specs
- CPU: Core i3 7th Gen, 2.4 GHZ
- Memory: 4GB
- OS: Win10
Previously Design
- Single Room Studio Type Unit Design & Floor Plan #4
- Small Home Perspective & Floor Plan Design #3 (SweetHome 3D)
- 60 SQM Modern Home Perspective & Floor Plan Design #2 (SweetHome 3D)
- Subscribe My Youtube Channel: https://www.youtube.com/channel/UCepumx81o7cZLAKhDViapJg?view_as=subscriber
- Follow My Instagram Account: @allanlarga