
SAND SPARKLE
This is a tutorial post to show you how to make this model of the ¨Marine Collection¨ ... Inspiring from the beaches of the Dominican Republic, using blue colors with variations of shades and earthy colors like sand, also incorporating textures and shapes of nature and creating compositions with movement.
It's very simple, you only need a glass/plastic container, acrylic paint, basting thread, stones, a candle and beach shells.

SAND SPARKLE
Este es un post tutorial para mostrarles como hacer este modelo de la ¨Colección marina¨... inspirando en las playas de República Dominicana, utilizando colores azules con variaciones de matices y colores tierra como la arena, incorporando también texturas y formas de la naturaleza y creando composiciones con movimiento.
Es muy simple, solo necesitas un envase de vidrio/plástico, pintura acrílica, hilo para hilvanar, piedras, una vela y conchas de playa.
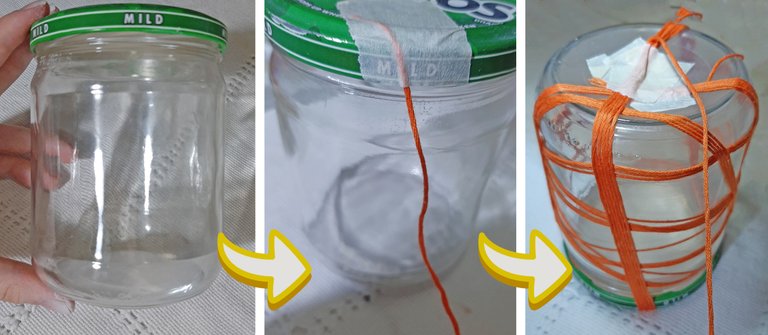
The first step is to boil the container to remove the wrapping paper ( Tutorial here ).
Then, with the basting thread (the thicker the better) we are forming our design of lines (I had to pass the thread several times through the same place to get the thickness I wanted in each area. You can help you with masking tape, placing on the top and on the bottom, to fix the thread... since in the end we can easily correct it.
I recommend leaving the lid on so that the paint does not stain the inside of the container.
El primer paso es hervir el envase para remover el papel envoltorio ( Tutorial aqui ).
Luego, con el hilo de hilvanar (mientras mas grueso mejor) vamos formando nuestro diseño de lineas (yo tuve que pasar el hilo varias veces por el mismo sitio para conseguir el grosor que quería en cada zona. Puedes ayudarte a cambiar de dirección con masking tape, colocando en la parte de arriba y en la de abajo ya que al final lo podemos corregir fácilmente.
Recomiendo dejar la tapa puesta para que la pintura no manche el interior del envase.
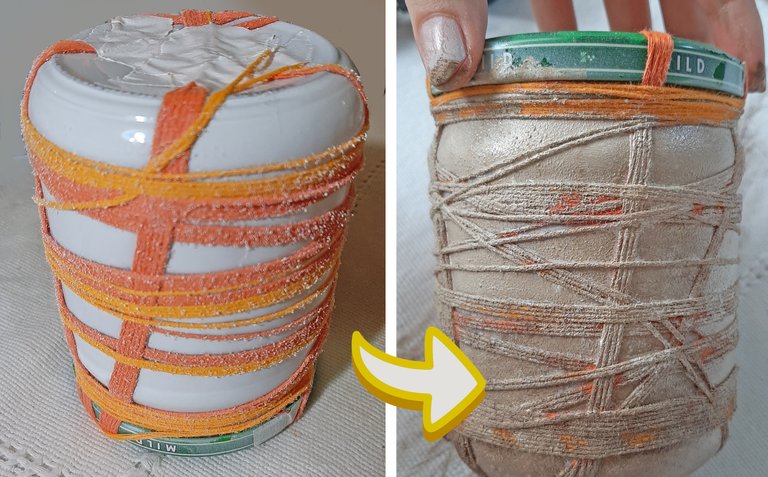
With a spray of white paint we give it a first coat of white, as a base and then give it the color we want... if you want the finish to be more perfect, I recommend that you give the color layer with paint in spray too, in this way all the spaces are covered well and the paint does not peel off.
But, as in this case I didn't have it, I gave it the second coat with acrylic paint and a sponge so that it had a rough texture (it can be whatever we find in the house)... we paint the darkest part first below and then we are adding white until we get the degradation we want.
Con un spray de pintura blanca le damos una primera capa de blanco, como base para luego darle el color que queremos... si quieres que la terminación quede mas perfecta te recomiendo que la capa de color se la des con pintura en spray también, de esta manera se cubren bien todos los espacios y no se despega la pintura.
Pero, como en este caso no tenía, le dí la segunda mano con pintura acrílica y una esponja para que quede con una textura rugosa (puede ser cualquiera que encontremos en la casa)... pintamos primero la parte mas oscura de abajo y luego le vamos agregando blanco hasta conseguir la degradación que queremos.
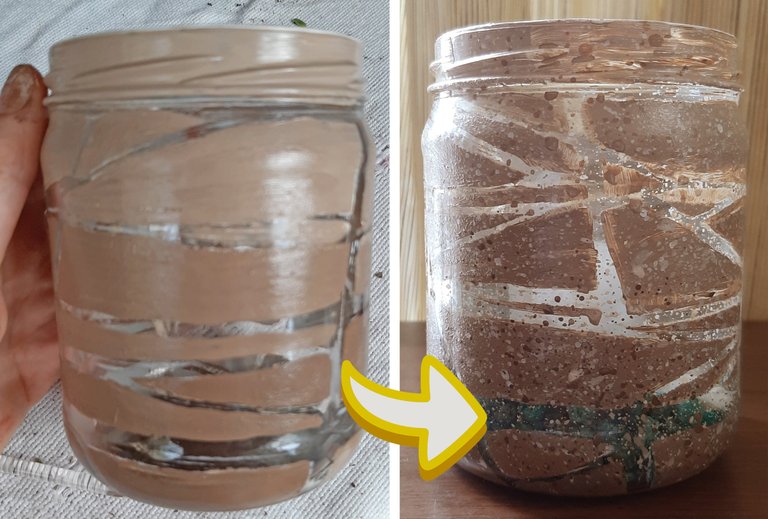
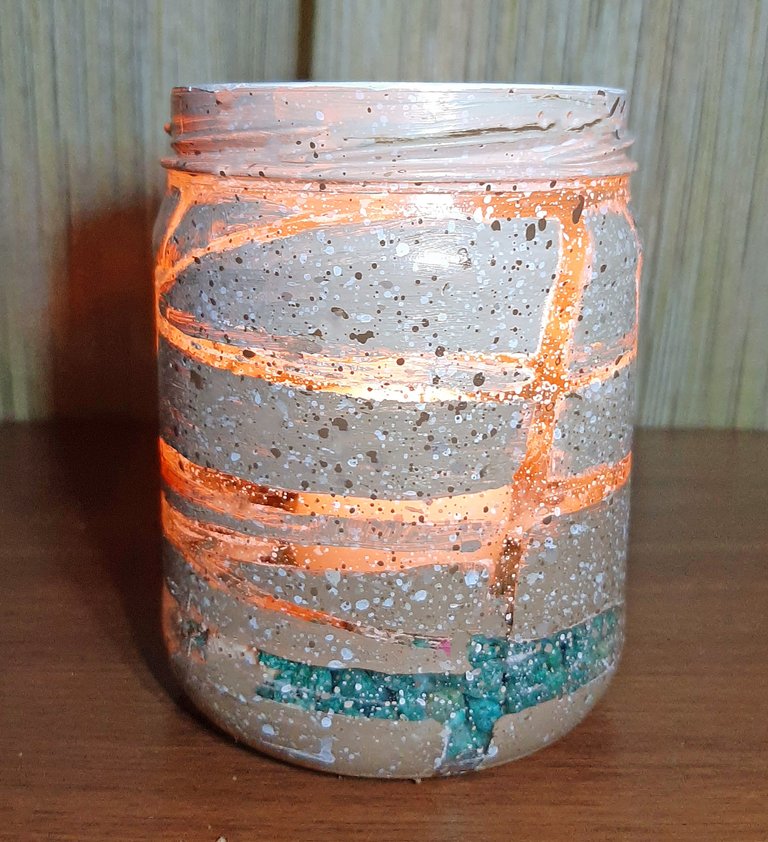
When it dries, we remove the threads and since it did not have a good finish, paint the spaces directly with a brush ... then, to give it a feeling of sand, splash paint of the same tones (with a fat brush you smear the paint, and with the base of another brush you splash it ... as if it were a catapult throwing the strands back and releasing it with speed).
Cuando seque, le quitamos los hilos y como no quedó con buena terminación pinte los espacios directamente con pincel... luego, para darle una sensación de arena le salpique pintura de los mismos tonos (con un pincel gordo untas la pintura, y con la base de otro pincel lo salpicas.. como si fuera una catapulta echando las hebras hacia atrás y soltándolo con velocidad).
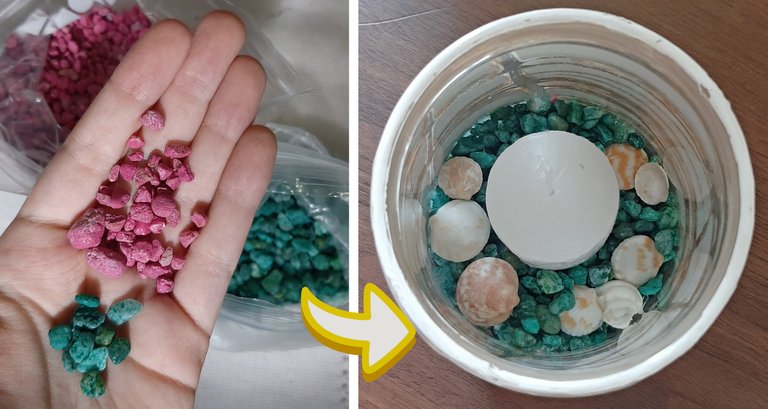
Inside we put a few stones, these were from an old fish tank... but if they don't have they can take stones from the garden or the street, wash them and paint them in the way I explain in this post: ¨Sea net¨.
With the help of hot silicone we fix the stones, then we fix the candle and then the shells (I found these one day when I went to the beach... I collect them)
Finally, I painted the top edge with white paint to give it a more elegant detail.
Adentro le colocamos unas cuantas piedras, estas las tenía de una pecera vieja... pero si no tienen pueden tomar piedras del jardín o de la calle, lavarlas y pintarlas de la forma en que explico en este post: ¨Sea net¨.
Con ayuda de silicón caliente fijamos las piedras, luego fijamos la vela y luego las conchas (estas las encontré un dia que fui a la playa... las colecciono)
Por ultimo, le pinte el borde de arriba con pintura blanca para darle un detalle mas elegante.
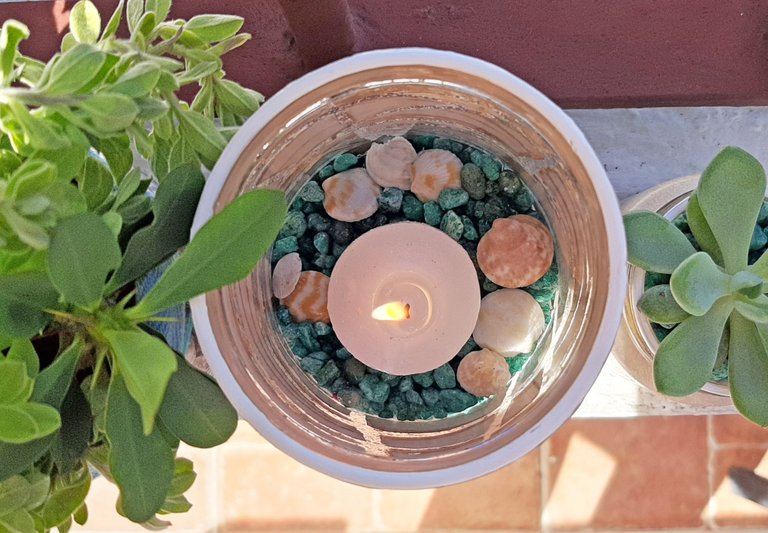
And voila! We already have a beautiful candle holder to add to our decoration for the house or to use as a personalized gift for any of our acquaintances.
Combining it with vegetation or with the other objects in the collection is divine.
Y Voilá! Ya tenemos un hermoso porta velones para agregarlo a nuestra decoración para la casa o para usarlo como regalo personalizado para cualquiera de nuestros conocidos.
Combinarla con vegetación o con los ortos objetos de la colección le va divino.
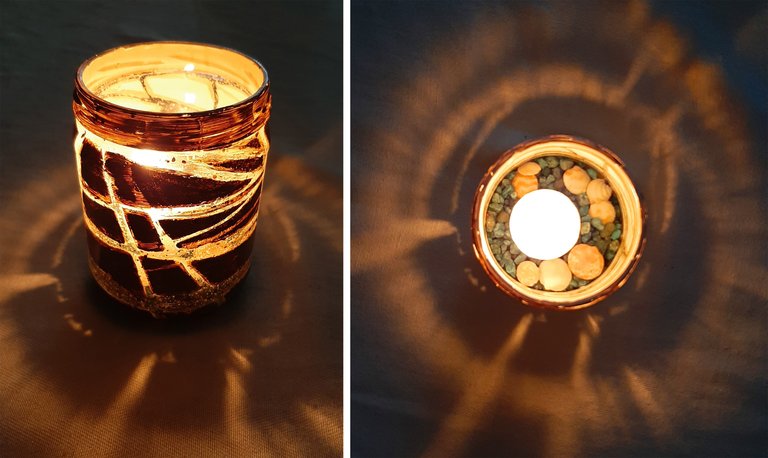
The design also produces very interesting lights on any surface that we place it on, excellent for creating movement in a space.
Here I will leave you the links of the other works of the ¨Marine collection¨, I invite you to see them:
El diseño también provocan unas luces muy interesantes en cualquier superficie que lo coloquemos, excelente para crear movimiento en un espacio.
Aquí les dejaré los links de las demás obras de la ¨Colección marina¨, te invito a verlas:
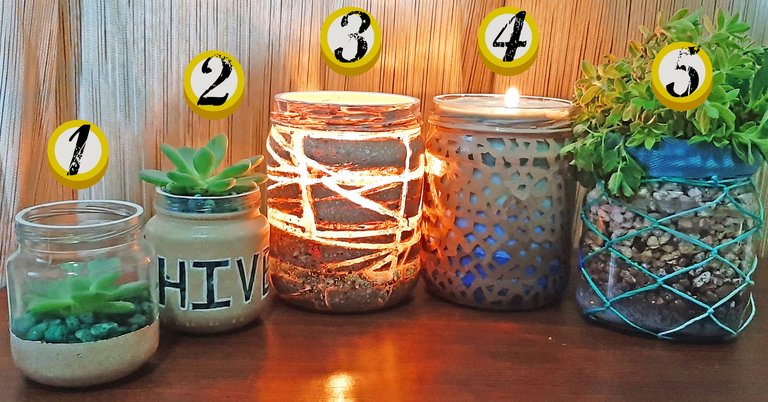
4. Peacefull waves --- 5. Sea net
![]()
![]()
Until next time.
Have a nice day!
![]()
Hasta la próxima.
Que tengas un buen día!
![]()

Wonderful work. This one looks really awesome! 🤗
Thank you so much!
Wonderful post.
Thank you!!
Gracias por compartir tu contenido con la comunidad de El Arca (@elarca), el mismo ha sido votado por nuestra iniciativa de curación artística @stellae. Si deseas puedes delegar HP al proyecto: Delegate 25 HP Delegate 50 HP Delegate 100 HP Delegate 250HP Delegate 500HP
Congratulations @tripode! You have completed the following achievement on the Hive blockchain and have been rewarded with new badge(s) :
You can view your badges on your board And compare to others on the Ranking
If you no longer want to receive notifications, reply to this comment with the word
STOPDo not miss the last post from @hivebuzz: